
Use DataTriggers to Initiate WPF Animation From Code
WPF has some great animation abilities; you might think they are toys, but in reality they are important, under-utilized tools for making your app easier to use. Use animation to draw attention to things that change or which users should pay attention to. Some studies have suggested that this kind of UI improvement can reduce training costs and improve your users’ efficiency by 10-40%.
You can initiate animation several ways, including when some routed event occurs. However, some not everyone knows how to start animation from code. A great way to do it is to use DataTriggers.
My little sample uses a timer (in code) to initiate flashing, but you could use any other code you like, so long as it sets the property “StartFlashing” to true. But we’ll get to that shortly. First, let’s start be defining a style that uses animation.
<Window.Resources>
  <Style x:Key="timerTriggeredFlash" TargetType="Label">
    <Style.Triggers>
      <DataTrigger Binding="{Binding RelativeSource={RelativeSource AncestorType=Window},
         Path=DataContext.StartFlashing}" Value="True">
          <DataTrigger.EnterActions>
             <BeginStoryboard>
               <Storyboard>
                  <ColorAnimation
                     Storyboard.TargetProperty="(Background).(SolidColorBrush.Color)"
                     From="White" To="Red" RepeatBehavior="3x"
                     AutoReverse="True" />
                   </Storyboard>
             </BeginStoryboard>
          </DataTrigger.EnterActions>
      </DataTrigger>
    </Style.Triggers>
  </Style>
</Window.Resources>
Note that
- You will reference the style below using its name, “timerTriggerdFlash”
- Your trigger references a property in your code named “StartFlashing”, it should be boolean
- When you set that property to true, the animation starts
- The target property is a bit tricky; basically the syntax references an attached property of the background’s brush
The next thing to do is reference the style in your label, as shown here:
<Label Grid.Row="1" Style="{StaticResource timerTriggeredFlash}" Content="Flashing label" />
Pretty simple, but it doesn’t hurt to spell things out!
Now, for the property that initiates the flashing (StartFlashing). We will bind our form to a ViewModel (class) and expose that property publicly, making sure to implement INotifyPropertyChanged. (Alternatively, you could make your property a DependcencyProperty, which I prefer, but which requires additional explanation.)
I think it is easiest if I show the entire ViewModel class:
public class MainWindowViewModel : INotifyPropertyChanged {
	DispatcherTimer _Timer;

	//Constructor
	public MainWindowViewModel() {
		_Timer = new DispatcherTimer();
		_Timer.Interval = TimeSpan.FromSeconds(1);
		_Timer.Tick += new EventHandler(_Timer_Tick);
		_SecondsLeft = 3;
		_Timer.Start();
	}

	//This event is fired every second, when the timer goes off
	void _Timer_Tick(object sender, EventArgs e) {
		SecondsLeft = SecondsLeft - 1;
		if (_SecondsLeft <= 0) {
			StartFlashing = true;
			_Timer.Stop();
		}
	}

	//This property controls our DataTrigger!
	private bool _StartFlashing;
	public bool StartFlashing {
		get { return _StartFlashing; }
		set {
			_StartFlashing = value;
			if (PropertyChanged != null) {
				PropertyChanged(this, new PropertyChangedEventArgs("StartFlashing"));
			}
		}
	}

	//This property is displayed as the countdown seconds:
	private int _SecondsLeft;
	public int SecondsLeft {
		get { return _SecondsLeft; }
		set {
			_SecondsLeft = value;
			if (PropertyChanged != null) {
				PropertyChanged(this, new PropertyChangedEventArgs("SecondsLeft"));
			}
		}
	}

	public event PropertyChangedEventHandler PropertyChanged;
}
Note that
- In the constructor, we create a timer that fires every second and initialize our countdown to 3 seconds
- When the timer goes-off, it decrements the countdown
- When the countdown hits zero, it stops the timer and sets our property “StartFlashing” to True
- Which triggers the animation
In case you haven’t done this before, you need to tell your form where to get its binding from, by assigning a DataContext. Our DataContext will be our ViewModel, and we assign it in our form’s constructor, like this:
public partial class MainWindow : Window {
	public MainWindow() {
		InitializeComponent();
		this.DataContext = new MainWindowViewModel();
	}
}
The last thing is to display the form’s XAML.
<Window x:Class="AnimatedAlarm.MainWindow"
xmlns="http://schemas.microsoft.com/winfx/2006/xaml/presentation"
xmlns:x="http://schemas.microsoft.com/winfx/2006/xaml"
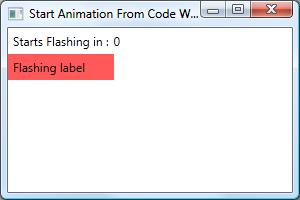
Title="Start Animation From Code With Data Binding" Height="200" Width="300"
WindowStartupLocation="CenterScreen" >
<Window.Resources>
<Style x:Key="timerTriggeredFlash" TargetType="Label">
<Style.Triggers>
<DataTrigger Binding="{Binding RelativeSource={RelativeSource AncestorType=Window},
Path=DataContext.StartFlashing}" Value="True">
<DataTrigger.EnterActions>
<BeginStoryboard>
<Storyboard>
<ColorAnimation
Storyboard.TargetProperty="(Background).(SolidColorBrush.Color)"
From="White" To="Red" RepeatBehavior="3x"
AutoReverse="True" />
</Storyboard>
</BeginStoryboard>
</DataTrigger.EnterActions>
</DataTrigger>
</Style.Triggers>
</Style>
</Window.Resources>
<Grid>
<Label Content="Starts Flashing in :" />
<TextBlock Grid.Column="1" Text="{Binding SecondsLeft}"
VerticalAlignment="Center" />
<Label Grid.Row="1"
Style="{StaticResource timerTriggeredFlash}"
Content="Flashing label" />
<Grid.RowDefinitions>
<RowDefinition Height="auto" />
<RowDefinition Height="auto" />
<RowDefinition />
</Grid.RowDefinitions>
<Grid.ColumnDefinitions>
<ColumnDefinition Width="auto" />
<ColumnDefinition />
</Grid.ColumnDefinitions>
</Grid>
</Window>
In summary, use a DataTrigger when you need to initiate animation from code. Declare a style for your control and, in the data trigger, bind to a property from your form’s DataContext, typically a ViewModel. In your code, make sure that your bound property (e.g. StartFlashing) raises the PropertyChanged event, or else is a DependencyProperty.

December 23, 2014 at 7:39 am
It would be nice to add the project solution here that people can download it and see the articles from first hand.
December 24, 2014 at 2:13 am
Hi Sinan – thanks for your interest. I updated the blog post; added a link to download the code. I hope it is informative 🙂
December 24, 2014 at 2:18 am
Hi actualrandy, I just got that and I’ll try it soon. Thanks for rapid reply with positive approach.
April 1, 2018 at 12:49 am
Use DataTriggers to Initiate WPF Animation From Code
[…]If you utilize the spiral certain school dominated notebooks, your students will destroy them shoving them into their backpacks.[…]