
Coding Raves
Serializing a List Containing Disjoint Class Instances
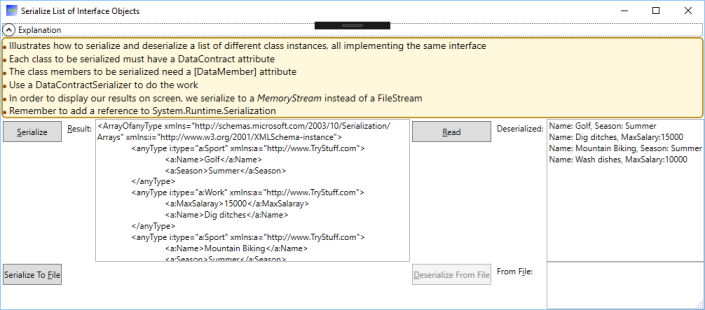
Serializing a list, all of the same class, is easy. Serializing a list of different class instances is not. (All class instances implement the same interface.) Since I couldn’t readily find how to do this anywhere else, I decided to write-up my results and share. Maybe I’ll need it again some day.
Just to make it perfectly clear, I want to serialize a list like the following
var serializeThis = new List<IActivity> {
   new Sport { Name = "Golf", Season = "Summer" },
   new Work { Name = "Dig ditches", MaxSalaray = 15000 },
   new Sport { Name = "Mountain Biking", Season = "Summer" },
   new Work { Name = "Wash dishes", MaxSalaray = 10000 }
};
Key Points
- Use DataContractSerializer to do the work
- When you initialize your serializer, provide a list of Types representing the class types in your list
- Mark your classes with a [DataContract] attribute
- Mark the class members to serialize with [DataMember] attribute
- Remember to add a reference to System.Runtime.Serialization
Note that the list contains Sport objects and Work objects; both implement IActivity. “Normal” serialization techniques won’t work here.
The Code
using System;
using System.Collections.Generic;
using System.IO;
using System.Runtime.Serialization;
using System.Text;
using System.Windows;
using System.Xml;

namespace SerializeListOfInterfaceObjects {
    /// <summary>
    /// Illustrates how to serialize/deserialize a list of objects of different classes,
    /// all implementing the same interface
    /// </summary>
    /// <remarks>
    /// Use DataContracts and DataContracSerializer to do the work. Also use a MemoryStream
    /// to hold the result.
    /// </remarks>
    public partial class MainWindow : Window {
        public MainWindow() {
            InitializeComponent();
        }

        /// <summary>This is our practice data</summary>
        private List<IActivity> ListToSerialize {
            get {
                //Note the list has two different kinds of class instances:
                return new List<IActivity> {
                    new Sport { Name = "Golf", Season = "Summer" },
                    new Work  { Name = "Dig ditches", MaxSalaray = 15000 },
                    new Sport { Name = "Mountain Biking", Season = "Summer" },
                    new Work  { Name = "Wash dishes", MaxSalaray = 10000 }
                };
            }
        }

        /// <summary>
        /// Send the list to a memory stream as xml, use a StreamReader to read from
        /// that MemoryStream and display the resulting text in the textbox
        /// </summary>
        /// <param name="sender">The button</param>
        /// <param name="e">Event args</param>
        private void BtnSerialize_Click(object sender, RoutedEventArgs e) {
            List<IActivity> serializeThis = ListToSerialize;

            //Note the list of class types; this tells the
			//DataContractSerializer what to expect:
            var mySerializer = new DataContractSerializer(serializeThis.GetType(),
                                        new Type[] { typeof(Sport), typeof(Work) });
            using (var memStr = new MemoryStream()) {
                mySerializer.WriteObject(memStr, serializeThis);

                memStr.Seek(0, SeekOrigin.Begin);

                using (var sw = new StreamReader(memStr)) {
                    var theText = sw.ReadToEnd();
                    txtSerialized.Text = theText;
                }
            }
            btnDeSerialize.IsEnabled = true;
        }

        /// <summary>
        /// Read the text in the textbox and deserialize it
        /// </summary>
        /// <param name="sender">The button</param>
        /// <param name="e">Event args</param>
        private void BtnDeserialize_Click(object sender, RoutedEventArgs e) {

            List<IActivity> activityList = null;
            //We will use a UTF8Encoding to write to this memory stream,
            //the DataContractSerializer will read from it
            using (var memStr = new MemoryStream()) {
                UTF8Encoding utf8Enc = new UTF8Encoding();
                byte[] byteThis = utf8Enc.GetBytes(txtSerialized.Text);
                memStr.Write(byteThis, 0, byteThis.Length);
                memStr.Seek(0, SeekOrigin.Begin);

                //The MemoryStream has the data, the DataContractReader will now read from it:
                XmlDictionaryReader reader = XmlDictionaryReader.CreateTextReader(memStr,
                                                new XmlDictionaryReaderQuotas());
                var ser = new DataContractSerializer(typeof(List<IActivity>),
                                        new Type[] { typeof(Sport), typeof(Work) });
                activityList = (List<IActivity>)ser.ReadObject(reader, true);
                reader.Close();
            }

            //activityList is now magically populated with a list of
            //IActivity objects; display on screen:
            txtSerializedResult.Clear();
            foreach (IActivity act in activityList) {
                txtSerializedResult.Text += act.ToString() + "\n";
            }
        }

        /// <summary>
        /// Send the same list to a file
        /// </summary>
        /// <param name="sender">The button</param>
        /// <param name="e">Event args</param>
        private void BtnSerializeToFile_Click(object sender, RoutedEventArgs e) {
            var serializeThis = ListToSerialize;

            using (FileStream fs = new FileStream("ActivityList.xml", FileMode.Create)) {
                var mySerializer = new DataContractSerializer(serializeThis.GetType(),
                                        new Type[] { typeof(Sport), typeof(Work) });
                mySerializer.WriteObject(fs, serializeThis);
            }

            btnDeserializeFromFile.IsEnabled = true;
            txtMessage.Text = "Serialized to file 'ActivityList.xml'";
        }

        /// <summary>
        /// Read the file we just wrote and deserialize into a list again
        /// </summary>
        /// <param name="sender">The button</param>
        /// <param name="e">Event args</param>
        private void BtnDeserializeFromFile_Click(object sender, RoutedEventArgs e) {
            List<IActivity> lstOfActivities = new List<IActivity>();

            using (FileStream fs = new FileStream("ActivityList.xml", FileMode.Open)) {
                var mySerializer = new DataContractSerializer(lstOfActivities.GetType(),
                    new Type[] { typeof(Sport), typeof(Work) });
                lstOfActivities = (List<IActivity>)mySerializer.ReadObject(fs);
            }

            //Display the deserialized result:
            txtFromFile.Clear();
            foreach (var activity in lstOfActivities)
                txtFromFile.Text += activity.ToString() + "\n";
        }

    }

    ////////////////////////////////////////////////////////////////////////////
    /// <summary>We will serialize a list of these</summary>
    interface IActivity {
        string Name { get; set; }
    }

    ////////////////////////////////////////////////////////////////////////////
    /// <summary>This will be one of the items in the list we serialize</summary>
    /// <remarks>The following attribute enables the DataContractSerializer to work</remarks>
    [DataContract(Name = "Sport", Namespace = "http://www.TryStuff.com")]
    class Sport : IActivity {
        /// <summary>A parameterless constructor is required</summary>
        public Sport() { }

        /// <summary>Members with the following attribute will be serialized:</summary>
        [DataMember]
        public string Name { get; set; }
        [DataMember]
        public string Season { get; set; }

        public override string ToString() {
            return $"Name: {Name}, Season: {Season}";
        }
    }

    ////////////////////////////////////////////////////////////////////////////
    /// <summary>Another class implementing the same interface</summary>
    [DataContract(Name = "Work", Namespace = "http://www.TryStuff.com")]
    class Work : IActivity {
        public Work() { }

        [DataMember]
        public string Name { get; set; }
        [DataMember]
        public int MaxSalaray { get; set; }

        public override string ToString() {
            return $"Name: {Name}, MaxSalary:{MaxSalaray}";
        }
    }
}
Highlight: The Code That Does the Work
var mySerializer = new DataContractSerializer(serializeThis.GetType(),
                            new Type[] { typeof(Sport), typeof(Work) });
using (var memStr = new MemoryStream()) {
    mySerializer.WriteObject(memStr, serializeThis);
Note the Type array I provide to the serializer, that tells what types to expect. You will need to replace this with a list of your own types, unfortunately it can’t autodetect your class types.
The serializer needs to send your text to a stream; MemoryStream is a handy place to send it when all you want to do is display it on screen. You can then use a StreamReader to get the XML out of the MemoryStream and do whatever you want with it.
Marking-Up My Classes
I had to decorate my classes with the following attribute:
[DataContract(Name = "Sport", Namespace = "http://www.TryStuff.com")]
class Sport : IActivity { ... }
And I had to decorate the class members to serialize with a [DataMember] tag. You can use the attribute on public and private members, but only certain data types are serializable. Anything you don’t want serialized –> omit the tag.
Possible Alternate Technique
I tried implementing the IXmlSerializable interface on my classes; that interface allows you to control how your classes are serialized. It seemed like it might work, but it didn’t. The bottom line is you will get an error to the effect of “A parameterless constructor is required“.
Since you can’t specify a constructor in an interface, this prevents you from serializing a list of interface intstances via this technique. Potentially you could the technique with abstract classes instead of interfaces; I was not in a position to refactor my code to try.
Summary
The DataContractSerializer will send your list to XML in a fairly automatic way. The Microsoft example shows how to do this (to a file) out-of-the-box. However, it doesn’t discuss handling different classes all in the same list. In order to do that, you need to provide a parameter specifying a list of types to serialize.
Unlike the MS example, if you want to manipulate your serialized XML without sending it to a file, you need to use a memory stream. You can read the results using a StreamReader (which is a lot easier than the examples Microsoft has on MSDN).
Reversing the process is fairly straightforward, the tricky part was I had to use a UTFEncoding to read from the memory stream; for some reason, XML doesn’t like to deserialize from Unicode, even though going the other way Unicode works perfectly fine. I didn’t experiment using a StreamReader, instead of a UTF8Encoding, but I’ll guess it won’t work.
Download the Code
You can download my code here, note that DropBox will ask you to create a new (free) account in order to access it.
Sunday Puzzle: State/City Built from Abbreviations
Synopsis: Fun and Easy!
This was an very easy challenge. If you have a list of cities by state, you can check the spelling of each state/city and see if it is constructed from state abbreviations.
To make it interesting, I did some binary searching and also wrote a fun little method to test if a string has even or odd length. Binary searches are super efficient, and so is my method for testing if a string is even/odd. Since the lists are short, I don’t really need that efficiency; I did it mostly for fun.
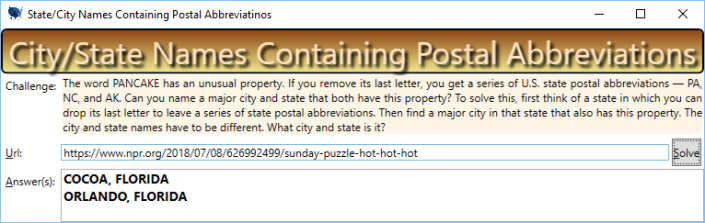
Answer Explained
Even though the city “Cocoa, Florida” technically meets the criteria, it isn’t a major city, so Will must be looking for “Orlando, Florida“:
- OR + LA + ND = Orland = Orland + o
- I.e., Or=Oregon, LA=Louisiana, ND=North Dakota
Techniques Used
- File IO
- String Manipulation
- Binary Searching
- Simple Classes
City/State List
You can get a big list of American cities by state here: https://homepage.divms.uiowa.edu/~luke/classes/STAT4580/maps.html, look for the link to the file “PEP_2017_PEPANNRES.zip“. This is the 2017 version of the file and might be formatted differently than the 2016 version I used to solve the puzzle.
Algorithm: The Big Picture
- Make a list of the state abbreviations
- Using the file discussed above, make a list of the cities for every state
- Write a function “NameContainsAbbrs” that indicates if the specified name (such as “Florida”) is built from state abbreviations
- Find the states whose names meet Will’s condition
- For the cities in that state, find the ones which meet Will’s condition
Implementation
The method below performs the steps listed above. (If you download the code below, you will notice that this code fires when you click the button on the UI.)
private void btnSolve_Click(object sender, RoutedEventArgs e) {
  //Build a list of state abbreviations
  List stateAbbrvs = InializeStateList();

  //List contains every state; each state entry contains a list of cities
  List citiesByState = ReadCityStateFile();

  var validstates = citiesByState
       .Where(s => NameContainsAbbrs(s.StateName, stateAbbrvs));

  foreach(var vState in validstates) {
    foreach(var aCity in vState.CityList) {
      if(aCity != vState.StateName
        && NameContainsAbbrs(aCity, stateAbbrvs)) {
        txtSolution.Text += $"{aCity}, {vState.StateName}\n";
      }
    }
  }
}
An explanation of each step follows.
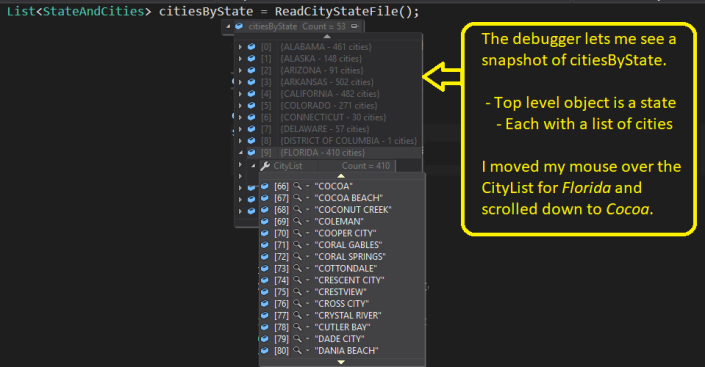
Algorithm Step 1: Read the States and Cities
Pertaining to step 2 above, “make a list of the cities for every state“, read the cities-by-state file described above. Use it to build a list of cities by state that looks like the image below:
Code for Class ‘StateAndCities’
public class StateAndCities {
  public StateAndCities() {
    CityList = new List();
  }

  public string StateName { get; set; }
  public List CityList { get; set; }

  public override string ToString() {
    return $"{StateName} - {CityList.Count} cities";
  }
}
The list discussed above is a list where each entry is an instance of the class ‘StateAndCities’.
Algorithm Step 2: Write a Method ‘NameContainsAbbrs’
private bool NameContainsAbbrs(string aName, List stateAbbrvs) {
  bool result = true;
  string nameNoSpace = aName.Replace(" ", "");
  bool lengthIsOdd = (nameNoSpace.Length & 1) == 1;

  if (lengthIsOdd) {
    //remove trailing letter:
    string candidate = nameNoSpace.Substring(0, nameNoSpace.Length - 1);
    var comp = new StateAbbrvPairComparer();
    for (int i = 0; i < candidate.Length; i += 2) {

      string abbrv = candidate.Substring(i, 2);
      int p = stateAbbrvs.BinarySearch(new StateAbbrvPair { Abbrv = abbrv }, comp);
      if (p < 0) {
        result = false;
        break;
      }
    }
  } else
    result = false;

  return result;
}
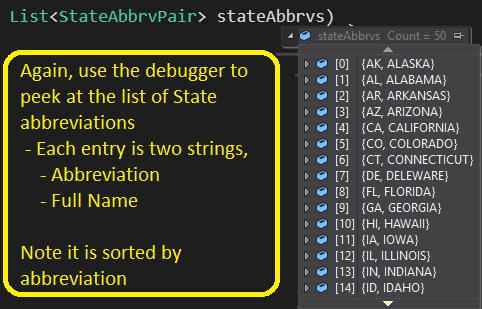
Notes:
- The method takes a parameter ‘stateAbbrvs’ that looks like the following:
- The first thing we do is remove spaces from the name we are checking,
- For example, “NEW York” –> “NEWYORK”
- Next, we make sure the name length is odd, for example, ‘Florida” has 7 letters, so it is odd.
- We want odd-length names because we need to subtract the last letter, such as “Florida” –> “Florid”
- And the result must be capable of forming a sequence of 2-letter abbreviations, such as “FL” – “OR” – “ID”
- Here is the code to check if the length is odd:
-
bool lengthIsOdd = (nameNoSpace.Length & 1) == 1;
- This effectively checks whether the length, when represented in binary, ends with a 1
- Example: Florid has length 7
- In binary, 7 is 111. Obviously it ends with a 1
- Note that the and operator here performs binary arithmetic, i.e.
- 111 & 001 = 001
- To wit, 7 & 1 == 1
- Indicating that Florida’s length is odd.
- This effectively checks whether the length, when represented in binary, ends with a 1
- What’s the point? I could have divided by 2 and checked if there was a non-zero remainder. Normally, that is fine, but quite a bit slower than my method. Division is one of the slowest primitive operators in programming, but performing an “and” operation is lightning quick.
- As I mentioned above, speed is not critical for this puzzle – I mostly did it for fun and to illustrate a different technique
- If you needed to determine if, say, a million words were even or odd, then this technique would be way faster than performing division, not just for fun
-
Building the Cities-By-State List
In the code above, the following line of code builds the list of cities by state:
List citiesByState = ReadCityStateFile();
The method ‘ReadCityStateFile’ builds the sorted list discussed above. You may be interested in this method because it illustrates some cool features related to binary searching. Take a look at the code below:
private List ReadCityStateFile() {
  string cityFile = @"C:\Users\User\Documents\Puzzles\Data\CensusCities\PEP_2016_PEPANNRES_with_ann.csv";

  //Each entry will be a state name containing a list of cities:
  var citiesByState = new List();
  var comp = new StateAndCityComparer();
  using (StreamReader sr = File.OpenText(cityFile)) {
    //First two lines contains headers, so skip it
    sr.ReadLine();
    sr.ReadLine();
    while (sr.Peek() != -1) {
      //read each successive line
      string aLine = sr.ReadLine();

      //This simple method extracts the city and state name from the line:
      ParseCityState(aLine, out string cityName, out string stateName);

      var stateAndCity = new StateAndCities { StateName = stateName };

      if (p < 0) {
        //Binary complement the negative index returned
		//by BinarySearch and insert there:
        citiesByState.Insert(~p, stateAndCity);
        stateAndCity.CityList.Add(cityName);
      } else {
        //Append to the existing entry's city list:
        citiesByState[p].CityList.Add(cityName);
      }
    }
  }

  return citiesByState;
}
Notes on Binary Searching
Let’s examine this line of code from above:
int p = citiesByState.BinarySearch(stateAndCity, comp);
- The search result “p” represents the index inside the list where we find the item in question
- The parameter ‘comp‘ is a very simple class that compares two StateAndCities instances through a method named “Compare”
- It returns 0 if they have the same state name,
- It returns a negative number if the 1st instance is alphabetically prior to the 2nd instance
- And a positive number if the 1st instance is alphabetically after 2nd instance
- Implementation below
- If the state name is not found in the list, p will be a negative number
- When we take the bitwise-complement of p (i.e. ~p), we get the index of the list where we should insert the state in order to keep it sorted,
- As in this code:
- citiesByState.Insert(~p, stateAndCity);
- As in this code:
Class StateAndCityComparer
public class StateAndCityComparer : IComparer<StateAndCities> {
  public int Compare(StateAndCities x, StateAndCities y) {
    return string.Compare(x.StateName, y.StateName);
  }
}
As discussed above, if x == y, we return 0, if x < y, we return a negative number, and if x > y, we return a positive number. “String.Compare” does this for us based on the state name; the result is that our list will be searched by state name.
Get the Code
You can download the code here, at my Dropbox account. In order to download, they will ask you to first create a free account.
Summary
- Using a list of state names with associated cities,
- We can check if each name is composed of state abbreviations
- For speed, a Binary Search is used to perform lookups
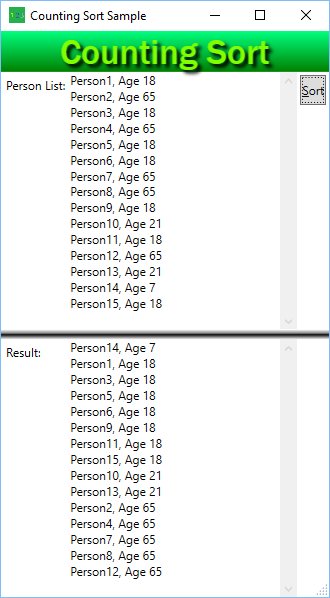
A Generic Implementation of Counting Sort
What is “Counting Sort”?
Counting Sort is a super fast sort algorithm that only works for certain types of data.
- It is only useful if you have a relatively small range of values to sort
- Even if there you have a large number of items to sort
For example, if you have a large list of “Person” objects, and each Person has an age between 1 and 100, then counting sort would be useful. Because what you are sorting on, age, has a relatively small range. The ages are repeated a lot, i.e. you will probably have a lot of Persons with age=18, a lot with age=65, etc.
For a counter example, assume each Person has a social security number; this would not be good use for Counting Sort, because there shouldn’t be any repeated SSNs.
Algorithm Speed
- Counting Sort runs in O(n) (refer to Big O Notation for an explanation)
- Which is superior to most other sorts, which run in O(n ∙ ln(n)) time
Counting Sort is only necessary in a special situations where you have need maximum efficiency, typically big data sets or other situations where you sort a lot.
Concepts Covered in this Post
- Counting Sort
- Generic Methods
- Extension Methods
- C# delegates using ‘Func’ declaration
First, The Code, Then The Explanation
using System;
using System.Collections.Generic;

namespace CountingSortExample {
  public static class CountingSortExt {
    public static IList<T> CountingSort<T>(this IList<T> sortMe,
                                           Func<T, int> sortProp) {
      List<int> buckets = new List<int>();
      for (int i = 0; i < sortMe.Count; i++) {
        int theVal = sortProp(sortMe[i]);

        //Increase the bucket size, if necessary
        for (int j = buckets.Count; j <= theVal; j++)
          buckets.Add(0);

        buckets[theVal]++;
      }

      int[] startIndex = new int[buckets.Count];
      for (int j = 1; j < startIndex.Length; j++) {
        startIndex[j] = buckets[j-1] + startIndex[j-1];
      }

      T[] result = new T[sortMe.Count];
      for (int i = 0; i < sortMe.Count; i++) {
        int theVal = sortProp(sortMe[i]);
        int destIndex = startIndex[theVal]++;
        result[destIndex] = sortMe[i];
      }

      return result;
    }
  }
}
Usage
List<Person> _PersonList;      //List populated elsewhere
//Now do the work:
IList<Person> sorted = _PersonList.CountingSort(p => p.Age);
Notes on Generic Aspects of My Implementation
- public static class CountingSortExt – This is an extension method, so it must be a static class
- Using an extension method allows the syntax immediately above, i.e. _Personlist.CountingSort…
- public static IList<T> CountingSort – Static again because it is an extension method
- T is a placeholder for the class type being sorted
- Func<T, int> sortProp – an anonymous function that allows the caller to specify the field used to perform the sort with
- When you invoke it, it will look like this: p => p.Age
- Which means “Use the age field for sorting”
Brief Discussion of the Algorithm
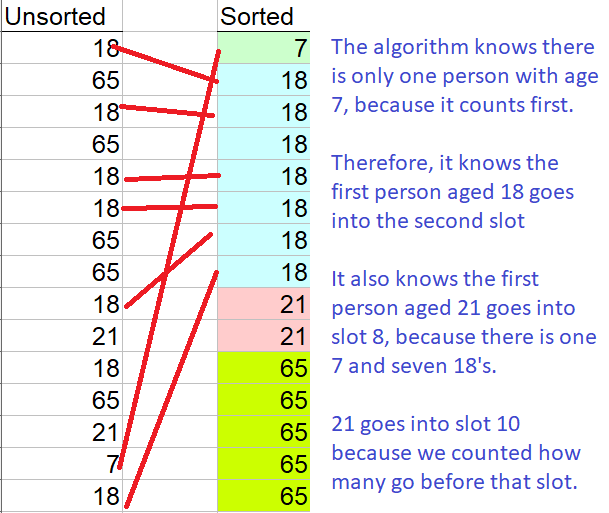
Counting sort works by:
- Counting how many there are of each age. There is one person with age 7, seven persons with age 18, two persons with age 21 and five persons with age 65.
- We can use the counts to compute the destination index to move each person to
- For example, since there is only one seven-year-old, we know to move the first eighteen-year-old into slot 2.
Another Example
Because I implemented my method as a generic method, you can sort anything that has an int property, such as sorting a list of strings by length. You simply need to pass a lambda expression indicating the field/property to sort on, such as a string length property, as shown in the sample below:
List<string> stringList = new List {
	"adsf",
	"adsfl;jkadsf",
	"qwerp9oui",
	"a",
	";ljsdfqweroiusd",
	"zcxv,mnzxcvnm,k"
};
IList<string> sortedString = stringList.CountingSort(w => w.Length);
foreach(string s in sortedString)
	Console.WriteLine(s);
Potential Modification
Note that my code works well when the field/property being sorted is close to 0. If that is not the case for you, you could replace my list ‘Buckets’ with a dictionary, or other type of hash list. Otherwise, if you have high values for the sorting field/property, you will allocate a large amount of memory for Buckets.
Download the Code
You can download my code from my DropBox account; they will ask you to set-up a free account for the privilege of downloading it.
SQL Server Function: TitleCase
T-SQL TitleCase Function: Beyond the Obvious
Periodically, you may need to convert text into mixed-case in SQL Server. I needed it because our legacy database stores all our customer names in upper case. For example, one of our customers might look like the following:
- Legacy sample customer: “ACME CLIENT, LLC”
- Desired customer name: “Acme Client, LLC”
Anyone can write a simplistic title-case function pretty quickly. I enhanced mine to handle the following special cases:
- State initials ID/WA/OR/WY/UT/NV/MT are capitalized
Select dbo.TitleCase(‘This is id and it is better than mT or Wy’)
This Is ID And It Is Better Than MT OR WY
- Leaves most 3-letter abbreviations capitalized
Select dbo.TitleCase(‘RYO CORRECTIONAL FACILITY’)
RYO Correctional Facility
- Removes repeated spaces
Select dbo.TitleCase(‘Had double spaces’)
Had Double Spaces
- Preserves special characters
Select dbo.TitleCase(‘Has special character ‘ + NChar(8631) + ‘ embedded’)
Has Special Character ↷ Embedded
- Runs reasonably fast (but would run faster if we built a table to hold my list of 3-letter English words)
In order to preserve 3-letter abbreviations, I had to get a list of English words. When my function encounters a 3-letter word, it checks to see if exists in my list. If so, convert to mixed case; otherwise leave all upper case.
Here’s the script
-- Author:	ActualRandy
-- Create date: 1/06/2016
-- Description:	Sends a string to Title Case while preserving abbreviations, also cleans-up repeated spaces
/*
Usage:
	SELECT dbo.TitleCase('This has "quotes" in it.  AND IS MIXED upper AND LOWER CASE.')
	Select dbo.TitleCase('THIS IS WA')
	Select dbo.TitleCase('Has special character ' + NChar(8631) + ' embedded')
*/
ALTER FUNCTION [dbo].[TitleCase] (@InputString NVARCHAR(4000) )
 RETURNS NVARCHAR(4000)
 AS
 BEGIN

  DECLARE @Index         INT                  --Position within the input string
  DECLARE @Char          NCHAR(1)             --The character we are examining
  Declare @Word          NChar(3)             --3-letter word that might need to be upper case
  DECLARE @OutputString  NVARCHAR(4000) = ''  --What we return
  Declare @IsStartOfWord TinyInt = 1          --When 0, we are in the middle of a word
  Declare @StateAbbrv    NChar(2)             --2-Letter string that might be a state
  Declare @LastChar      NChar(1) = ''        --Previous character we examined

  If @InputString Is Not Null
  Begin
    Set @Index = 1
    While @Index <= Len(@InputString)
    Begin
      Set @Char = Substring(@InputString, @Index, 1)
      --If we found repeated spaces...
      If Not (@Char = ' ' And @LastChar = ' ')
      Begin
        If @Char = ''''
        Begin
          Set @OutputString = @OutputString + @char
        End
        Else If @Char in (' ', ';', ':', '!', '?', ',', '.', '_', '-', '/', '&', '(' )
        Begin
          Set @IsStartOfWord = 1
          Set @OutputString = @OutputString + @char
        End
        Else
        Begin
          If @IsStartOfWord = 1
          Begin
            --Are we 2 letters from the end?
            If  (@Index = Len(@InputString) - 1)
              Or
              --Are we more than 2 letters from end of InputString, but just 2 letters from end of the current word?
              (
                @Index < Len(@InputString) - 1
                And
                SUBSTRING(@InputString, @Index + 2, 1) in (' ', ';', ':', '!', '?', ',', '.', '_', '-', '/', '&', '(' )
              )
            Begin
              Set @StateAbbrv = Substring(@InputString, @Index, 2)
              If @StateAbbrv in ('ID', 'OR', 'WA', 'MT', 'NV','UT', 'WY')
              Begin
                Set @OutputString = @OutputString + Upper(@StateAbbrv)
                Set @Index = @Index + 1
                Set @IsStartOfWord = 1
              End
              Else
              Begin
                --We have a 2-letter word, but it is not a state abbrv
                Set @OutputString = @OutputString + Upper(@char)
                Set @IsStartOfWord = 0
              End
            End
            --Are we looking at a 3-letter word?, i.e. are we within
            -- the string and the 4th character hence is not a letter
            Else If (@Index <= Len(@InputString) - 2)
                And
                SUBSTRING(@InputString, @Index + 3, 1) in (' ', ';', ':', '!', '?', ',', '.', '_', '-', '/', '&', '(' )
            Begin
              Set @Word = SUBSTRING(@InputString, @Index, 3)
              --If it is a 3-letter word in English
			  --For brevity, I shrunk-down my list of words, which is actually quite huge
              If @Word In ('aah', 'ace','act','add','adj','ado','zoo')
              Begin
                --Set it to normal casing because it is an english word:
                --uppercase on letter 1 and lowercase for the last 2:
                Set @OutputString = @OutputString + Upper(@Char) + Lower(Substring(@InputString, @Index + 1, 2))
                Set @IsStartOfWord = 0
                Set @Index = @Index + 2
              End
              Else
              --Probably some initials or abbreviation; i.e. a 3-letter string, but not an English word
              Begin
                Set @OutputString = @OutputString + Upper(@Word)
                Set @Index = @Index + 2
              End
            End
            Else
            Begin
              --We are at the beginning of a word, and it is not state abbrv or 3-letter word
              Set @OutputString = @OutputString + Upper(@char)
              Set @IsStartOfWord = 0
            End
          End
          Else
          --Not beginning of a word, so send it to lower case
          Begin
            Set @OutputString = @OutputString + Lower(@Char)
          End
        End
      End
      Set @LastChar = @Char
      Set @Index = @Index + 1
    End
  End

  RETURN @OutputString
END
Comments
The method makes a single pass through your string, so it is reasonably efficient in that regard. Of course, the slowest part of the function is determining whether a 3-letter word is an abbreviation or an English word. If speed is crucial, you can save all the words in a table and put an index on it. As I said above, it runs reasonably fast. When I tested it, it converted roughly 20,000 names in one second.
Usage
Because it is a function, you can use it in any query you use for moving data around. It works great when you have data from older sources that is all upper case. Naturally, my function is not perfect. One enhancement you could make would be to insert handling for 4-letter words, since I have seen some company names with 4-letter abbreviations.
T-SQL Cross Apply
Great for De-Normalized Tables!
SQL Server has a nice statement ‘Cross Apply’ that is super handy when working with old-fashioned, badly designed data. And I’m doing a lot of that now as we import legacy data into our new CRM.
Specifically, it helps when your old table has a lot of columns with the same data repeated over and over. Like
- Separate columns, in your table ‘People’, for PhoneNumber1, PhonwNumber2, PhoneNumber3
- Or Separate columns, in your table ’employees’, for Employee1, Employee2, Employee3, etc.
- In my case, separate columns for call and demand, named “Call01… Call25” and “Demand01…Demand25”
The data in these badly designed tables is not in the First Normal Form. I won’t talk about the problems with that here, but my task is to convert this data into normalized data. If I was working with phone numbers, I would want one row for each phone number. Similarly, I want one row for each Call-Demand pair.
Get Off Your Soapbox and Show me the Query Already!
The following query will return one row for each call/demand pair, as long as the value is non-zero.
Select Select Select leg.ItemId, v.ColNum, leg.Qty, v.Calls, v.Demands
From   PCPPIST0
              Cross Apply (Values (1, clmo01, dmmo01),
                           (2, Call02, Demand02),
                           (3, Call03, Demand03),
                           (4, Call04, Demand04),
                           (5, Call05, Demand05),
                           (6, Call06, Demand06),
                           (7, Call07, Demand07),
                           (8, Call08, Demand08),
                           (9, Call09, Demand09),
                           (10, Call10, Demand10),
                           (11, Call11, Demand11),
                           (12, Call12, Demand12),
                           (13, Call13, Demand13),
                           (14, Call14, Demand14),
                           (15, Call15, Demand15),
                           (16, Call16, Demand16),
                           (17, Call17, Demand17),
                           (18, Call18, Demand18),
                           (19, Call19, Demand19),
                           (20, Call20, Demand20),
                           (21, Call21, Demand21),
                           (22, Call22, Demand22),
                           (23, Call23, Demand23),
                           (24, Call24, Demand24),
                           (25, Call25, Demand25)
                   ) as v (colNum, Calls, Demands)
Where  Calls <> 0
       And Demands <> 0
The results look like the following:

I created the query on SQL Fiddle so you can experiment with it: Link to SQLFiddle.
Basically, I took a really wide table and created a result-set with one row for each item and its calls and demands.
Dissecting the Query
“Values Clause” – Here you specify the column names that will become rows. You can specify as many column names as you like. In my example, I have one for each call/demand pair. I also hard-code a number as a value, different for each pair.
“Table Alias” – In my query, the phrase is ‘as v‘, where ‘v’ stands for the “virtual table” which is created from your columns.
“Column Aliases” – in my query above, they look like this:
(colNum, Calls, Demands)
this allows me to treat each column in my values clause by a common name. Thus, ‘Call01″ becomes “Call” and “Call25” also becomes “Call”. Same thing for the Demand column and and my ColNum.
What Would You do Without Cross Apply?
One alternative would be to use a big, honking Union, like the following:
Select ItemId, Quantity, Calls, Demands
From   (
Select ItemId, Qty, clmo01 AS [Calls], dmmo01 AS Demands, 1 As ColNum FROM LegacyCallDemand where clmo01 <> 0 and dmmo01 <> 0 union all
Select ItemId, Qty, clmo02 AS [Calls], dmmo02 AS Demands  2 As ColNum FROM LegacyCallDemand where clmo02 <> 0 and dmmo02 <> 0 union all
Select ItemId, Qty, clmo03 AS [Calls], dmmo03 AS Demands  2 As ColNum FROM LegacyCallDemand where clmo03 <> 0 and dmmo03 <> 0 union all
Select ItemId, Qty, clmo04 AS [Calls], dmmo04 AS Demands  2 As ColNum FROM LegacyCallDemand where clmo04 <> 0 and dmmo04 <> 0 union all
Select ItemId, Qty, clmo05 AS [Calls], dmmo05 AS Demands  2 As ColNum FROM LegacyCallDemand where clmo05 <> 0 and dmmo05 <> 0 union all
Select ItemId, Qty, clmo06 AS [Calls], dmmo06 AS Demands  2 As ColNum FROM LegacyCallDemand where clmo06 <> 0 and dmmo06 <> 0 union all
Select ItemId, Qty, clmo07 AS [Calls], dmmo07 AS Demands  2 As ColNum FROM LegacyCallDemand where clmo07 <> 0 and dmmo07 <> 0 union all
Select ItemId, Qty, clmo08 AS [Calls], dmmo08 AS Demands  2 As ColNum FROM LegacyCallDemand where clmo08 <> 0 and dmmo08 <> 0 union all
Select ItemId, Qty, clmo09 AS [Calls], dmmo09 AS Demands  2 As ColNum FROM LegacyCallDemand where clmo09 <> 0 and dmmo09 <> 0 union all
Select ItemId, Qty, clmo10 AS [Calls], dmmo10 AS Demands  2 As ColNum FROM LegacyCallDemand where clmo10 <> 0 and dmmo10 <> 0 union all
Select ItemId, Qty, clmo11 AS [Calls], dmmo11 AS Demands  2 As ColNum FROM LegacyCallDemand where clmo11 <> 0 and dmmo11 <> 0 union all
Select ItemId, Qty, clmo12 AS [Calls], dmmo12 AS Demands  2 As ColNum FROM LegacyCallDemand where clmo12 <> 0 and dmmo12 <> 0 union all
Select ItemId, Qty, clmo13 AS [Calls], dmmo13 AS Demands  2 As ColNum FROM LegacyCallDemand where clmo13 <> 0 and dmmo13 <> 0 union all
Select ItemId, Qty, clmo14 AS [Calls], dmmo14 AS Demands  2 As ColNum FROM LegacyCallDemand where clmo14 <> 0 and dmmo14 <> 0 union all
Select ItemId, Qty, clmo15 AS [Calls], dmmo15 AS Demands  2 As ColNum FROM LegacyCallDemand where clmo15 <> 0 and dmmo15 <> 0 union all
Select ItemId, Qty, clmo16 AS [Calls], dmmo16 AS Demands  2 As ColNum FROM LegacyCallDemand where clmo16 <> 0 and dmmo16 <> 0 union all
Select ItemId, Qty, clmo17 AS [Calls], dmmo17 AS Demands  2 As ColNum FROM LegacyCallDemand where clmo17 <> 0 and dmmo17 <> 0 union all
Select ItemId, Qty, clmo18 AS [Calls], dmmo18 AS Demands  2 As ColNum FROM LegacyCallDemand where clmo18 <> 0 and dmmo18 <> 0 union all
Select ItemId, Qty, clmo19 AS [Calls], dmmo19 AS Demands  2 As ColNum FROM LegacyCallDemand where clmo19 <> 0 and dmmo19 <> 0 union all
Select ItemId, Qty, clmo20 AS [Calls], dmmo20 AS Demands  2 As ColNum FROM LegacyCallDemand where clmo20 <> 0 and dmmo20 <> 0 union all
Select ItemId, Qty, clmo21 AS [Calls], dmmo21 AS Demands  2 As ColNum FROM LegacyCallDemand where clmo21 <> 0 and dmmo21 <> 0 union all
Select ItemId, Qty, clmo22 AS [Calls], dmmo22 AS Demands  2 As ColNum FROM LegacyCallDemand where clmo22 <> 0 and dmmo22 <> 0 union all
Select ItemId, Qty, clmo23 AS [Calls], dmmo23 AS Demands  2 As ColNum FROM LegacyCallDemand where clmo23 <> 0 and dmmo23 <> 0 union all
Select ItemId, Qty, clmo24 AS [Calls], dmmo24 AS Demands  2 As ColNum FROM LegacyCallDemand where clmo24 <> 0 and dmmo24 <> 0 union all
Select ItemId, Qty, clmo25 AS [Calls], dmmo26 AS Demands  2 As ColNum FROM LegacyCallDemand where clmo26 <> 0 and dmmo25 <> 0 union all
) as bigUnion
As you can see, the ‘Grand Union’ version is a lot more typing! Furthermore, it runs almost twice as slowly.
Related Technique
The SQL Server keyword ‘UnPivot’ is related to Cross Apply However, you can’t use Unpivot if you have more than one column to fix. In my case, I could have used UnPivot if I only wanted Calls or only wanted Demands. Since I need them both, Cross Apply is the technique to use.
Summary
Cross Apply works great when you are forced to work with denormalized data; it allows you to treat repeated columns as if they were in a separate related table. You could use a huge union statement to accomplish the same thing, but that is very lengthy and slower.
Enhance SQL Server With a CLR Function
Sometimes you can’t easily do what you need in T-SQL; fortunately you can create new functionality in a .NET project and invoke it from your stored procedures or SQL. You can build a Visual Studio project that you can publish to your SQL Server database and use like a normal function or stored proocedure.
In principal, it is not too hard to extend SQL Server, but there are several frustrating issues which I explain in the post below. You will save your own frustration if you learn from my efforts! For example, projects that won’t build but have no error messages, fixing apparent damage to Visual Studio, and explicitly turning-on CLR in SQL Server.
My Business Need: Enhanced String Comparison
I’m importing legacy data and discovered some data that should be identical but isn’t, due to similar punctuation marks! For example ASCII as at least three different single quote marks: a ‘straight’ single quote, an open single-quote and a close single-quote. Like the following:
‘`´
Also, there are a couple different ASCII hyphens: a normal version, and an extra-wide one. Presumably there are other punctuation marks that look similar to humans but aren’t the same to SQL Server
Names the Same Except for Punctuation
Normally I don’t care about the punctuation, but I have some key fields with different punctuation, such as:
- Joe’s Bar and Grill (straight quote)
- Joe´s Bar and Grill (close quote)
The problem arises when I try to prevent duplicates: the two names above are the same to me, but SQL Server says they are different, because of the differing punctuation.
At first, I thought I could avoid the issue by specifying a collate clause in my SQL, but that that is actually designed for comparisons in different languages and doesn’t help here.
.NET to the Rescue!
Fortunately, .NET has a CompareOptions object which allows you to compare strings with a ‘IgnoreSymbols’ setting. Not perfect, because it only ignores punctuation; it isn’t smart enough to compare the three kinds of single quotes against each other but not against other punctuation. However, I judged it good enough for my purposes. Now, I will use that capability to build a “SQL CLR C# User Defined Function in SQL SERVER”.
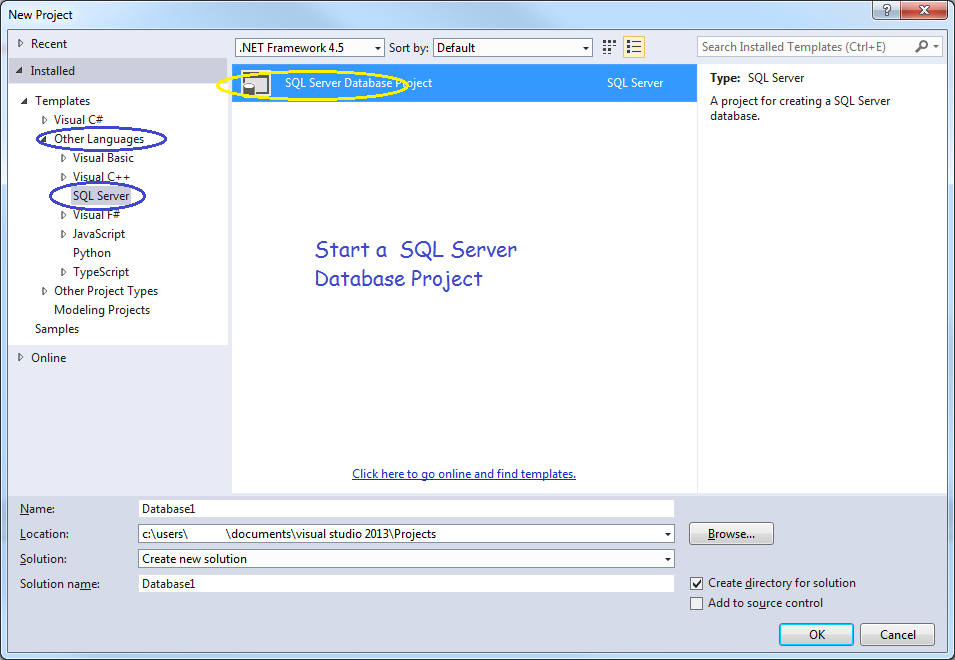
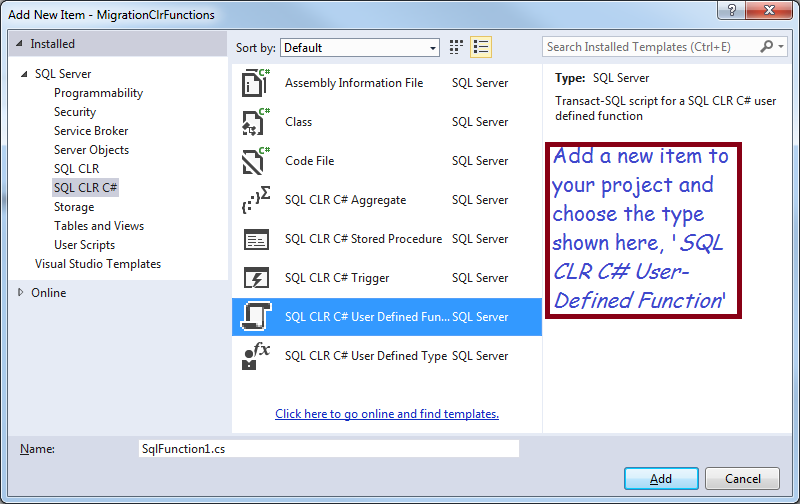
Start by creating a SQL Server Database Project
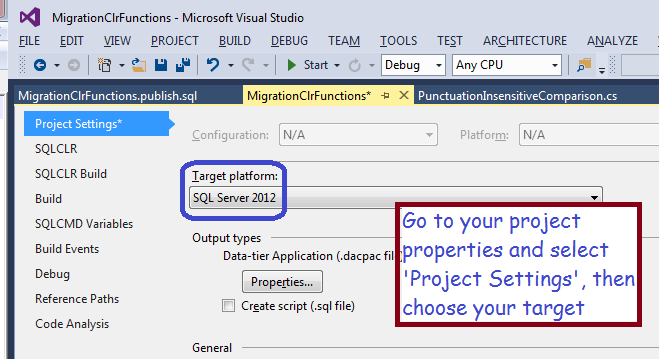
After starting your project, make sure you target the correct version of SQL Server, in my case, SQL Server 2012.
Now, choose the type of functionality you wish to add to SQL Server, in my case, a User-Defined Function. Add a new item to your project and choose the template indicated in the screen shot below.
Now, Write Some Code!
You will get a stub function; you should fill-in the functionality to meet your needs. In my case, I will return a 0 if two strings are equivalent, a -1 if the first string is smaller, and a 1 if the first string is bigger.
using System.Data.SqlTypes;
using System.Globalization;
using Microsoft.SqlServer.Server;

public partial class UserDefinedFunctions
{
  [Microsoft.SqlServer.Server.SqlFunction(DataAccess = DataAccessKind.None, IsDeterministic = true, SystemDataAccess = SystemDataAccessKind.None, IsPrecise = true)]
  public static SqlInt16 PunctuationInsensitiveComparison(SqlString s1, SqlString s2)
  {
    try
    {
      if (s1.IsNull && s2.IsNull)
        return 0;
      else if (s1.IsNull)
        return -1;
      else if (s2.IsNull)
        return 1;
      else
      {
        CompareOptions myOpts = CompareOptions.IgnoreSymbols | CompareOptions.IgnoreWidth | CompareOptions.IgnoreCase | CompareOptions.IgnoreNonSpace;
CompareInfo ci = CompareInfo.GetCompareInfo("en-US");
        SqlInt16 compareResult = (SqlInt16)ci.Compare((string)s1, (string)s2, myOpts);
        return compareResult;
      }
    }
    catch (System.Exception ex)
    {
      return -1;
    }
  }
Highlights
- The tag decorating the start of my function tells SQL Server what kind of usage to expect, I believe it is used for optimization
[Microsoft.SqlServer.Server.SqlFunction(DataAccess = DataAccessKind.None, IsDeterministic = true, SystemDataAccess = SystemDataAccessKind.None, IsPrecise = true)]
- Note the use of SQL Server data types, such as SqlString and SqlInt16. This is important for optimzation
- Also note that I took pains to check for nulls, for example:
else if (s1.IsNull)
- This will work when String.IsNullOrEmpty fails!
Avoid this Gotcha!
At this point, you can try to build, but, even though the syntax is correct, it failed for me. In fact, it failed without an error message! After some research, I discovered I needed to install SQL Server Database Tooling, which you can get at this url: https://msdn.microsoft.com/en-us/dn864412.
Next Problem
Installing this extension may mess-up your instance of Visual Studio, it certainly did mine! You may get an error ‘No exports were found that match the constraint contract name‘ After some research, I found the solution was to rename or delete the following folder:
- C:\Users\YourUserName\AppData\Local\Microsoft\VisualStudio\12.0\ComponentModelCache
Now Publish Your Solution
Right-click on your project and choose ‘Publish’ from the context menu.
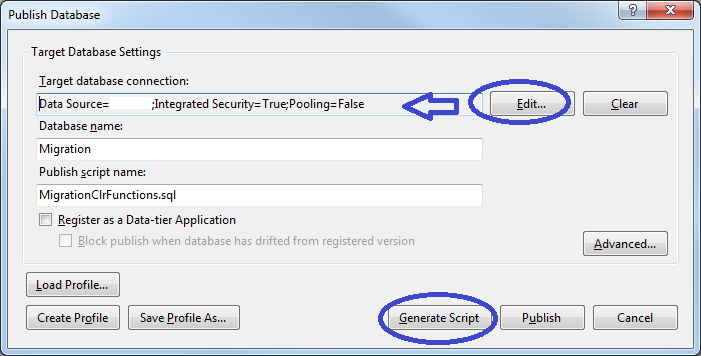
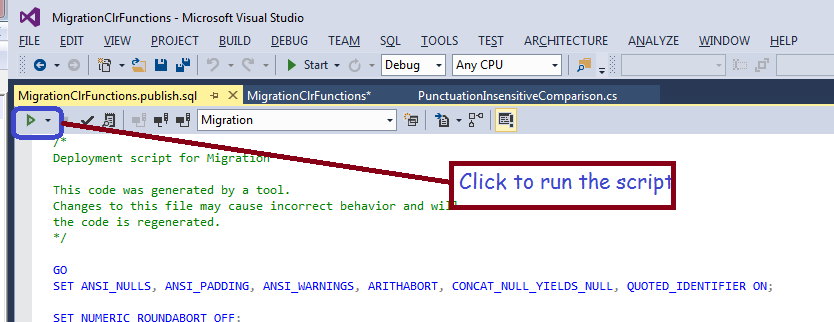
You will have to browse for your server/database by clicking the ‘edit’ button; afterwards, you can either generate a script or else click the publish button. If you generate a script, you can tweak it, afterwards you will need to run it by clicking the button indicated in the following screen shot.
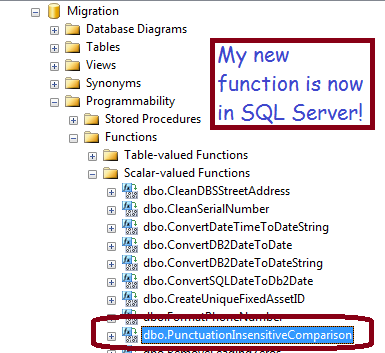
After publishing, your new function will appear in SQL Server!
One Last Step Before You Can Use it
The last thing to do is enable CLR functionality in your database instance, by running the following two commands:
sp_configure 'clr enabled', 1
Reconfigure
Now, you can use your new function in SQL, like the following simple example:
if dbo.PunctuationInsensitiveCompare('Jim''s Bar', 'Jim´s Br') = 0
   Print 'Same'
Else
   Print 'Different'
Microsoft documentation states that CLR functions can be more efficient than the equivalent in a normal Scalar-valued function, and my test confirmed that statement. However, if you aren’t careful about null checking, use the wrong data types, or generate errors, it can be much slower!
Summary
If you have a task that is hard in SQL but easy in .NET, you can build a CLR function and publish it to SQL Server. Things like string manipulation come to mind. You will build a SQL Server Database project, add an item ‘SQL CLR C# User-Defined Function’ and publish it to your database. There are several gotchas involved, so be careful and be sure to use System Restore Points and other backup techniques.
Two Lightweight Graphing Techniques for MVC
Your users will enjoy your apps more, and be more productive, when you use charts and graphs, where possible. Because they can mentally process a graphic faster than the corresponding numbers. When you make it easier for your users, you should get some positive feedback from grateful users!
Two Lightweight Technologies
There are lots of ways to create simple charts in HTML, here’s a couple that I recently found useful:
- SVG (Scalable Vector Graphics), a fairly new feature in HTML
- Dynamically-rendered images which you build on-the-fly using the .NET Drawing library
These two are great for small charts whose purpose is self evident. They are both good for inserting inside a table row, which I needed. Sadly, our PDF conversion technology won’t handle SVGs, which is why I investigated the second technique.
Other Chart Tools – for Bigger, Complicated Charts
Both of the two approaches above give you full customization, if you can do a little arithmetic. There are other methods available for fancier charts, including:
These are fine if you need a big chart with legends, axes, tick lines, titles, etc. They also won’t fit into a table cell, are complicated to learn, harder to customize, and, in the case of MS charts, badly documented. I used these technologies elsewhere, but for now, I do not want all the features they offer.
Explanation
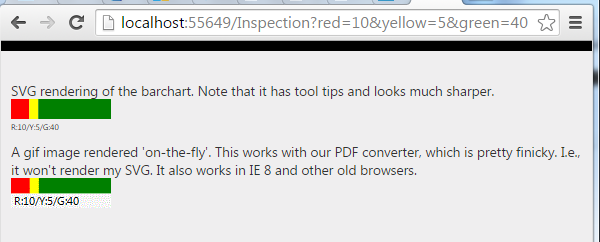
Note that both samples above are data driven, created in response to the data being displayed.
At work, I use this to display inspection data. The data displayed summarizes pass/fall/monitor counts for inspection details. Any given inspection may, for example, have 10 failed inspection details (red), 5 details needing monitoring (yellow) and 40 passed (green) detail items. Effectively, I am graphing the header for the inspection, showing the severity of its details. Also at work, I place the chart inside a table, which is one reason I don’t want a full-bore chart control.
The nice thing about this is I always know I will need between 0 and 3 colored rectangles.
Each chart is a set of 3 rectangles: one rectangle fore each color. With both technologies, drawing a rectangle is simple matter of calculating the height and width, specifying a color and a position to draw it at. I think you know enough for me to jump into some code:
Here’s the Code from my MVC View File (.cshmlt)
@model ProgBar.Models.Inspection

@Html.Raw(Model.ColorGraph)

<img src="@Url.Action("GetHorizontalBarchartImg",
		new { red = Model.RedCount,
			  yellow = Model.YellowCount,
			  green = Model.GreenCount })" />
The code above is from my View file, which, if you don’t know MVC, is the last layer of code before the web server sends the html page to the user. Obviously, my model and controller are doing the work here, but I wanted to show you the simple part first! In case you aren’t familiar with MVC, the model statement at the top makes it possible to reference my model class (“Inspection”) in the markup, for example, ColorGraph is a property of my model, and ‘GetHorizontalZBarchartmg” is a method on that same class.
Here’s How it Looks When Rendered into HTML
<!-- The SVG rendered into HTML -->
<svg Height='40' Width='100'>
    <rect x='0' y='0' width='18.1818181818182' height='20' fill='red'>
      <title>10</title>
    </rect>
  <rect x='18.1818' y='0' width='9.09090909090909' height='20' fill='yellow'>
    <title>5</title>
  </rect>
  <rect x='27.2727' y='0' width='72.7272' height='20' fill='green'>
    <title>40</title>
  </rect>
  <text x='0' y='31' fill='black' font-size='8'>R:10/Y:5/G:40</text>
</svg>

<!-- The second technique, an image rendered into HTML -->
<img src="/Inspection/GetHorizontalBarchartImg?red=10&yellow=5&green=40" />
As you can see, the SVG item has all the details, which gives the benefit of allowing you to manipulate it with javascript (for example, you could make something happen when user clicks a colored rectangle). In contrast, the image is a just like any other, except for the fact that I render it on demand. It is completely static by the time it arrives at the users’ browser.
Now the Code to Build my SVG
  public class Inspection {
    private int DEFAULT_HEIGHT = 30;
    private int DEFAULT_WIDTH = 100;

    private string _ColorGraph = "";
    public string ColorGraph {
      get {
        if (string.IsNullOrWhiteSpace(_ColorGraph))
          _ColorGraph = BuildColorGraph();
        return _ColorGraph;
      }
    }

    private string BuildColorGraph() {
      string boxPattern = "<rect x='{0}'  y='{1}' width='{2}' height='{3}' fill='{4}'><title>{5}</title></rect>";
      string redRect = "", greenRect = "", yellowRect = "";
      int tot = RedCount + GreenCount + YellowCount;
      double barHeight = 20;//0.667 * Height;

      if (RedCount > 0) {
        redRect = string.Format(boxPattern, 0, 0, Width * ((double)RedCount / tot), barHeight, "red", RedCount);
      }

      double xPos = Width * ((double)RedCount / tot);
      if (YellowCount > 0) {
        yellowRect = string.Format(boxPattern, xPos, 0, Width * ((double)YellowCount / tot), barHeight, "yellow", YellowCount);
      }

      xPos += Width * ((double)YellowCount / tot);
      if (GreenCount > 0) {
        greenRect = string.Format(boxPattern, xPos, 0, Width * ((double)GreenCount / tot), barHeight, "green", GreenCount);
      }

      string textPattern = "<text x='{0}' y='{1}' fill='black' font-size='8'>R:{2}/Y:{3}/G:{4}</text>";
      string theText = string.Format(textPattern, 0, 31, RedCount, YellowCount, GreenCount);
      string result = "<svg Height='" + Height.ToString() + "' Width='" + Width.ToString() + "'>"
            + redRect
            + yellowRect
            + greenRect
            + theText
            + "</svg>";
      return result;
    }

    public string InspectionNumber { get; set; }
    public int RedCount { get; set; }
    public int GreenCount { get; set; }
    public int YellowCount { get; set; }

    private int _Height;
    public int Height {
      get {
        if (_Height == default(int))
          _Height = DEFAULT_HEIGHT;
        return _Height;
      }
      set { _Height = value; }
    }
    private int _Width;
    public int Width {
      get {
        if (_Width == default(int))
          _Width = DEFAULT_WIDTH;
        return _Width;
      }
      set { _Width = value; }
    }
}
As you can see, I just build a string that looks like the rendered HTML. I build each rectangle separately, as a string, then concatenate three all together. The only “hard” part is calculating the rectangle widths, which you should be able to do if you can perform elementary algebra.
Hair-Splitting?
Some purists would say the model should not be responsible for creating any kind of formatting, and they’d have a point. My Inspection class should not return html; it should be agnostic about the display technique used. And they’d be right. However, it is pretty easy to move the code into the controller; I have not done so because I was not able to make this fine code work with our PDF generator.
If you want to move that code into the controller, it would be with a technique similar to how I build my chart image, in the next section.
Here’s the Code to Dynamically Render an Image
public class InspectionController : Controller
{
    public ActionResult GetHorizontalBarchartImg(int red, int yellow, int green,
        int canvasHeight = 30, int canvaseWidth = 100) {

        Bitmap bmp = new Bitmap(canvaseWidth, canvasHeight);
        Graphics g = Graphics.FromImage(bmp);
        g.SmoothingMode = System.Drawing.Drawing2D.SmoothingMode.HighQuality;
        float colorSum = red + yellow + green;
        float redWidth = (float)(red / colorSum * 100);
        float yellowWidth = (float) (yellow / colorSum * 100);
        float greenWidth = (float) (green / colorSum * 100);
        if (red > 0) {
            if (redWidth < 1)
                redWidth = 1;
            g.FillRectangle(Brushes.Red, 0.0F, 0.0F, redWidth, 15);
        }

        if (yellow > 0) {
            if (yellowWidth < 1)
                yellowWidth = 1;
            g.FillRectangle(Brushes.Yellow, redWidth, 0, yellowWidth, 15);
        }

        if (green > 0) {
            if (greenWidth < 1)
                greenWidth = 1;
            g.FillRectangle(Brushes.Green, redWidth + yellowWidth, 0, greenWidth, 15);
        }

        g.FillRectangle(Brushes.WhiteSmoke, 0, 15, 100, 15);
        string caption = string.Format("R:{0}/Y:{1}/G:{2}", red, yellow, green);
        g.DrawString(caption, new Font("Segoe UI", 8F), Brushes.Black, 1, 16);

        using (MemoryStream ms = new MemoryStream()){
            bmp.Save(ms, System.Drawing.Imaging.ImageFormat.Gif);
            return File(ms.GetBuffer(), "image/gif");
        }
    }

    public ActionResult Index(int red, int yellow, int green) {
        Models.Inspection insp = new Models.Inspection { GreenCount = green,
                          RedCount = red,
                          YellowCount = yellow,
                          Height = 40,
                          Width = 100
                        };
        return View("index", insp);
    }
}
Note: you will need to add a reference to your project, to System.Drawing.
Also note: depending on your security model, you may need to decorate the ‘GetHorizontalBarchartImg’ method with an ‘[AllowAnonymous]’ tag.
The big picture:
- First I get a drawing context to an in-memory Bitmap object
Graphics g = Graphics.FromImage(bmp);
- Use the drawing method ‘fillRectangle’ to build 3 colored rectangles, for example,
g.FillRectangle(Brushes.Red, 0.0F, 0.0F, redWidth, 15);
- Add other features to the bitmap, such as text
g.DrawString(caption, new Font("Segoe UI", 8F), Brushes.Black, 1, 16); - Save your bitmap to a memory stream (any stream type will work, memory stream is best for use)
- Convert the memory stream to a file and return it to your caller, namely, your page controller.
        using (MemoryStream ms = new MemoryStream()){
            bmp.Save(ms, System.Drawing.Imaging.ImageFormat.Gif);
            return File(ms.GetBuffer(), "image/gif");
        }
Summary
There are lots of ways to build charts, and users typically love them. SVG is great for small charts, but for my purposes, wasn’t easy to convert to PDF (there are other ways and I sure it would work fine in your environment). You can also build an image in memory, and return it to your controller as a dynamically-built file object.
Both techniques involve drawing rectangles with arithmetic and simple algebra. You can provide any color you like and the text is optional.
Download the Code!
You can get the code and play with it, or adapt it to your needs. Link to download
A Handy Query for SQL Server
Here is a nice query that you won’t find everywhere that could be rather useful
- A query to fix duplicates and clean-up your ‘look-up’ tables
Query: Clean-Up Your Duplicates!
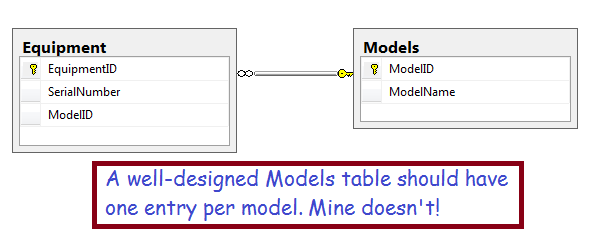
The diagram above illustrates the relationship between equipment and models. A well-designed Models table should have a unique-constraint on the ModelName column to prevent duplicates. My table doesn’t. This can happen if you get data from users who don’t understand the problems this can create!
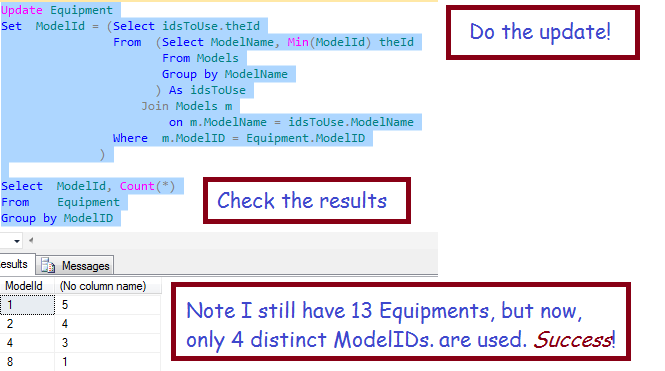
Here’s the Query!
Update Equipment
Set  ModelId = (Select idsToUse.theId
		From  (Select ModelName, Min(ModelId) theId
		       From Models
		        by ModelName
		       ) idsToUse
		Join Models m
			on m.ModelName = idsToUse.ModelName
		Where  m.ModelID = Equipment.ModelID
		)
Does that look like a bunch of impenetrable gobbledegook? Allow me to explain!
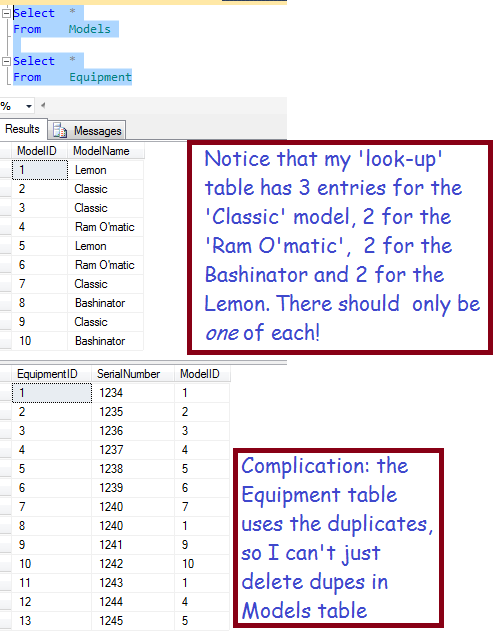
The following subquery (from above) is used to select the lowest model ID for each model name:
Select ModelName, Min(ModelId) theId
From Models
Group by ModelName
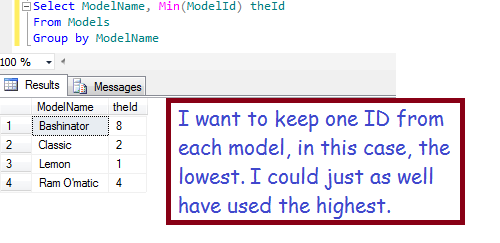
Notice that, in the main query, I convert the results of this subquery into a derived table, which I call ‘idsToUse’.
Having created a ‘derived table’ containing a list of IDs to use
- Join the derived table ‘idsToUse’ against Models on ModelName
- The result is a data set with every ModelID in use, associated with the ID we should use instead
- Now, select the good ID from the join results (in the where-clause)
- And use it to update the Equipment table, by matching against the ModelID from Equipment
- Resulting in every ModelId being replaced with the minimum
- Which is what we want!
The Last Step
At this point, we have fixed the Equipment table,
- Now, only one of each ModelId is in use
The easy part is deleting the duplicated model names form the Models table. We will delete every model ID except for the minimum of each group, with the following query:
Delete Models
Where ModelId Not in (Select Min(ModelId)
		      From  Models
		      Group by ModelName
		      )
This query wouldn’t have worked unless we previously fixed the Equipment table, because referential integrity would have prevented us from making orphan records. It would have prevented deleting ModelIds that are in use in the Equipment table.
Summary
Cleaning-up your database is a good way to make sure you can generate good reports and keep your sanity. Cleaning-up duplicates is a tricky chore. Finding the dupes is not too hard, and my query showed how you can pick one ID from each repeated model name. Then I showed you how you can use those good IDs in a derived table, which you can then utilize as a way to look-up every model ID in the equipment table and map it to the correct ID to use.
Programmatically Retrieve Files from TFS
If you use Team Foundation Server (TFS) for version control, you can do a lot of customization using Microsoft’s API. For example, you can search for specific types of bugs, build your own custom check-in policies, and more. Try this link for some ideas on what you can do. You could be a hero and improve your team’s process; maybe this kind of project will be your ticket into management! Assuming you use TFS for Continuous Integration, Agile tasks, etc. (And also assuming you are interested in that management thing :-))
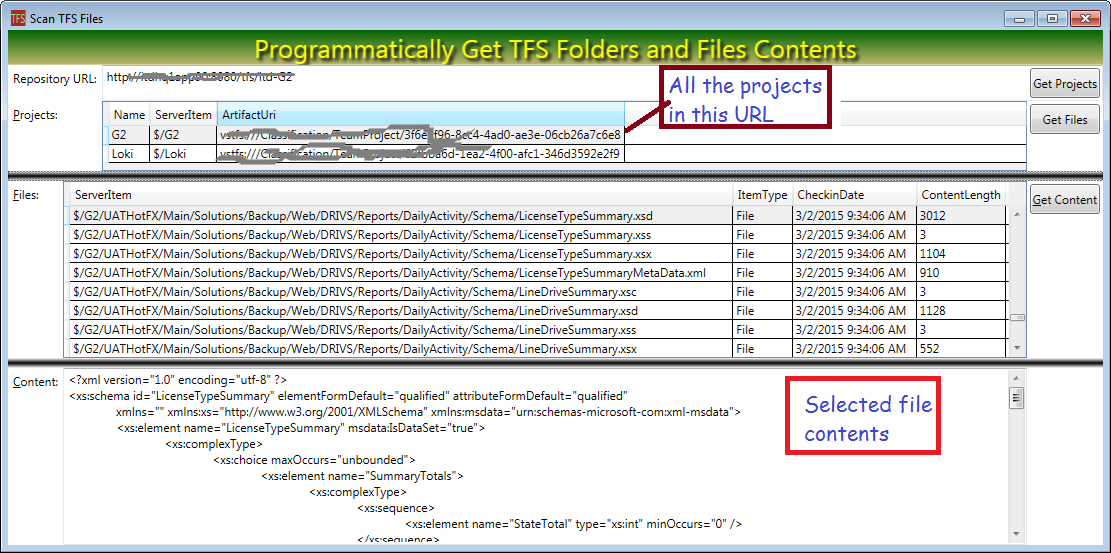
FYI, I previously posted a blog article on using Power Shell to query TFS, in case you don’t need as much capability as provided by writing code. For this post, I will explain some code that:
- Lists all the projects in your TFS repository
- Lists all the files for your selected project
- Retrieves the contents for your selected file, without requiring a check-out!
I actually use TFS at work to perform analysis on our project, specifically to map database object usage within our massive project. The project I describe in this post was part of my proof-of-concept. Programatically accessing TFS is nice because 1) I don’t need to check-out all the code and 2) I can inspect each file’s check-in date on each file and avoid parsing it if I hasn’t changed since last time, 3) my web-based UI does not need to open any local files, which would be a problem.
If interested, this article should be a big help for you. Because most of the other blog posts seem to deal with obsolete versions of TFS. My version works with Visual Studio 2013, and I hope Microsoft doesn’t make any additional breaking changes when the new Visual Studio comes out!
You may also find this helpful because the Microsoft documentation isn’t that good. I’m doing some pretty basic stuff, but it took me almost two days of research to figure-out how to do it. It was particularly hard to discover how to get file contents without performing a check-out.
Get the API
At home, I already have the API (I didn’t specifically download it), but at work, I needed to perform a special download from here: http://www.microsoft.com/en-gb/download/details.aspx?id=40776. To check if you need to download, see if you have this file (and others in the same folder):
- C:\Program Files (x86)\Microsoft Visual Studio 12.0\Common7\IDE\ReferenceAssemblies\v2.0\Microsoft.TeamFoundation.Client.dll
If you have the Team Foundation dlls in that folder, you probably don’t need to download. If you download my code sample, you can see all the other dlls you need for this project.
Explain the Code!
The code for this project is pretty short, just 71 lines (including all my ‘using-statements, try-catch blocks, etc.). Basically, I just have code for three button-click events.
Code to Get the Project List
Fetching the project list is easy, just open a TeamProjectCollectionServer, use it to get a VersionControlServer, then use that object to get a list of all projects, which I have bound to my grid.
private void btnGetProjects_Click(object sender, RoutedEventArgs e) {
    try {
        //Use the URL provided by user
        Uri tfsUri = new Uri(txtRepositoryURL.Text);
        TfsTeamProjectCollection server = TfsTeamProjectCollectionFactory
                                        .GetTeamProjectCollection(tfsUri);
        VersionControlServer myVersion = server.GetService(
                    typeof(VersionControlServer)) as VersionControlServer;
        TeamProject[] allProjects = myVersion.GetAllTeamProjects(true);

        //We have the list of projects, display in the grid
        grdProjectList.ItemsSource = allProjects;
    } catch (Exception ex) {
        MessageBox.Show(ex.Message);
    }
}
Now Get the List of Files for the Selected Project
Getting the files is easy; use the version control server from above to perform a GetItems operation on the project which user has selected in the grid and display the results in the grid.
TeamProject selectedPrj = grdProjectList.SelectedItem as TeamProject;
ItemSet items = myVersion.GetItems(selectedPrj.ServerItem, RecursionType.Full);
grdFileList.ItemsSource = items.Items;
Finally, Get the File Contents
Basically, we’re going to perform a DownloadFile operation on the selected file and open it with a stream. Again, using the VersionControlServer from the first step.
Item theItem = grdFileList.SelectedItem as Item;
using (StreamReader sr = new StreamReader(theItem.DownloadFile())) {
    txtContent.Text = sr.ReadToEnd();
}
Summary
This is just a demo, you can do a lot more with the TFS API. It made life a lot easier for my current project, for reasons referenced above. Get the code here.
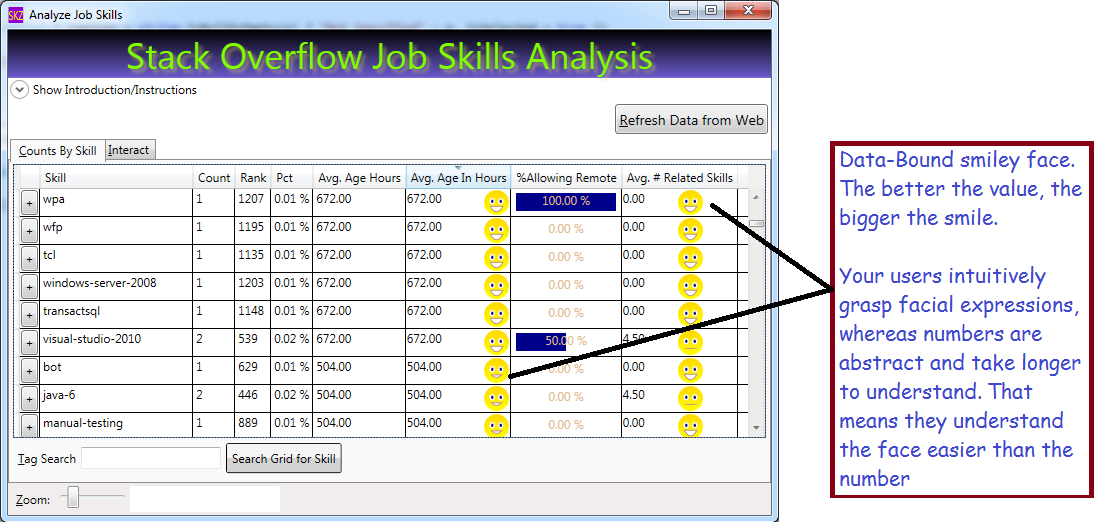
Use a DataBound Smiley Face for Super-Easy Data Comprehension
Humans can understand a smile in a heartbeat, but they need to think to parse a number. You can deal with that by displaying your data with smiley faces. Result: you will put a smile on your users’ faces, making their data easy to understand. By doing so, you’ll reduce your app’s overall costs, because training costs will be lower. Also, your users will get their work done faster when they can understand their data rapidly. For some apps, that speed can make the difference between profit or loss, such as apps used in fast-paced financial markets. If your company is work a meritocracy, you will be rewarded when your reduce costs for your company!

What We Will Use to Build Our Data-Bound Smiley Face
- A WPF UserControl
- WPF Geometry Drawing, including
- EllipseGeometry (to draw the eyes and the face)
- Geometry Path Markup Strings – to draw the smile
- DependencyProperty – we add one to our UserControl to expose our new property ‘SmilePct’
- DataBinding – I’ll share a real pain-saver that will help you bind UserControls in DataGrids
- DataGridTemplateColumn – to host our SmileyFace in our grid
Get Started: Build Your UserControl
Hopefully you already know how to add a UserControl to your project (right-click your project in Solution Explorer, choose, ‘Add’, then pick ‘UserControl’). We will build a user control that has an Image for its XAML (no grid or StackPanel needed). We will draw 3 different parts in our image:
- The Face
- The Smile (data-bound)
- The Eyes
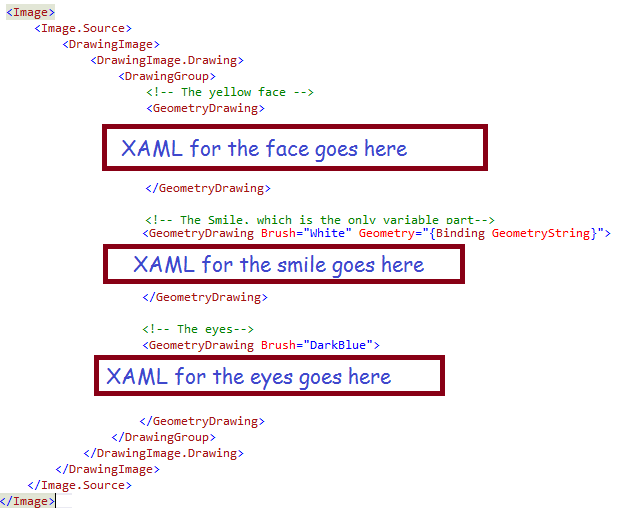
XAML for the Face
For the face, we will use a simple circle (actually an ellipse, but you probably know that a circle is merely a special case of an ellipse) with a gradient background.
<!-- The yellow face -->
<GeometryDrawing>
    <GeometryDrawing.Geometry>
        <!-- Draw the circle, which will represent the face -->
        <EllipseGeometry RadiusX="12.5" RadiusY="12.5" Center="6.25, 6.25"  />
    </GeometryDrawing.Geometry>
    <GeometryDrawing.Brush>
        <LinearGradientBrush EndPoint="0.5,1" StartPoint="0.5,0">
            <GradientStop Color="Gold" Offset="0"/>
            <GradientStop Color="Yellow" Offset="1"/>
        </LinearGradientBrush>
    </GeometryDrawing.Brush>
</GeometryDrawing>
To specify an ellipse, we describe the 1) size and shape using the RadiusX and RadiusY, plus 2) the position using the Center, which is described in Cartesian Coordinates (with the origin in the upper left corner of our Image). So, our face will be 25 pixels high (i.e. double the radius) and 25 pixels wide (double the RadiusX). Since RadiusX and RadiusY are equal, we will have a circle.
XAML for the Smiley
For the smile, we will use a string representation of the drawing to draw an ArcSegment. If you remember your geometry, or if you like to eat pies or pizza, you should already know that the ArcSegment is just the line represented by pizza crust. Basically a chunk of curve ripped out of a circle or, in the general case, an ellipse. We will build the geometry string in code; a sample geometry string looks like this: “M 0,10 A 10,25 0 0 0 12.5,10 Z”. I will explain how they work shortly; first, let’s look at the smiley XAML:
 <!-- The Smile, which is the only variable part-->
≶!-- The data binding will get the geometry from our code behind -->
 <GeometryDrawing Brush="White" Geometry="{Binding GeometryString}">
     <GeometryDrawing.Pen>
         <Pen Brush="RosyBrown" Thickness="1" />
     </GeometryDrawing.Pen>
 </GeometryDrawing>
It looks like not much is happening; that is because all the work is done via the Geometry property, which is bound to our code-behind. You can see the white brush, which is used for filling-in the teeth, and the pen (RosyBrown) which draws the lips. The shape of the lips is controlled via data binding, using a class property which I set in code. I will explain the Geometry string after explaining the XAML for the eyes. One further point: until now, I have not mentioned the data source I am binding to; in this case, I am binding to my own code-behind. I omitted that code until now (for clarity). To use your own code-behind for data binding, simply use the markup shown here to declare your UserControl:
XAML for the Eyes
For the eyes, we will draw two ellipses. They are similar to the face; their RadiusY is slightly larger than their RadiusX, to make them taller than wide, and they user different colors than the face.
<!-- The eyes-->
<GeometryDrawing Brush="DarkBlue">
    <GeometryDrawing.Pen>
        <Pen Brush="White" Thickness="1.5" />
    </GeometryDrawing.Pen>
    <GeometryDrawing.Geometry>
        <GeometryGroup>
            <!-- Draw 2 ellipses, each slightly taller than wide, for the eyes -->
            <!-- Left eye-->
            <EllipseGeometry RadiusX="2" RadiusY="2.5" Center="2,5" />
            <!-- Right eye-->
            <EllipseGeometry RadiusX="2" RadiusY="2.5" Center="10.5, 5" />
        </GeometryGroup>
    </GeometryDrawing.Geometry>
</GeometryDrawing>
Now, for the UserControl Code-Behind
The code-behind has a simple structure: just two properties:
- The GeometryString property, which tells WPF how to draw the smile, and
- The SmilePct property, which allows the outside world to control the size of our grin. 100% → big smile, while 0% → straight face
You might have noticed from my screen shots that my face never frowns, it just varies from a straight line to a big smile. I did that because, for one reason, it is a little easier, and also because I don’t want any frowns in my apps!
DependencyProperties
OK, I only have two properties, but you should make them be special DependencyProperty instances, because that is what works best with UserControls. DependencyProperties are similar to INotifyPropertyChanged properties, but designed for special situations like UserControls, etc. Here’s a quick tip: Visual Studio will help you stub-out a DependencyProperty if you type the shortcut ‘propdp‘ and hit the tab key. For details, take a look at my Visual Studio Quick Tip on the Snippet Manager. Here’s what my two properties look like:
private static string NO_SMILE = "M 5,12.5 A 10,0 0 0 0 7.5, 12.5 Z";

public string GeometryString {
    get { return (string)GetValue(GeometryStringProperty); }
    set { SetValue(GeometryStringProperty, value); }
}

//Windows stores the property value (for GeometrySttring) on your behalf, so you don't
//declare any variable to hold the value
public static readonly DependencyProperty GeometryStringProperty =
    DependencyProperty.Register("GeometryString", typeof(string),
	typeof(DataBoundSmiley), new PropertyMetadata(NO_SMILE));


public double SmilePct {
    get { return (double)GetValue(SmilePctProperty); }
    set { SetValue(SmilePctProperty, value); }
}

//Note the callback referenced below, 'OnSmileyPctChanged'
public static readonly DependencyProperty SmilePctProperty =
    DependencyProperty.Register("SmilePct", typeof(double),
	typeof(DataBoundSmiley), new PropertyMetadata(0.0, OnSmileyPctChanged));
Where’s the Logic?
I deliberately skipped the complicated part, so that I could emphasize the fact that I only have two properties in my code-behind. All the work happens when the SmilePct is set to a new value, which causes the callback method ‘OnSmileyPctChanged‘ to be invoked. That is where we assign the value for our GeometryString. The geometry string will vary between these two extremes, which I will explain shortly:
- Big Smile = “M 0,10 A 10,25 0 0 0 12.5,10 Z”;
- No Smile = “M 5,12.5 A 10,0 0 0 0 7.5, 12.5 Z”;
Geometry Path String Explanation:
- “M 0,10” means start the drawing at the coordinates (0,10). “M 5,12” means start the drawing at coordinates (5,12.5)
- “A 10,25 0 0 0 12.5,10 Z” defines an ArcSegment, where
- “A” means start the arc
- “10,25” means RadiusX =10,RadiusY =25
- “0 0 0” means: (first zero) rotate 0 degrees; (second zero) IsLargeArc = false; (third zero) means Clockwise = false
- “12.5,10″ means finish the arc at coordinates (12.5,10)
- “Z” means close the arc, i.e. draw a line from the end point to the start point, which, for us, represents the top lip
Besides ArcSegments, you can draw LineSegments, BezierSegments and QuadraticBezierSegments. You can read more about them here: https://msdn.microsoft.com/en-us/library/ms752293(v=vs.110).aspx. So, basically, my method ‘OnSmileyPctChanged’ serves to build a string like either 1) the big smile string listed above, 2) the no smile string, or 3) some arc segment intermediate between them. I’ll list the code here, but leave it to you to figure-out the algebraic computations involved. Remember, my callback is invoked when the SmilePct property is set.
public static void OnSmileyPctChanged(object sender, DependencyPropertyChangedEventArgs e) {
    double theVal = (double)e.NewValue;
    //protect against bad data:
    if (theVal < 0)
        theVal = 0.0;
    else if (theVal > 1.0)
        theVal = 1.0;

    double xInit = 5 - (5.0 * theVal);
    double yInit = 12.5 - (2.5 * theVal);
    double pctHappy = (25 * theVal);
    double xTerm = 7.5 + (5.0 * theVal);
    double yTerm = 12.5 - (2.5 * theVal);
    DataBoundSmiley theInstance = (DataBoundSmiley)sender;
    theInstance.GeometryString = string.Format("M {0}, {1} A 10,{2} 0 0 0 {3},{4} Z",
                                               xInit, yInit, pctHappy, xTerm, yTerm);
}
Final notes on the code-behind: the input parameter ‘sender‘ represents our UserControl; ‘e‘ is the event args, containing the NewValue (for SmilePct) and other info. Since the method is static (required by WPF), we need to set the value of the GeometryString on the specific instance of the control which is identified by the input parameter ‘sender’.
Code-Behind Summary
OK, at this point, I’ve shown you the code to create the UserControl, which is basically just a drawing with three ‘sub’ GeometryDrawing elements. We use ellipses for the face and eyes, and the smile is an ArcSegment which I bind to a DependencyProperty in my code-behind. The property ‘GeometryString’ is set in my method ‘OnSmileyPctChanged’; in that method, I use some algebra to define the ArcSegment corresponding to a big smile for high value of SmileyPct. All told, the control consists of
- 54 lines of XAML, and
- 60 lines of code
Using the Data-Bound Smiley in a DataGrid
I won’t talk about DataGrid basics here, suffice it to say that I will add a template column to my DataGrid to host my smiley UserControl. Actually, I want the single column to display a smiley face and a numeric value, which is easy if I embed a grid inside my template. Here’s the XAML, which I have simplified to only display the grid and the template column:
<DataGrid AutoGenerateColumns="False" Name="grdCountsByTag" IsReadOnly="True"  >
    <DataGrid.Columns>
        <!-- Other columns omitted for brevity. Define a template column here: -->
	<DataGridTemplateColumn Header="Avg. Age In Hours" CanUserSort="True" SortMemberPath="AvgAgeInHours">
            <DataGridTemplateColumn.CellTemplate>
                <DataTemplate>
                    <Grid>
                        <!-- Textblock holds the number -->
                        <TextBlock Text="{Binding AvgAgeInHours, StringFormat=N2}" />
                        <!--Now the smilley; note the data binding, which was tricky -->
                        <local:DataBoundSmiley Grid.Column="1"
                                               SmilePct="{Binding DataContext.AvgJobAgePct,
                                                          RelativeSource={RelativeSource AncestorType=DataGridRow}}" />
                        <Grid.ColumnDefinitions>
                            <ColumnDefinition />
                            <ColumnDefinition Width="auto" />
                        </Grid.ColumnDefinitions>
                    </Grid>
                </DataTemplate>
            </DataGridTemplateColumn.CellTemplate>
        </DataGridTemplateColumn>
    </DataGrid.Columns>
</DataGrid>
Notes:
The prefix ‘local’ is an XMLNS definition which we place at the top of our form, like this:
The namespace declaration allows us to reference classes from our own project in the XAML. The TextBlock is bound to a separate (but related) column: AvgAgeInHours. The Smiley control is bound to a field named ‘AvgJobAgePct’. The first, AvgAgeInHours, varies between 0 and 672 (usually), while AvgJobAgePct varies between 0 and 1; the two are inversely proportional. The data binding expression also bears notice, as I spent almost as much time on this as the rest of the code. It was a major source of frustration! Some key points:
- A normal control (such as my TextBlock) binds directly to the same data source as the grid
- Maddeningly, custom controls do not, their data source is, AFAIK, themselves
- Which is why I needed to use the RelativeSource syntax to find the data source for the Grid Row hosting our control, i.e.
RelativeSource={RelativeSource AncestorType=DataGridRow} - The DataContex syntax (e.g. ‘DataContext.AvgJobAgePct’) is used to avoid binding to properties of the Grid Row, such as width/height, and instead goes for the data source used to display the row
Summary
The smiley control quickly conveys meaning to your users, making their lives easier. A UserControl is the best way to build a re-usable container to display your data – without it, you would not be able to display smileys for two separate columns. The UserControl I built uses an Image containing a GeometryGroup which, in turn, holds three GeometryDrawings (face, eyes and smile). The Smile is defined in my control’s code-behind as a DependencyProperty; I build it using the syntax for the WPF Path Markup. Specifically, I use it to draw an ArcSegment, whose curve and endpoints vary according to the SmilePct. If you want your users to easily comprehend your data, I recommend you use my data-bound smiley, because users recognize faces with little mental effort. To get download code, you can go to my open source project on CodePlex: http://visualizejobskills.codeplex.com/
