
WPF
Sunday Puzzle: Find a Word With a ‘T’ Pronounced as ‘ZH’
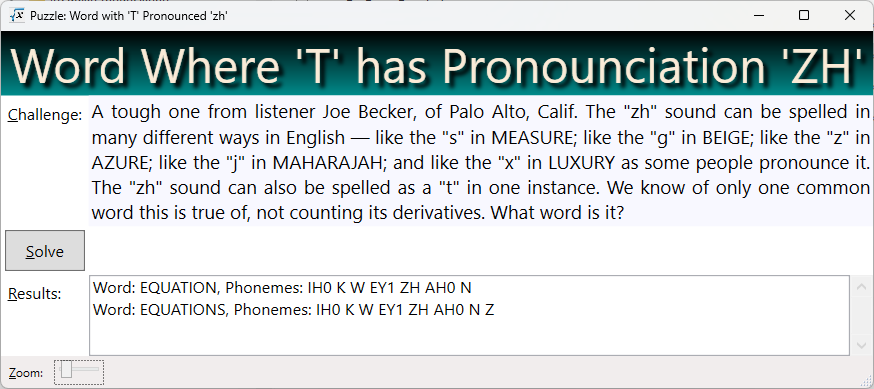
A tough one from listener Joe Becker, of Palo Alto, Calif. The “zh” sound can be spelled in many different ways in English — like the “s” in MEASURE; like the “g” in BEIGE; like the “z” in AZURE; like the “j” in MAHARAJAH; and like the “x” in LUXURY as some people pronounce it. The “zh” sound can also be spelled as a “t” in one instance. We know of only one common word this is true of, not counting its derivatives. What word is it?
Link to the challenge
Synopsis
Once again, a sweet easy one 😁. Easy because I happen to have the magic key to solving it: a phoneme dictionary! Carnegie Mellon University has released the CMU Pronunciation Dictionary. Because I have that dictionary, I solved it with just 49 lines of code. And most of those lines were infrastructure.
Definition
phoneme fō′nēm″ noun
- The smallest phonetic unit in a language that is capable of conveying a distinction in meaning, as the m of mat and the b of bat in English.
Their Dictionary is a File that Looks Like This

To solve the puzzle, we simply read this file and seek a word having a ‘ZH’ phoneme in the same position as a ‘T’ in the original word. Sounds simple? It basically is.

But there was a tricky part that I could only avoid because I got lucky. I’ll discuss it below!
While examining my code below, see if you can spot the assumption my code makes before I explain it.
I elected to use WPF (Windows Presentation Framework, a type of .NET solution) as the environment to solve the puzzle. Rationale: I need to process a file, so web solutions are out. WPF looks nice and .NET has a powerful set of string manipulation functions that I already know.
Techniques Used
- String manipulation
- File IO
- A tiny bit of Regular Expressions
Video Explaining the Code
Sometimes it’s more fun to watch a video than to read through code, so this time I made a video explaining it, here’s a link! It’s just 13 minutes long, and by watching, you may learn a couple tricks you can use in the debugger.
Here’s the Code!
Since the algorithm is so simple, I will just list my code. Note that numbered comments in the code correspond to explanations listed below.
private void btnSolve_Click(object sender, RoutedEventArgs e) {
  Mouse.OverrideCursor = Cursors.Wait;
  txtResults.Clear();

  // 1) Open the file for reading
  using (var sr = File.OpenText(DICT_PATH)) {
    string aLine = "";
    // 2) Skip the top of the file, looking for a line
    // which starts with a letter, which represents the file payload
    while (sr.Peek() != -1) {
      aLine = sr.ReadLine() ?? "";
      if (aLine.Length > 0 && char.IsLetter(aLine[0]))
        break;
    }

    while(true) {
      // 3) Every word is separated from its phonemes by a double space
      var p = aLine.IndexOf("  ");
      if (p > 0) {
        // 4) Every phoneme is separated by a space, build a list of them
        var phonemes = aLine[(p + 2)..].Split(' ').ToList();

        // 5) Find the index (if any) of the phoneme represented by 'ZH'
        var zhPos = phonemes.IndexOf("ZH");
        if (zhPos >= 0) {
          // 6) Grab the word and strip off anything that looks lke '(2)'
          var aWord = Regex.Replace(aLine[..p], @"\(\d\)", "");
          // 7) Check if the index of 'T' is the same as the index of 'ZH'
          if (zhPos < aWord.Length && aWord[zhPos] == 'T') {
            txtResults.Text += $"Word: {aWord}, Phonemes: {aLine[(p + 2)..]}\n";
          }
        }
      }

      if (sr.Peek() == -1)
        break;
      aLine = sr.ReadLine() ?? "";
    }
  }

  Mouse.OverrideCursor = null;
}
Comments Explained
- Open the file for reading. ‘DICT_PATH’ is a constant, defined above, holding the file path of the dictionary, such as “c:\cmudict.0.7a”. The variable
sris aStreamReaderthat can read a line of text. - Skip the top of the file, looking for a line which starts with a letter, which represents the file payload. Note that the first 121 lines of the file are comments and explanations, not part of the dictionary per se. Those lines start with a space or punctuation mark. Note that
aLine[0]represents the first character of the line (data typechar)- char.IsLetter is a built-in method that returns
truefor letters andfalseotherwise
- Every word is separated from its phonemes by a double space. For example, EQUATION IH0 K W EY1 ZH AH0 N. It might be hard to see, but there are two spaces after ‘EQUATION’. The variable
prepresents the position of the first space. Now we know where to find the end of the word, and the beginning of the phoneme list. - Every phoneme is separated by a space, build a list of them. There is a lot happening in this short line, let’s examine each carefully:
aLine[(p + 2)..]This code grabs a substring out of the original line, effectively the last half of the line, starting at the 2nd letter afterpand running to the end of the line. If the double space starts at position 10, then(p + 2), i.e. 12 is the starting position of everything after the double space.Split(' '). This built-in method builds an array out of the substring I gave it, splitting on the space character. Every time a space is encountered, we start a new entry in the array. If the input to split is “IH0 K W EY1 ZH AH0 N”, then the array will look like [“IH0”, “K”, “W”, “EY1”, “ZH”, “AH0”, “N”]. Meaning that the first entry is “IH0” and the last is “N”.ToList(). This converts the array to a list. Why?ArraysandListsare very similar, but they don’t have the same methods available to them. In particular, I want to use the methodIndexOf, which is not available toarrays.
- Find the index (if any) of the phoneme represented by ‘ZH’. For our example array, [“IH0”, “K”, “W”, “EY1”, “ZH”, “AH0”, “N”], the index will be 4, meaning we can access that entry with the line of code
phonemes[4]. If the list doesn’t have a ZH, then zhPos will be assigned -1. - Grab the word and strip off anything that looks lke ‘(2)’. Once again, there is a lot going on with this line:
aLine[..p]. Remember, p is the position where we found the double space. This code fragment grabs a substring starting at the beginning of the line, up to positionp.Regex.Replace. Regular expressions are a handy, but tricky, way to match patterns in strings. If you download and examine the CMU Phoneme dictionary, you will see some lines that look like the following:- ERNESTS ER1 N AH0 S T S
- ERNESTS(2) ER1 N AH0 S S
- ERNESTS(3) ER1 N AH0 S
- Note the two entries “(2)” and “(3)’. We want to replace these with an empty space, i.e., delete them.
Regex.Replacewill do that if we give it a string to start with, a pattern to match, and a replacement string (in our case, an empty string). @"\(\d\)"This is the pattern we will look for- @” means this string contains \ characters
\(represents an open parenthesis. Because ( is a specal character, we need to preface it with \ so that .NET will look for that character in the string, instead of starting a capture group. Capture groups are an advanced topic which we don’t need to understand today. There are a few special characters which we need to preface with \, so we can avoid confusion; the \ is called an escape character.\dThis is a pattern element signifying “capture any digit“, i.e., the characters 0-9- \) This represents the close parenthesis. As before, the backspace is used as an escape character.
- The upshot is that, if aLine contains “ERNESTS(2) ER1 N AH0 S S”, then
aWordwill be assigned “ERNESTS”, because we replaced (2) with “”
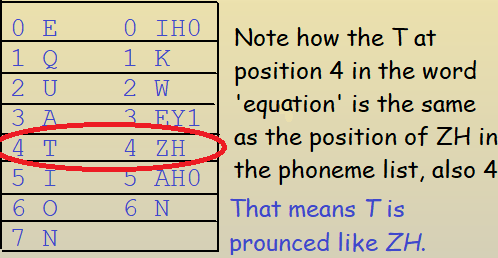
- Check if the index of ‘T’ is the same as the index of ‘ZH’. Note that, within the string ‘EQUATION’, ‘T’ has index 4 (remember, indexes start at 0, not at 1). Similarly, ‘ZH’ also has index 4 within the list [“IH0”, “K”, “W”, “EY1”, “ZH”, “AH0”, “N”]. Since the index is 4 in both, we are pretty confident that T is pronounced ‘ZH’ in the word equation.
The Tricky Part Explained!
You’ve now read my code. Have you managed to guess what I meant when I said I got lucky?
Answer: My code assumes that every letter in the original word is represented by a phoneme. But that isn’t actually true. Sometimes a pair of letters are used to make a sound, like the pair “sh”, “th”, or “ch”. I don’t know how many letter pairs are used that way, but it makes things complicated when you try to determine whether the letter ‘T’ is represented by the phoneme ‘ZH’ by determining that both are at position 4.
Since I found a good solution without taking this issue into account, and since dealing with it makes my blog entry a lot harder to understand, and since the whole thing is just for fun, I elected not to deal with the issue. Once again, I leave it as an exercise to the reader.
Get the Code
You can get a copy of my code from my dropbox account at this link. Note that you will need to create a free DropBox account to do so. Use the link above to get the CMU phoneme dictionary, and remember to revise my code to point to the file path on your machine.
Sunday Puzzle: Nationality, Demonyms and Consonyms!
This week’s challenge is a spinoff of my (e.g. Will’s) on-air puzzle. Name two countries that have consonyms that are nationalities of other countries. In each case, the consonants in the name of the country are the same consonants in the same order as those in the nationality of another country. No extra consonants can appear in either name. The letter Y isn’t used.
Link to the Challenge
Definition Demonym; noun: A name for an inhabitant or native of a specific place that is derived from the name of the place.

Synopsis
Well, that was a nice, easy, fun one! Happily, I already had a list of nations and their demonyms, so it was just a matter of making two lists and matching them against each other. Each of those two lists contains the original word plus its consonym. One list uses the country as the original word, the other uses nationality as the original word. We match the lists using the consonym.
I elected to use WPF once again, mainly because it produces a nice UI and I am pretty fast in it. The choice of UI is fairly unimportant for solving this puzzle, since there is almost no interaction with the user, other than clicking the Solve button.
If you read through to the end, I’ll explain my big learning moment writing this code. Yes, I made a big mistake because I misunderstood something tricky about Linq. Hopefully you can save time by learning from my goof!
In case anyone is following me, I hope I don’t sound too over-confident in my analysis, possibly discouraging you. I always do the write-up as if I knew what I was doing from the very start, as if solving the puzzle is inevitable due to my great skill 😏. But that is not the case at all! I have a lot of struggles and plenty of dead ends. So I hope you don’t feel unworthy if I accidentally make it sound easier than it truly is. Because in reality, it only seems easy after I finally succeed.
Screenshot Showing My Results:
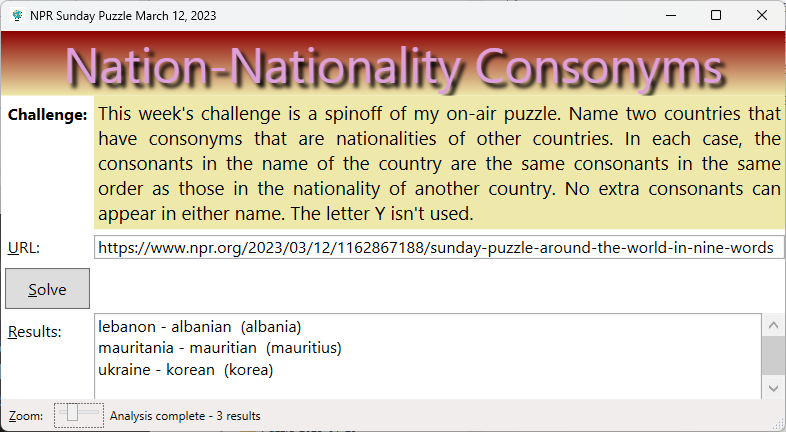
I got 3 results, but from Will’s description, I think he expects two results. I re-read his description a few times and don’t see anything I misinterpreted, so let’s see what he says come Sunday. Maybe there was some confusion over Mauritania and Mauritius, two very similar names.
Techniques Used
Difficulty Level
- Intermediate
- Dogged beginners
Algorithm
We start with a file that looks like the following (you can download your own copy below):
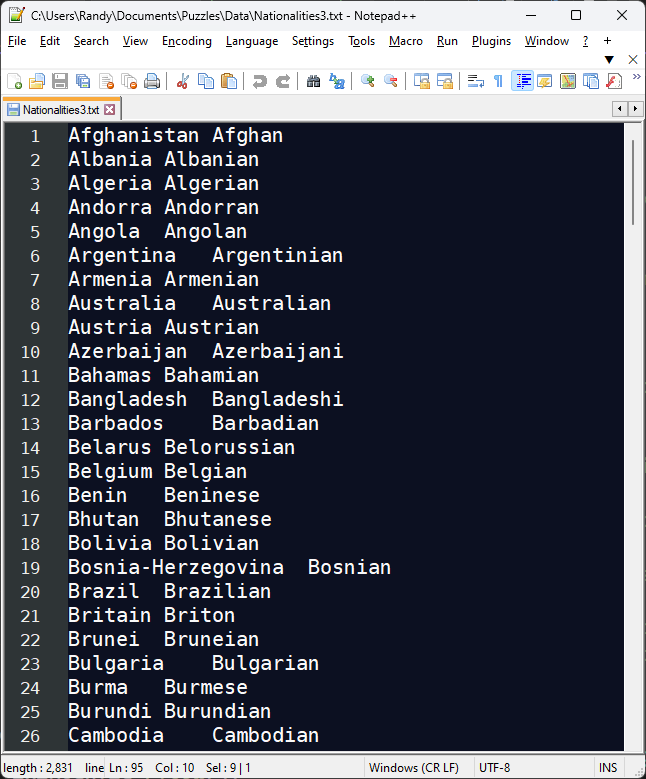
As you can see above, this file has two columns, separated by a tab character. The country comes first, followed by the demonym. Given this file structure, we take the following steps to find a solution:
- Open the file for reading
- Read one line at a time
- Split the line on the tab character, effectively separating the two words
- Build two lists,
- Using the two words from the line we just split
- One list for nationalities
- The other for demonyms
- Each list will contain a data type (a class in this case) which contains the original word and its consonym (refer to the image below)
- After we finish reading the file and building the list,
- Match the two lists using the consonym field
- Note that some countries will match against their own demonym, for example
- Britain → brtn → Briton (consonants “brtn” for both)
- Therefore, when we match the two lists, we need to avoid self-matching by requiring that the matched demonym not come from the original country
Illustration of Matching the Two Lists
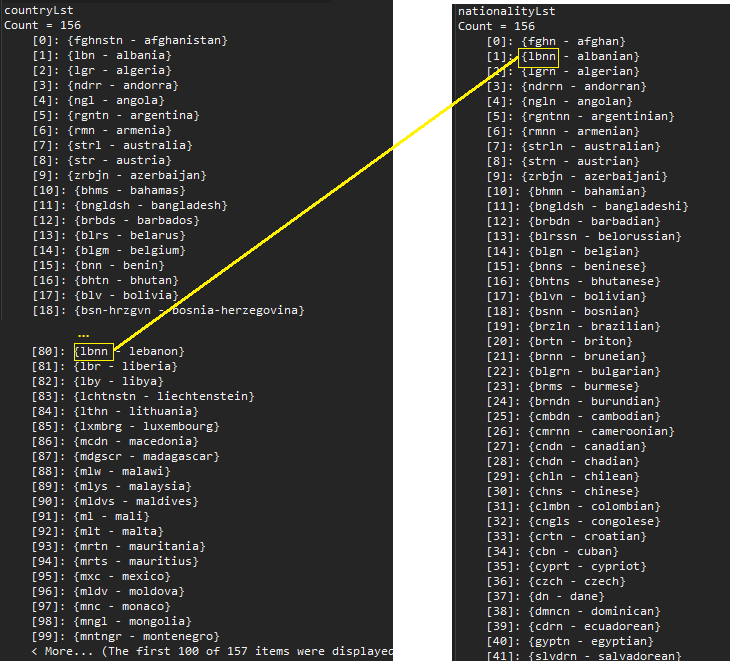
ConsonymWordPair , which consists of the consonants plus the original word. When we match entries on the left against those on the right, we find a match for “lbnn” in both lists. Now we know the two original words share a consonym, one word being a country and the other a nationality. Here’s The Code!
//This is the main method; it runs when user clicks the 'solve' button
private void btnSolve_Click(object sender, RoutedEventArgs e) {
  txtResults.Clear();
  txtMessage.Text = "";

  //1) The subroutine (method) reads my file and builds the two lists:
  var (countryLst, nationalityLst) = BuildCountryNationalityLists();

  var solutionCount = 0;
  //2) Loop through the country list and match against the nationality list
  foreach (var c in countryLst) {
    //3) Get all the nationalities whose Consonym matches the country's
    var matches = nationalityLst.Where(n => n.Consonym == c.Consonym);
    foreach (var m in matches) {
      //4) 'Mate' is my term for the original country
      //I call it 'Mate' to make the class name more generic
      //If the country's consonym is the same as its nationalit's, skip it
      if (m.Mate != c.Mate) {
        //5) Display the results!
        txtResults.Text += $"{c.Word} - {m.Word}  ({m.Mate})\n";
        solutionCount++;
      }
    }
  }

  txtMessage.Text = $"Analysis complete - {solutionCount} results";
}
Discussion – Main Method
🙆🏻I really like how short the main method is, it makes me feel good to write concise code that does something useful and, hopefully, something cool!
Numbered notes below correspond to the numbered comments above. If you already understand the code above, skip ahead to the next heading!
- The subroutine reads my file and builds the two lists
var (countryLst, nationalityLst) = BuildCountryNationalityLists();- That subroutine (‘
BuildCountryNationalityLists‘) is listed below - Note that this method returns two variables,
countryLstnationalityLst
- Which is one of my favorite features of .NET!
- Both lists contains
ConsonymWordPairelements (a class defined below)
- Loop through the country list and match against the nationality list
foreach (var c in countryLst) {- The variable ‘
c‘ is an instance of my class ‘ConsonymWordPair‘ - And we will examine all 156 of them, one per loop pass
- Get all the nationalities whose Consonym matches the country’s
- The Linq method
Wheredoes a search on the listnationalityLstvar matches = nationalityLst.Where(n => n.Consonym == c.Consonym);n.Consonymrefers to the nationality consonym- c
.Consonymrefers to the demonym consonym (say that 3 times fast!)
- And returns all the matches.
- Theoretically there could be more than one match, but not with this data
- The Linq method
- ‘Mate’ is my term for the original country
-
if (m.Mate != c.Mate) { - The class is named ‘
ConsonymWordPair‘, but I added an extra field ‘Mate'after naming it - So it isn’t really a pair any more 😑- whoops!
- The if-statement,
if (m.Mate != c.Mate)ensures that I don’t accidentally match, for example, Briton against Britain
-
- Display the results!
txtResults.Text += $"{c.Word} - {m.Word} ({m.Mate})\n";- That code appends a new solution to the textbox called ‘
txtResults‘ - The
+=operator causes the new string to be appended to the existing one - We build a string to append using the
$""nomenclature - This allows us to mix variables with text in a more natural way
- Variables are recognized inside the
{}brackets; everything else is plain text - Note that
\n(look at the end of the line) is how we specify a newline
Method ‘BuildCountryNationalityLists’
private (List<ConsonymWordPair>, List<ConsonymWordPair>) BuildCountryNationalityLists() {
  //1) Build the two empty lists which we will populate and return:
  var countryLst = new List<ConsonymWordPair>();
  var nationalityLst = new List<ConsonymWordPair>();

  //2) NATIONALITY_FILE is defined at the class-level; it is the file name
  using var sr = File.OpenText(NATIONALITY_FILE);
  //3) Read until end-of-file detected
  while (sr.Peek() != -1) {
    //4 Read the line, convert to lower case, split on tab character
    //The split operation means that 'twain' is an array
    var twain = sr.ReadLine().ToLower().Split('\t');
    if (twain != null && twain.Length == 2) {
      //5) twain[0] is the country name; build a pair with the
      //word and its consonants
      var c1 = RemoveVowels(twain[0]);
      var cwp1 = new ConsonymWordPair(twain[0], c1, twain[0]);
      countryLst.Add(cwp1);

      //6) Now do the same for the nationality, which is in twain[1]:
      var c2 = RemoveVowels(twain[1]);
      var cwp2 = new ConsonymWordPair(twain[1], c2, twain[0]);
      nationalityLst.Add(cwp2);
    }
  }

  return (countryLst, nationalityLst);
}
Discussion – BuildCountryNationalityLists
The method reads the file and builds two lists. As above, the list numbers below correspond to numbered comments above. The string operators used are ToLower and Split. The three File IO operators are File.OpenText, StreamReader.Peek and StreamRead.ReadLine. By putting this code in a separate method, the main method is simplified and easier to read.
- Build the two empty lists which we will populate and return
- Each list contains an instance of my class ‘
ConsonymWordPair‘
- Each list contains an instance of my class ‘
- NATIONALITY_FILE is defined at the class-level; it is the file name
- The variable
sris a StreamReader that can read a line at a time - The ‘
using‘ keyword guarantees that the stream will be closed and disposed
- The variable
- Read until end-of-file detected
- The StreamReader has a
Peekmethod that returns -1 whenEOFis detected, that terminates mywhile-loop
- The StreamReader has a
- Read the line, convert to lower case, split on tab character. The split operation means that ‘twain’ is an array
- I’m doing 3 things in this line:
var twain = sr.ReadLine().ToLower().Split('\t');
ReadLineshould be obviousToLowerconverts to lower case, so that I won’t try comparing ‘Lbnn’ against ‘lbnn’, because those two strings are not equal!- Split does what it says → it finds the tab character (\t) and splits the line every time it finds it
- The result is an array with two elements:
- Element 0: the country name (everything to the left of the tab)
- Element 1: And the nationality (everything to the right of the tab
- I’m doing 3 things in this line:
- twain[0] is the country name; build a pair with the word and its consonants
- The code below invokes my method
RemoveVowels, passing twain[i] as the inputvar c1 = RemoveVowels(twain[0]);
- For example, if the line was ‘Albania Albanian’
- Then twain[0] is ‘albania’ (note the lowercase ‘a’)
- The output from invoking
RemoveVowelsis ‘lbn’
- The code below invokes my method
- Now do the same for the nationality, which is in twain[1]:
- Following the example above,
twain[1]will be ‘albanian’ - The output from invoking RemoveVowels is ‘lbnn’
- Following the example above,
RemoveVowels Method
This method is really simple, so I won’t bore you with any unnecessary explanation. Here’s the code!
private string RemoveVowels(string input) {
  //StringBuilder is easy to use and a more memory-efficient way to build a string
  var result = new StringBuilder();
  //Declare and initialize the array of char
  var vowels = new[] { 'a', 'e', 'i', 'o', 'u' };
  //Examine each char in the input string
  foreach (var c in input)
    if (!vowels.Contains(c))
      result.Append(c);

  return result.ToString();
}
Class ‘ConsonymWordPair’
internal class ConsonymWordPair {
  //1) My three public properties, the most important part of the class
  public string Consonym { get; set; }
  public string Word { get; set; }
  public string Mate { get; set; }

  //2) Default constructor
  public ConsonymWordPair() {
    Consonym = Word = Mate = "";
  }

  //3) 3-parameter constructor
  public ConsonymWordPair(string newWord, string newConsonym, string newMate) : this() {
    Word = newWord;
    Consonym = newConsonym;
    Mate = newMate;
  }

  public override string ToString() {
    var result = $"{Consonym} - {Word}";
    return result;
  }
}
Discussion – ConsonymWordPair
- My three public properties, the most important part of the class
- The remainder of the class is practically fluff
- As mentioned before, “pair” is not quite accurate any more, but “tuple” is harder to understand
- Default constructor
- Ensures that the public properties are initialized
- 3-parameter constructor
- The constructor used by the caller. Note that it actually invokes the default constructor with the code “
: this()“ - A pattern I try to follow which ensures the code in the default constructor is only written once
- The constructor used by the caller. Note that it actually invokes the default constructor with the code “
One other thing, the ToString method is not invoked when I solve the puzzle – so why did I write it? The answer is that Visual Studio uses it to display the list contents during debug sessions. When I hover my mouse over the pertinent variable (a list), it displays the contents using my method. Note that I built the image above (showing how the two lists are matched against each other) using the Immediate Pane in a debug session. Again, Visual Studio utilized my ToString method to display the data in that pane for me. Kind of the opposite of “immediate pain” 😉.
Lessons Learned
🙎🏼I made one big booboo writing this code: I used .NET’s Except method instead of my current method RemoveVowels. It didn’t work and I was surprised 😒! Except doesn’t work the way I thought it does, and I’ve been using it for years. I sure hope I didn’t create any bugs in production because of this.
Here’s some sample bad code that illustrates how I attempted to use Except:
  var vowels = new[] { 'a', 'e', 'i', 'o', 'u' };
  var twain = new[] {"albania", "albanian"};
  var c1 = twain[0].Except(vowels).Aggregate("", (p,c) => p + c);
  Console.WriteLine(c1);
  var c2 = twain[1].Except(vowels).Aggregate("", (p,c) => p + c);
  Console.WriteLine(c2);
Can you guess what the output is for c2? I’ll keep you in suspense while I explain my code.
- Note that
twain[0]contains the string “albania” - When I invoke
Excepton it, passingvowelsas the input parameter, I get anIEnumerable<char>as the output (something like a list) that looks like the following:- ‘l’
- ‘b’
- ‘n’
- In other words, I get everything except the vowels. Just what we all expected.
- The code fragment
.Aggregate("", (p,c) => p + c)serves to create a string from the IEnumerable; basically it iterates the char elements and uses the+operator to concatenate them into a string
OK, now that I’ve explained how c1 is created, what do you think the value of c2 is? The code is the same for both, except the input for creating c2 is “albanian”. To my surprise, c1 is “lbn”. I expected “lbnn”, i.e. two n’s. .NET dropped one of my n’s.
What happened? Except works on IEnumerables, and I gave it a string, which .NET treated like a list of char. So far, so good. Reading the documentation, it doesn’t say anything about applying the Distinct operator, so all I can guess is that, under set operations, no one cares about preserving duplicates. Yes, I studied Set Theory in college, and I don’t remember anything like that, but it does seem somewhat consistent with how we did things then. So I don’t really know why it behaves that way, but now you know what to expect!
Efficiency Analysis
OK, my data file is only 156 lines long, and the code runs in just 7 milliseconds (according to .NET when running in debug mode, see below).
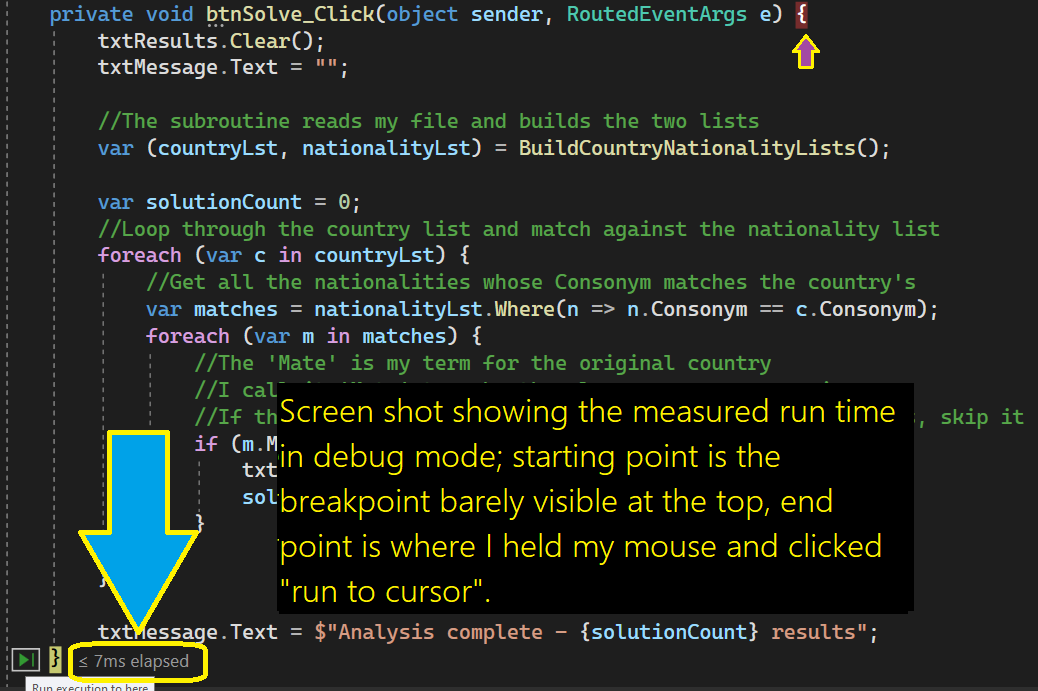
So, I must admit that we don’t care much about whether this code runs in 7 milliseconds, or 500 milliseconds – you’ve already burned thousands of milliseconds reading this😊 But it’s always good to understand the performance of your code, for one reason, it’s interesting!
The algorithm I used runs in O(n2), meaning that it first runs through the main list (the countries) and, for each pass through that list, makes another pass through the other list (nationalities), searching for a match. In this type of analysis, we ignore the fact that the 2nd search/array pass completes in an average of just half the array size; instead we focus on limiting behavior.
For our calculations, each pass in the first list means a pass through the second, so if the first array has length n, then the algorithm runs in n × n passes, or n2.
How to Improve Performance
I could have improved my performance by storing nationalities in a dictionary instead of a list. Note that .NET dictionaries use hashing instead of what I used, namely, a linear search. Hashing is much more efficient because we can determine whether some nationality exists in our dictionary in just O(1) run time, basically one calculation instead of examining the whole list. O(1) is generally the fastest possible run time.
By using a dictionary, my algorithm could have had a run time of O(n). Maybe that would shave a whole millisecond off my run time! I leave it as an exercise for the reader to make those sweet changes. Realistically, the bottleneck for this app is the file I/O, which typically runs 1000 times slower than memory calculations, though that won’t be anywhere near as bad if you have an SSD drive.
Improve Even More?
If we want to get ridiculous and shave off another millisecond, we can parallelize the main loop. That would also require that we use some sort of locking to make sure that different threads don’t update the display simultaneously and interfere with each other; either use of the lock keyword or else Dispatcher.Invoke.
The main loop would look like the following:
Parallel.ForEach(countryLst, (c) => {
  var matches = nationalityLst.Where(n => n.Consonym == c.Consonym);
  foreach (var m in matches) {
    if (m.Mate != c.Mate) {
      Dispatcher.Invoke(() => txtResults.Text += $"{c.Word} - {m.Word}  ({m.Mate})\n");
      solutionCount++;
    }
  }
});
Since my PC has 20 cores, the code above would potentially run 20 times faster than my current main loop. Who knows what amazing things I could do with the time I saved using that technique! Seriously though, parallelization is a powerful tool for tackling certain difficult problems.
Download the Code
Here’s a copy of my code. If you choose to download it, remember to modify the file path (at the top of the code) to reference a location on your computer, not on mine. Here’s a copy of my nationalities file. You will need a free Dropbox account to download.
NPR Puzzle for November 20, 2022
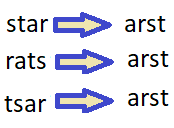
Science Branch with Two Embedded Anagrams
Last week’s challenge came from Henri Picciotto, of Berkeley, Calif. He coedits the weekly “Out of Left Field” cryptic crossword. Name a branch of scientific study. Drop the last letter. Then rearrange the remaining letters to name two subjects of that study. What branch of science is it?
Link to the challenge
General Approach
I elected to use WPF for this one, for one reason, I was in a bit of a hurry, and I’m faster in WPF. Also, WPF is well suited for file handling, unlike web-based solutions, and the code needs to load a file containing English words, as well as a file containing fields of science. Finally, the code is a bit CPU intensive; Python would run slower, and building a nice UI in Python is harder, at least for me!
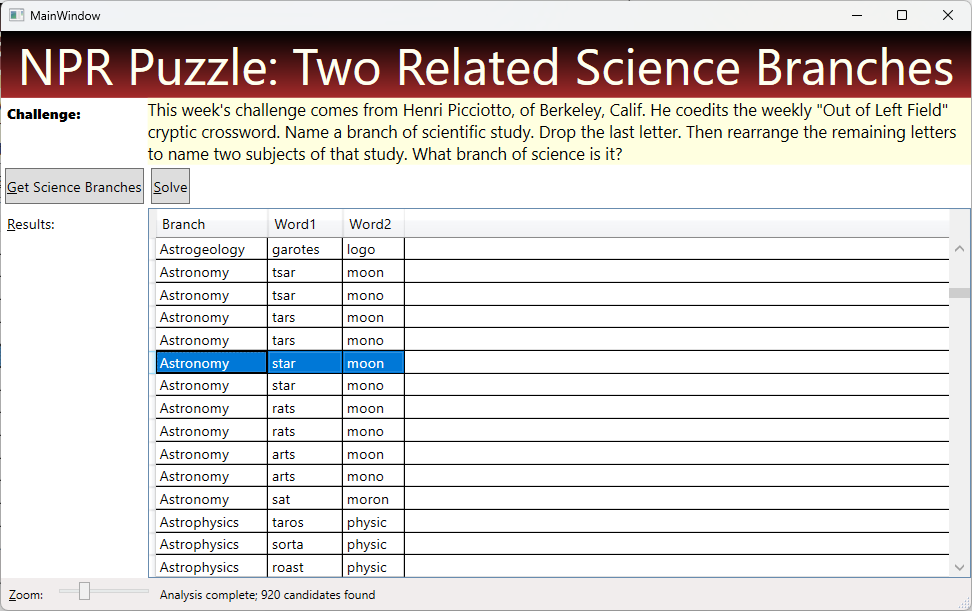
Here’s how my UI looks after clicking the ‘Solve’ button:
Techniques Used
Synopsis
We can get a list of 716 branches of study from Wikipedia. Using HtmlAgilityPack, we can extract the names from the raw HTML on that page. That is the list we will attempt to manipulate, so we need a list of English words, many of which are available on the web (including this one).
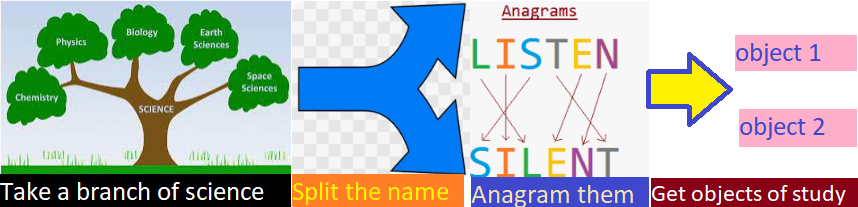
Using those two sources, proceed by first splitting each branch into two parts (after stripping the last letter). Note that each branch can be split at several points, so we use a loop to try every valid split point.
Having split the original, we anagram the two sub-words. To do so, we take advantage of a simple fact relating to anagrams:
Two words are anagrams if their sorted letters are the same
To capitalize on this principle, we build a dictionary, using every word in English, whose keys are the sorted letters, having an associated value composed of the list of words that share those sorted letters. That way, we can easily and efficiently find the anagrams of any word. Here’s what a sample dictionary entry looks like:
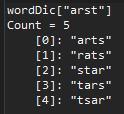
Interpretation: the image above is a screen shot from Visual Studio’s Immediate Pane. It shows the value associated with one particular dictionary key, “arst”, which is a list of 5 words, all of which are anagrams of each other. Just to make it ultra clear, here is the dictionary entry for “mnoo”:
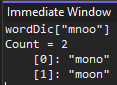
The dictionary will contain 75,818 such entries.
Using the dictionary, we can tell if a candidate has any anagrams by checking if its sorted letters exist in the key. If the key exists, we can get all the anagrams for the candidate by examining the value associated with that key. Remember, each entry in a dictionary is a key/value pair.
So, to recapitulate, we will build a dictionary from all English words, each entry has the sorted letters as the key, and the list of anagrams as the value. We loop through the science branches, splitting each into two candidates. If both candidates are in the dictionary (after sorting their letters), then we have a candidate solution.
Here’s the Code!
To save space, I will omit the part of my code which downloads the list of science branches. But have no fear, you can download all my code and examine it to satisfy your curiosity, using the link at the bottom.
Note that the code below is just an excerpt, representing the most important code. At the point where the excerpt begins, we already have the following variables:
branchList– a list of all 716 branches of science, a simple list of type stringwordDic– a dictionary constructed as described above, using sorted letters as the key to each entry
Obviously, if you want to see the code I haven’t discussed below, you can just download my entire project (link below); I believe the embedded comments in that code should satisfy your curiosity.
Note that each numbered comment in the listing below has a corresponding explanation after the code listing.
//Every candidate solution will go into this collection, which is bound to the display:
var answers = new ObservableCollection<Answer>();
grdResults.ItemsSource = answers;
//The syntax below allows the screen to remain responsive while the algorithm runs
await Task.Run(() => {
  int count = 0;
  foreach (var candidate in branchList) {
    //1) remove the last letter
    var trimmed = candidate.ToLower()[..^1];

    //2) This inner loop tries splits the science branch at all possible points
    //forming two parts, br1 and br2:
    for (var i = 1; i < trimmed.Length - 1; i++) {
      //3) Take the first part of the candidate and sort its letters
      var br1 = trimmed[..i].OrderBy(c => c).Aggregate("", (p, c) => p + c);
      //4) If the sorted letters are in the dictionary, work with
      //the 2nd part of the branch:
      if (wordDic.ContainsKey(br1)) {
        //5) Grab the 2nd part of the branch and sort its letters
        var br2 = trimmed[(i)..].OrderBy(c => c).Aggregate("", (p, c) => p + c);
        //6) If br2 is in the dictionary, we have a potential solution:
        if (wordDic.ContainsKey(br2)) {
          //7) Each entry (the science branch name part) has a list associated with it
	  //(the entry's value); display all combinations from those 2 lists
          foreach (var word1 in wordDic[br1]) {
            foreach (var word2 in wordDic[br2]) {
              var addmMe = new Answer { Branch = candidate, Word1 = word1, Word2 = word2 };
              answers.Add(addmMe);
            }
          }
        }
      }
    }

    //Update the progress bar
    var pct = (int)(100 * count++ / (float)branchList.Count);
    Dispatcher.Invoke(() => prg.Value = pct);
  }
});
Numbered Comment Explanation
var trimmed = candidate.ToLower()[..^1];- Each branch of science in the list is mixed case, so use “
ToLower” to match our dictionary - [..^1] means take a substring starting at the beginning, all the way to 1 before the end
- Each branch of science in the list is mixed case, so use “
for (var i = 1; i < trimmed.Length - 1; i++) {- The variable
icontrols the split point in the candidate; the first eligible position is 1, because we don’t want any zero-length strings. Similarly, the last split point is 1 before the end - For example, the word “astronomy” would be split as 7 different times, once for each pass through the loop, with the split points shown below, as well as the pertinent variables:
- i = 1, a – stronom, br1 = a, br2 = oomnrst
- i = 2, as – tronom, br1 = as, br2 = oomnrt
- i = 3, ast – ronom, br1 = ast, br2 = oomnr
- i = 4, astr – onom, br1 = arst, br2 = oomn
- i = 5, astro – nom, br1 = aorst, br2 = omn
- i = 6, astron – om, br1 = anorst, br2 = mo
- i = 7, astrono – m, br1 = anoorst, br2 = m
- The variable
var br1 = trimmed[..i].OrderBy(c => c).Aggregate("", (p, c) => p + c);- Take the substring ending at position i. Then sort the letters (“
OrderBy“). Note that the result isIEnumerable<char>– basically a list of characters. Now take the result of that operation andAggregateit so we get a string instead of a list of char. - Interpret the aggregation as follows:
- “” (Empty quotes) This is the seed, we start with an empty string and append everything to it
(p,c) =>this introduces the two parameters used in the operation, they represent the previous (p) value and the current valuec. Previous means the string we have built so farp + cWe simply append the current character to the previous value
- The upshot is this code converts a list of char into a string
- Take the substring ending at position i. Then sort the letters (“
if (wordDic.ContainsKey(br1)) {- Test if the sorted letters (
br1) have an anagram by asking the dictionary if it has a corresponding key. This is like asking the dictionary if ‘arst’ has an entry in the key. Remember, ‘arst’ is an anagram of ‘star’.
- Test if the sorted letters (
var br2 = trimmed[(i)..].OrderBy(c => c).Aggregate("", (p, c) => p + c);- Now take the second part of the science branch and do the same thing
- The only thing that is different is how we take the last part of the original, namely,
trimmed[(i)..]
- This means “take a substring starting at position i, up to the very end
if (wordDic.ContainsKey(br2))- Like before, check if the sorted letters “br2” have any anagrams,
- If so, we have a potential solution!
Remember, the list answers is bound to the display grid, so merely adding it causes it to be displayed. It is then up a human to decide whether the displayed anagrams are actually studied as part of the science branch.
Get the Code to Solve the Puzzle
You can download my complete code, including my list of 716 branches of science, here. Note that you will need a DropBox account to use that link, but that is free. Also, you will need a list of English words; you can get one here. You will need to modify your version of the code to reflect the path where you save this file.
Fun With Linq – Solving the Sunday Puzzle
The Challenge
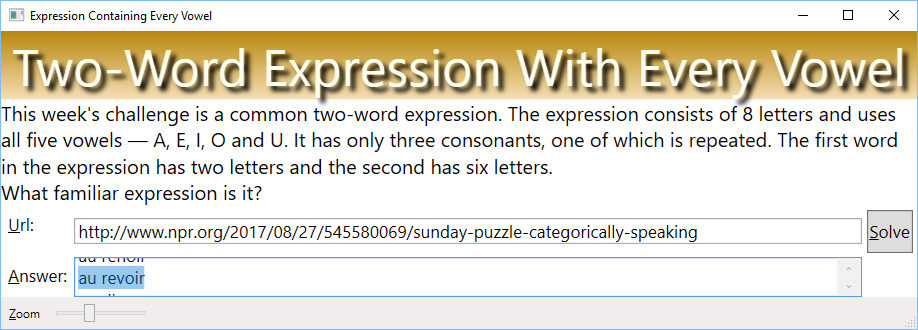
This week’s challenge is a common two-word expression. The expression consists of 8 letters and uses all five vowels — A, E, I, O and U.
It has only three consonants, one of which is repeated. The first word in the expression has two letters and the second has six letters.
Techniques to Solve
- File IO
- Complex dictionaries
- Linq operations, including
- Where
- Aggregate
- Except
- GroupBy
Comments on the Puzzle
That was kind of a tough puzzle! I found some phrase lists on the internet, but they weren’t very big and none of them contained the solution. Out of frustration, I elected to search word lists to construct word pairs that match Will’s description. Even that didn’t work until I get a really big word list that had some French words.
Finally, after plugging in my biggest word list, and manually sifting through 4,403 candidates, I found the answer. While looking at the candidates starting with “au”, something in the back of my mind pulled-up the answer “au revoir” before I actually saw it on screen.
Some Near Misses
I got a kick out of these, which met the rules, but probably aren’t “common expressions”:
- Go, Aussie!
- No Auntie!
- Oi, abuses
- Up roarie
 Overview of The Algorithm
- Open the word list, read every word
- Length == 2 ? add to a list named “twoLetterWords”
- Length == 6 ? Store in a dictionary
- The dictionary uses the word’s vowels as a key,
- Such as key = “eio” for the word “revoir”
- For each key, keep a list of all the 6-letter words that contain those vowels
- So the data type for my dictionary is “Dictionary<string, List> sixLetterWordDic”
- So, under the dictionary key “eio”, I store a list of 1,227 words that use those three vowels, including “revoir”
- The dictionary uses the word’s vowels as a key,
- After building the dictionary and the 2-letter word list
- Iterate all the two-letter words
- Compute the vowels not used in the 2-letter word
- Use them as a key to the dictionary
- Loop through the word list stored under key composed of the remaining vowels
- Apply Will’s criteria “3 consonants, one of which is repeated”
- By using the GroupBy operator
Here’s the Code
private void btnSolveFromWordList_Click(object sender, RoutedEventArgs e) {
   List<string> twoLetterWords = new List<string>();

   //For speed, we look-up words using their vowels as a key
   //For example,
   //  sixLetterWordDic["eio"] = { "belion", "beloid", .... "revoir" }
   //To wit, the key "eio" represents all the vowels EXCEPT "au"
   //  The value is a list of words containing those vowels, 1,227 total, including "revoir"
   Dictionary<string, List<string>> sixLetterWordDic = new Dictionary<string, List<string>>();

   List<string> vowels = new List<string> { "a", "e", "i", "o", "u" };
   //Open the word file and read every line, building the word list and the dictionary
   using (StreamReader sr = new StreamReader(File.OpenRead(WORD_File))) {
    while (sr.Peek() != -1) {
     string aWord = sr.ReadLine().ToLower();
     if (aWord.Length == 6) {
      //Get all the vowels in the word and concatenate into a string
      string vowelKey = vowels.Where(v => aWord.Contains(v))
            .Aggregate("", (p, c) => p + c);
      if (vowelKey.Length > 0) {
       //Add to the dictionary using the vowels as a key; hopefully it does not need sorting
       if (sixLetterWordDic.ContainsKey(vowelKey))
        sixLetterWordDic[vowelKey].Add(aWord);
       else
        sixLetterWordDic.Add(vowelKey, new List<string> { aWord });
      }
     } else if (aWord.Length == 2 && !twoLetterWords.Contains(aWord))
      twoLetterWords.Add(aWord);
    }
   }

   //Now that we have the word list and dictionary, loop through seeking
   //a solution:
   int word2Count = 0;
   foreach (string aWord in twoLetterWords) {
    //Get just the vowels; for examle, if the word is "of", then foundVowels will be { "o }
    List<string> foundVowels = vowels.Where(v => aWord.Contains(v)).ToList();

    if (foundVowels.Count > 0) {
     //get all the vowels NOT used in foundVowels
     string remaining = vowels.Except(foundVowels)
            .Aggregate("", (p, c) => p + c);
     if (sixLetterWordDic.ContainsKey(remaining)) {
      foreach (string partner in sixLetterWordDic[remaining]) {
       //We know there should be two distinct consonants, and one of them is repeated
       //so use GroupBy on the letters.
       var consonantGroups = (aWord + partner)
           .Where(l => "aeiou".IndexOf(l) < 0)
           .GroupBy(l => l);
       if (consonantGroups.Count() == 2 &&
        (consonantGroups.First().Count() == 2 || consonantGroups.Last().Count() == 2)) {
        txtAnswer.Text += aWord + " " + partner + "\n";
        matchCount++;
       }
      }
     }
    }
   }
}
What’s Up with the Dictionary?
My word list is huge – more than 775,000 entries. That results in 54,596 six letter words and 646 2-letter words. I can’t wait around while my code checks every 2-letter word against that huge list of 6-letter words. So I used a dictionary for speed.
The dictionary has a shorter list for every vowel combination. As I mentioned in my code comments, the key “eio” is linked to a list of 1,227 6-letter words. So when I encounter words like “au”, I don’t need to check all 56,596 6-letter words, I only need to check 1,227. So, for just that sample, it runs 46 times faster.
Explain the Aggregate Operation!
I used the Linq operation ‘Aggregate’ a couple of times, like here:
string vowelKey = vowels.Where(v => aWord.Contains(v)) .Aggregate(“”, (p, c) => p + c);
For example, if aWord = “revoir”, then vowelKey will be assigned “eoi”.
Here’s a step-by-step breakdown of what each clause does:
- “Vowels.Where(v => aWord.Contains(v))” means:
- Loop through my list of vowels
- Build a list of each vowel (string) that meats the Where clause
- Namely, if aWord contains that vowel, add it to that list
- If you want to be picky, it is an IEnumerable<string>, not a “list”
- Take the list we just built and pipe it into an aggregate operation
- “Aggregate(“”, (p, c) => p + c)” means:
- “” – The empty quotes represent the seed.
- We add everything else to the seed
- We could have used something else as a seed, like a hyphen
- In which case the result would have been “-eio”, not “eio”
- (p, c) => p + c – perform this operation on every entry in the list
- p represents the accumulated result so far
- c is the current list entry, i.e. a vowel
- In case you didn’t know, the “+” operator concatenates two strings
- So, on the first pass, p == “” and c == “e”
- Second pass, p == “e” and c == “i”
- Third pass, p == “ei” and c == “o”
- “” – The empty quotes represent the seed.
Summary
Linq operators shorten the code quite a bit. The hashing capabilities of the dictionary make the solution run a lot faster.
Get the Code
Here’s a link to my drop box account to download the code and run it yourself (note that DropBox will require you to set-up a free account to get the code). I didn’t include my word list (too big), but you can download it here.
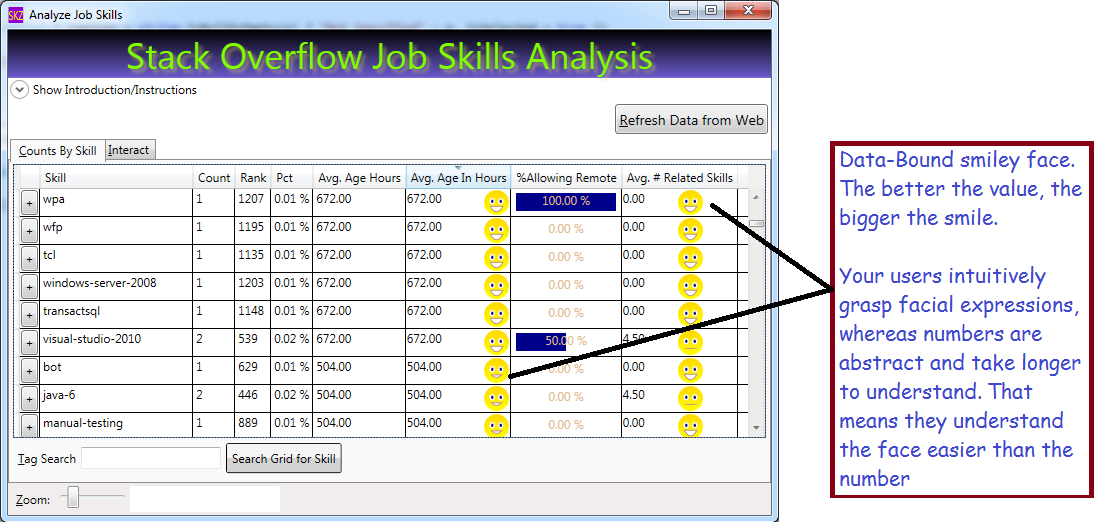
Use a DataBound Smiley Face for Super-Easy Data Comprehension
Humans can understand a smile in a heartbeat, but they need to think to parse a number. You can deal with that by displaying your data with smiley faces. Result: you will put a smile on your users’ faces, making their data easy to understand. By doing so, you’ll reduce your app’s overall costs, because training costs will be lower. Also, your users will get their work done faster when they can understand their data rapidly. For some apps, that speed can make the difference between profit or loss, such as apps used in fast-paced financial markets. If your company is work a meritocracy, you will be rewarded when your reduce costs for your company!

What We Will Use to Build Our Data-Bound Smiley Face
- A WPF UserControl
- WPF Geometry Drawing, including
- EllipseGeometry (to draw the eyes and the face)
- Geometry Path Markup Strings – to draw the smile
- DependencyProperty – we add one to our UserControl to expose our new property ‘SmilePct’
- DataBinding – I’ll share a real pain-saver that will help you bind UserControls in DataGrids
- DataGridTemplateColumn – to host our SmileyFace in our grid
Get Started: Build Your UserControl
Hopefully you already know how to add a UserControl to your project (right-click your project in Solution Explorer, choose, ‘Add’, then pick ‘UserControl’). We will build a user control that has an Image for its XAML (no grid or StackPanel needed). We will draw 3 different parts in our image:
- The Face
- The Smile (data-bound)
- The Eyes
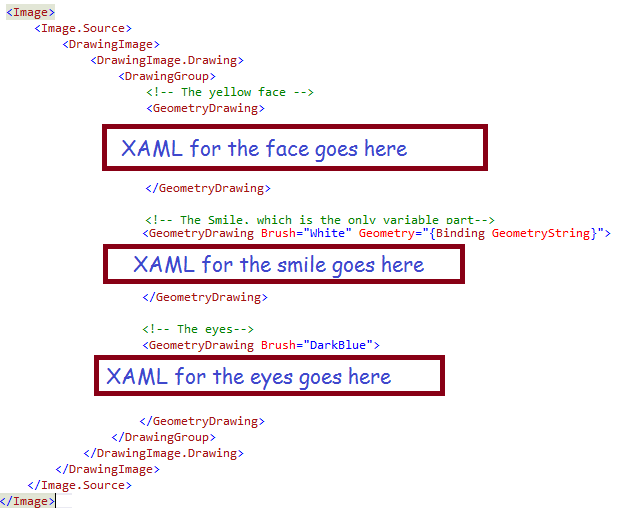
XAML for the Face
For the face, we will use a simple circle (actually an ellipse, but you probably know that a circle is merely a special case of an ellipse) with a gradient background.
<!-- The yellow face -->
<GeometryDrawing>
    <GeometryDrawing.Geometry>
        <!-- Draw the circle, which will represent the face -->
        <EllipseGeometry RadiusX="12.5" RadiusY="12.5" Center="6.25, 6.25"  />
    </GeometryDrawing.Geometry>
    <GeometryDrawing.Brush>
        <LinearGradientBrush EndPoint="0.5,1" StartPoint="0.5,0">
            <GradientStop Color="Gold" Offset="0"/>
            <GradientStop Color="Yellow" Offset="1"/>
        </LinearGradientBrush>
    </GeometryDrawing.Brush>
</GeometryDrawing>
To specify an ellipse, we describe the 1) size and shape using the RadiusX and RadiusY, plus 2) the position using the Center, which is described in Cartesian Coordinates (with the origin in the upper left corner of our Image). So, our face will be 25 pixels high (i.e. double the radius) and 25 pixels wide (double the RadiusX). Since RadiusX and RadiusY are equal, we will have a circle.
XAML for the Smiley
For the smile, we will use a string representation of the drawing to draw an ArcSegment. If you remember your geometry, or if you like to eat pies or pizza, you should already know that the ArcSegment is just the line represented by pizza crust. Basically a chunk of curve ripped out of a circle or, in the general case, an ellipse. We will build the geometry string in code; a sample geometry string looks like this: “M 0,10 A 10,25 0 0 0 12.5,10 Z”. I will explain how they work shortly; first, let’s look at the smiley XAML:
 <!-- The Smile, which is the only variable part-->
≶!-- The data binding will get the geometry from our code behind -->
 <GeometryDrawing Brush="White" Geometry="{Binding GeometryString}">
     <GeometryDrawing.Pen>
         <Pen Brush="RosyBrown" Thickness="1" />
     </GeometryDrawing.Pen>
 </GeometryDrawing>
It looks like not much is happening; that is because all the work is done via the Geometry property, which is bound to our code-behind. You can see the white brush, which is used for filling-in the teeth, and the pen (RosyBrown) which draws the lips. The shape of the lips is controlled via data binding, using a class property which I set in code. I will explain the Geometry string after explaining the XAML for the eyes. One further point: until now, I have not mentioned the data source I am binding to; in this case, I am binding to my own code-behind. I omitted that code until now (for clarity). To use your own code-behind for data binding, simply use the markup shown here to declare your UserControl:
XAML for the Eyes
For the eyes, we will draw two ellipses. They are similar to the face; their RadiusY is slightly larger than their RadiusX, to make them taller than wide, and they user different colors than the face.
<!-- The eyes-->
<GeometryDrawing Brush="DarkBlue">
    <GeometryDrawing.Pen>
        <Pen Brush="White" Thickness="1.5" />
    </GeometryDrawing.Pen>
    <GeometryDrawing.Geometry>
        <GeometryGroup>
            <!-- Draw 2 ellipses, each slightly taller than wide, for the eyes -->
            <!-- Left eye-->
            <EllipseGeometry RadiusX="2" RadiusY="2.5" Center="2,5" />
            <!-- Right eye-->
            <EllipseGeometry RadiusX="2" RadiusY="2.5" Center="10.5, 5" />
        </GeometryGroup>
    </GeometryDrawing.Geometry>
</GeometryDrawing>
Now, for the UserControl Code-Behind
The code-behind has a simple structure: just two properties:
- The GeometryString property, which tells WPF how to draw the smile, and
- The SmilePct property, which allows the outside world to control the size of our grin. 100% → big smile, while 0% → straight face
You might have noticed from my screen shots that my face never frowns, it just varies from a straight line to a big smile. I did that because, for one reason, it is a little easier, and also because I don’t want any frowns in my apps!
DependencyProperties
OK, I only have two properties, but you should make them be special DependencyProperty instances, because that is what works best with UserControls. DependencyProperties are similar to INotifyPropertyChanged properties, but designed for special situations like UserControls, etc. Here’s a quick tip: Visual Studio will help you stub-out a DependencyProperty if you type the shortcut ‘propdp‘ and hit the tab key. For details, take a look at my Visual Studio Quick Tip on the Snippet Manager. Here’s what my two properties look like:
private static string NO_SMILE = "M 5,12.5 A 10,0 0 0 0 7.5, 12.5 Z";

public string GeometryString {
    get { return (string)GetValue(GeometryStringProperty); }
    set { SetValue(GeometryStringProperty, value); }
}

//Windows stores the property value (for GeometrySttring) on your behalf, so you don't
//declare any variable to hold the value
public static readonly DependencyProperty GeometryStringProperty =
    DependencyProperty.Register("GeometryString", typeof(string),
	typeof(DataBoundSmiley), new PropertyMetadata(NO_SMILE));


public double SmilePct {
    get { return (double)GetValue(SmilePctProperty); }
    set { SetValue(SmilePctProperty, value); }
}

//Note the callback referenced below, 'OnSmileyPctChanged'
public static readonly DependencyProperty SmilePctProperty =
    DependencyProperty.Register("SmilePct", typeof(double),
	typeof(DataBoundSmiley), new PropertyMetadata(0.0, OnSmileyPctChanged));
Where’s the Logic?
I deliberately skipped the complicated part, so that I could emphasize the fact that I only have two properties in my code-behind. All the work happens when the SmilePct is set to a new value, which causes the callback method ‘OnSmileyPctChanged‘ to be invoked. That is where we assign the value for our GeometryString. The geometry string will vary between these two extremes, which I will explain shortly:
- Big Smile = “M 0,10 A 10,25 0 0 0 12.5,10 Z”;
- No Smile = “M 5,12.5 A 10,0 0 0 0 7.5, 12.5 Z”;
Geometry Path String Explanation:
- “M 0,10” means start the drawing at the coordinates (0,10). “M 5,12” means start the drawing at coordinates (5,12.5)
- “A 10,25 0 0 0 12.5,10 Z” defines an ArcSegment, where
- “A” means start the arc
- “10,25” means RadiusX =10,RadiusY =25
- “0 0 0” means: (first zero) rotate 0 degrees; (second zero) IsLargeArc = false; (third zero) means Clockwise = false
- “12.5,10″ means finish the arc at coordinates (12.5,10)
- “Z” means close the arc, i.e. draw a line from the end point to the start point, which, for us, represents the top lip
Besides ArcSegments, you can draw LineSegments, BezierSegments and QuadraticBezierSegments. You can read more about them here: https://msdn.microsoft.com/en-us/library/ms752293(v=vs.110).aspx. So, basically, my method ‘OnSmileyPctChanged’ serves to build a string like either 1) the big smile string listed above, 2) the no smile string, or 3) some arc segment intermediate between them. I’ll list the code here, but leave it to you to figure-out the algebraic computations involved. Remember, my callback is invoked when the SmilePct property is set.
public static void OnSmileyPctChanged(object sender, DependencyPropertyChangedEventArgs e) {
    double theVal = (double)e.NewValue;
    //protect against bad data:
    if (theVal < 0)
        theVal = 0.0;
    else if (theVal > 1.0)
        theVal = 1.0;

    double xInit = 5 - (5.0 * theVal);
    double yInit = 12.5 - (2.5 * theVal);
    double pctHappy = (25 * theVal);
    double xTerm = 7.5 + (5.0 * theVal);
    double yTerm = 12.5 - (2.5 * theVal);
    DataBoundSmiley theInstance = (DataBoundSmiley)sender;
    theInstance.GeometryString = string.Format("M {0}, {1} A 10,{2} 0 0 0 {3},{4} Z",
                                               xInit, yInit, pctHappy, xTerm, yTerm);
}
Final notes on the code-behind: the input parameter ‘sender‘ represents our UserControl; ‘e‘ is the event args, containing the NewValue (for SmilePct) and other info. Since the method is static (required by WPF), we need to set the value of the GeometryString on the specific instance of the control which is identified by the input parameter ‘sender’.
Code-Behind Summary
OK, at this point, I’ve shown you the code to create the UserControl, which is basically just a drawing with three ‘sub’ GeometryDrawing elements. We use ellipses for the face and eyes, and the smile is an ArcSegment which I bind to a DependencyProperty in my code-behind. The property ‘GeometryString’ is set in my method ‘OnSmileyPctChanged’; in that method, I use some algebra to define the ArcSegment corresponding to a big smile for high value of SmileyPct. All told, the control consists of
- 54 lines of XAML, and
- 60 lines of code
Using the Data-Bound Smiley in a DataGrid
I won’t talk about DataGrid basics here, suffice it to say that I will add a template column to my DataGrid to host my smiley UserControl. Actually, I want the single column to display a smiley face and a numeric value, which is easy if I embed a grid inside my template. Here’s the XAML, which I have simplified to only display the grid and the template column:
<DataGrid AutoGenerateColumns="False" Name="grdCountsByTag" IsReadOnly="True"  >
    <DataGrid.Columns>
        <!-- Other columns omitted for brevity. Define a template column here: -->
	<DataGridTemplateColumn Header="Avg. Age In Hours" CanUserSort="True" SortMemberPath="AvgAgeInHours">
            <DataGridTemplateColumn.CellTemplate>
                <DataTemplate>
                    <Grid>
                        <!-- Textblock holds the number -->
                        <TextBlock Text="{Binding AvgAgeInHours, StringFormat=N2}" />
                        <!--Now the smilley; note the data binding, which was tricky -->
                        <local:DataBoundSmiley Grid.Column="1"
                                               SmilePct="{Binding DataContext.AvgJobAgePct,
                                                          RelativeSource={RelativeSource AncestorType=DataGridRow}}" />
                        <Grid.ColumnDefinitions>
                            <ColumnDefinition />
                            <ColumnDefinition Width="auto" />
                        </Grid.ColumnDefinitions>
                    </Grid>
                </DataTemplate>
            </DataGridTemplateColumn.CellTemplate>
        </DataGridTemplateColumn>
    </DataGrid.Columns>
</DataGrid>
Notes:
The prefix ‘local’ is an XMLNS definition which we place at the top of our form, like this:
The namespace declaration allows us to reference classes from our own project in the XAML. The TextBlock is bound to a separate (but related) column: AvgAgeInHours. The Smiley control is bound to a field named ‘AvgJobAgePct’. The first, AvgAgeInHours, varies between 0 and 672 (usually), while AvgJobAgePct varies between 0 and 1; the two are inversely proportional. The data binding expression also bears notice, as I spent almost as much time on this as the rest of the code. It was a major source of frustration! Some key points:
- A normal control (such as my TextBlock) binds directly to the same data source as the grid
- Maddeningly, custom controls do not, their data source is, AFAIK, themselves
- Which is why I needed to use the RelativeSource syntax to find the data source for the Grid Row hosting our control, i.e.
RelativeSource={RelativeSource AncestorType=DataGridRow} - The DataContex syntax (e.g. ‘DataContext.AvgJobAgePct’) is used to avoid binding to properties of the Grid Row, such as width/height, and instead goes for the data source used to display the row
Summary
The smiley control quickly conveys meaning to your users, making their lives easier. A UserControl is the best way to build a re-usable container to display your data – without it, you would not be able to display smileys for two separate columns. The UserControl I built uses an Image containing a GeometryGroup which, in turn, holds three GeometryDrawings (face, eyes and smile). The Smile is defined in my control’s code-behind as a DependencyProperty; I build it using the syntax for the WPF Path Markup. Specifically, I use it to draw an ArcSegment, whose curve and endpoints vary according to the SmilePct. If you want your users to easily comprehend your data, I recommend you use my data-bound smiley, because users recognize faces with little mental effort. To get download code, you can go to my open source project on CodePlex: http://visualizejobskills.codeplex.com/
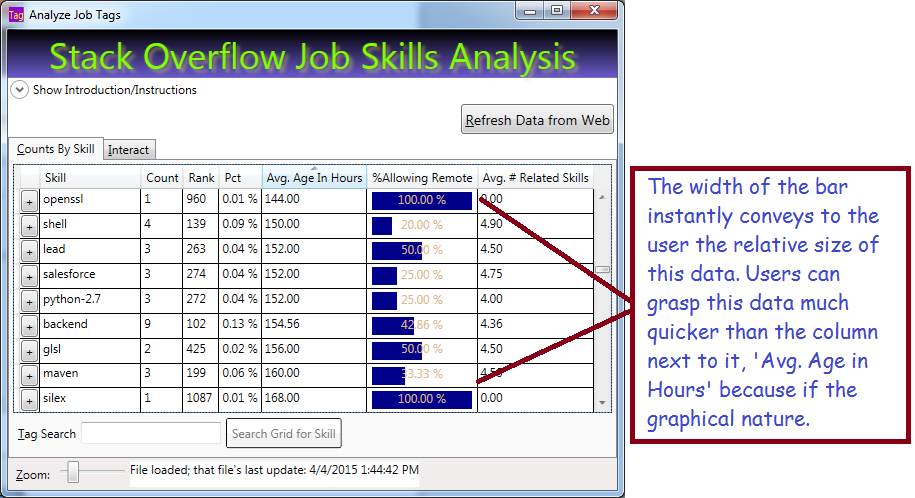
Make Your Data Graphical in WPF
Data Visualization and User Experience (UX) is very important in making your apps easy to use. If your apps are easy to use, they will be cheaper for your employer, because users will require less training and grasp the data faster. Hopefully, that will reflect positively on you too!. In this blog post, I will show a simple way to display a bar graph inside your grid to represent data.
The Basic Ingredients
To make this work, we will use:
- Data Converter which allows the UI to convert a percentage value to a bar-graph width
- DataTemplateColumn in the grid to display the bar graph
- Rectangle, with variable width and colored background, to represent the value. Bind your rectangle width to the value
- Textblock with transparent background to display the numeric value
The Converter
If you work with WPF, you already know that converters are used to bridge the gap between your data and the UI. Your converter will implement the interface IValueConverter; that will allow you to add it as a resource to your page. Basically, you write a bit of code in a simple class, add it as a resource to your page, then reference it in your data binding. Here is the code to write the Converter:
using System;
using System.Windows;
using System.Windows.Data;

namespace CountJobTags {
    public class Pct2WidthConverter : IValueConverter {
        public object Convert(object value,
                             Type targetType,
                             object parameter,
                             System.Globalization.CultureInfo culture) {
            //'value' is PctAllowingRemote'
            if (value is double) {
            //Result will be int between 0 and 100: the width of the rectangle
                return (int)(100 * (double)value);
            }
            return 0;
        }

        //ConvertBack is used for read-write, this is readonly
        public object ConvertBack(object value,
                                  Type targetType,
                                  object parameter,
                                  System.Globalization.CultureInfo culture) {
            return DependencyProperty.UnsetValue;
        }
    }
}
Your UI calls your converter for the PctAllowingRemote value in every grid row. The parameter ‘value’ holds what we bind to in the grid. Don’t worry, this will make more sense shortly.
Reference the Converter in your XAML
Once we have the code class to convert between our value (PctAllowingRemote) and the rectangle width, we need to reference the converter class in our XAML. To do so, we will need:
- Resource
- XMLNS reference to the class namesapce in our XAML, basically a shortcut prefix
Here’s the XAML from the top of my window where I set-up the XMLNS reference (XMLNS == XML NameSpace):
<Window x:Class="CountJobTags.MainWindow"
        xmlns="http://schemas.microsoft.com/winfx/2006/xaml/presentation"
        xmlns:x="http://schemas.microsoft.com/winfx/2006/xaml"
        xmlns:local="clr-namespace:CountJobTags"
        Title="Analyze Job Tags" Height="750" Width="705"
        MinHeight="300" MinWidth="400"
        FocusManager.FocusedElement="{Binding ElementName=btnFetch}"
        DataContext="{Binding RelativeSource={RelativeSource Self}}"
        WindowStartupLocation="CenterScreen" >
Basically, the highlighted code allows me to reference my own code inside the markup, using the prefix ‘local’ in front of any class names I need. ‘CountJobTags’ is the namespace that my class lives in. Relax: the Intellisense will help you write this code if you just type ‘xmlns:’ and pause.
Now, let’s use the prefix ‘Local’ to reference my converter as a resource. We enter the XAML below somewhere on our page. Of course, there are other ways, this is the most straighforward. We’re almost there!
<Window.Resources>
    <!-- Converts percentage to an int between 0 and 100, suitable for binding to a rectangle width to represent a bar graph -->
    <local:Pct2WidthConverter x:Key="widthConverter" />
</Window.Resources>
Define a DataGridTempateDataColumn To Host The Bar
At this point, we have a converter and a means to reference it in our page. Now we need a special column in our grid that will host a Rectangle representing the value as its width. Here’s the simplified DataGrid with our template column, plus another column for comparison:
<DataGrid AutoGenerateColumns="False" Name="grdCountsByTag" IsReadOnly="True" >
    <DataGrid.Columns>

        <!-- Normal column for comparison -->
        <DataGridTextColumn Header="Avg. Age In Hours"
	    Binding="{Binding AvgAgeInHours, StringFormat=N2}" />

        <!-- Template holds rectangle, with variable width,
         and a Textblock for the text -->
        <DataGridTemplateColumn Header="%Allowing Remote"
			CanUserSort="True" SortMemberPath="PctAllowingRemote">
            <DataGridTemplateColumn.CellTemplate>
                <DataTemplate>
                    <Border Width="104" Height="20" >
                        <!-- Grid allows us to put 2 controls -->
                        <Grid>
                 <!--Rectangle has its width bound to the
                 value we display, using the converter! -->
                            <Rectangle Height="18" HorizontalAlignment="Left"
					VerticalAlignment="Center" Fill="DarkBlue"
					Margin="2 0 2 0"
                                Width="{Binding PctAllowingRemote,
					Converter={StaticResource widthConverter}}" />
                         <!-- Display the text; note transparent background color for Textblock
                         Color is chosen to be visible with either light or dark background -->
                            <TextBlock Background="Transparent"
					Foreground="BurlyWood" HorizontalAlignment="Center"
					Text="{Binding PctAllowingRemote, StringFormat=P}" />
                        </Grid>
                    </Border>
                </DataTemplate>
            </DataGridTemplateColumn.CellTemplate>
        </DataGridTemplateColumn>
        <DataGridTextColumn Header="Avg. # Related Skills"
		Binding="{Binding AvgNumRelatedSkills, StringFormat=N2}" />
    </DataGrid.Columns>
</DataGrid>
The XAML above represents the simplified data grid with a normal column for comparison, and a template column which holds the bar. The template holds two controls, a Rectangle with variable width and a Textblock to display the text value. Important: note that both controls are bound to the same value, ‘PctAllowingRemote. The rectangle binds its width to the that value, using the converter we defined above, while the Textblock binds its text.
A couple key points:
- You can place any kind of control in a template column
- Normally you can only have a single direct child control; I used a layout grid (not a DataGrid) as the direct child and the grid will allow multiple child controls
- By giving the Textblock a transparent background, it will appear on top of the rectangle
- The text color is not super nice, but I have little choice because it must be visible with either a light or dark background
- Normal columns allow sorting by default; but note that I had to specifically allow sorting (CanUserSort=”true”) and specify the column to use (please refer to the XAML for details.)
Bind Your DataGrid to an IEnumerable
I bound my entire grid to a List<TagAndCount> in code. Hopefully you already grasp that TagAndCount is a class and each row in the grid represents an instance of that class. Obviously, the class has properties that correspond to the grid columns, such as ‘PctAllowingRemote’. Here’s the code to bind it:
List<TagAndCount> tagList);
//...Write code to build the list, then bind:
grdCountsByTag.ItemsSource = tagList;
Summary
WPF gives you a lot of flexibility on how to display data. You should make your data easy to understand using graphical techniques; that reduces training costs and improves comprehension of your data. Your users will thank you for making the data easier to use!
We displayed our data using a rectangle whose width is bound to the data we are displaying. The rectangle was bound using a reference to a converter class we wrote, which converted a percentage value into a different value between 0 and 100. The rectangle was displayed in DataGridTemplateColumn.
Get the Code
I already hosted this project on Codeplex. Occasionally I update that site and add features, such as my new bar-chart column. You can download the entire project or seem more of the code on line. The project is available here: http://visualizejobskills.codeplex.com/
WPF – Animate Textboxes to Highlight Bad Data
WPF makes extremely good UIs (i.e. easy to use and attactive), but most programmers don’t take advantage of the power at their fingertips. One common scenario is providing immediate feedback when your users mess-up. I like to know immediately, not when I try to click the button to submit. Because I hate it when I don’t realize I made a mistake until long after the fact!

The Technique
- Set-up validation for multiple textboxes with the same code
- Using delegates to reduce your code!
- Build a border animation
- Using a gradient
- Your gradient will use a moving middle stop, generating something like a wiping effect
- Every time the textbox change event fires, call your validation on users’ text;
- If bad, display your fancy animation, and set the tool tip and status bar message
The result looks (IMHO) pretty slick and is hard. I prefer it to the standard technique (IDataErrorInfo) for scenarios when I have several textboxes with the same validation rules, because it is less work overall.
The Fun Part – Animate Your Border!
public static void ReddenTextboxBorder(TextBox txt, MainWindow theMainWindow) {
    //Starting by defining 3 gradient stops; the middle one will move from left to right
    GradientStop stop1 = new GradientStop(Colors.Black, 0);
    GradientStop stop2 = new GradientStop(Colors.Red, 0);

    //Since we created the stop 'on-the-fly', we need to register the name to animate
    theMainWindow.RegisterName("stop2", stop2);
    GradientStop stop3 = new GradientStop(Colors.Black, 1);

    //We will use the brush for the border being animated, tell it all 3 stops:
    LinearGradientBrush gradBrush = new LinearGradientBrush(new GradientStopCollection { stop1, stop2, stop3 });
    txt.BorderBrush = gradBrush;

    //The animation will go from 1% to 99% over .3 second time period:
    DoubleAnimation ani = new DoubleAnimation(.1, .99, new Duration(TimeSpan.FromMilliseconds(300)));
    //When we hit the right border, bounce back to the left again:
    ani.AutoReverse = true;

    //Storyboard helps connect the animation parts
    Storyboard sb = new Storyboard();
    Storyboard.SetTargetName(ani, "stop2");
    Storyboard.SetTargetProperty(ani, new PropertyPath(GradientStop.OffsetProperty));
    sb.Children.Add(ani);

    //After the animation is don, set the border to pure red (no gradient)
    sb.Completed += delegate(object sndr, EventArgs evtArg) { txt.BorderBrush = new SolidColorBrush(Colors.Red); };

    sb.Begin(theMainWindow);
    //By unregistering the name, I release memory and become confident I can re-run without issues
    theMainWindow.UnregisterName("stop2");
}
At this point, we have a method to animate any textbox, so long as it inhabits our main form. It looks cool and tells the user they messed-up with minimal pain. Now, let’s hook-up several textboxes to use our new method:
Connect the Animation to Your Validation
private void SetUpRequiredFieldValidation()
{
    //An array of textboxes which must be populated before user
    //can click the button to do some work
    TextBox[] _RequiredTextBoxes = new[] { txtName,
                         txtAddress,
                         txtCity,
                         txtState,
                         txtZip
                         };

    //Hook-up a TextChanged event for every textbox in the array;
    foreach (TextBox tb in _RequiredTextBoxes)
    {
        //Dynamically declare an event to fire for each textbox using a delegate
        tb.TextChanged += delegate(object sender, TextChangedEventArgs e) {
            //'ValidIdentifier' (omitted for clarity) is my Regular Expression that checks
            //whether the textbox text is valid. You could substitue
            /your own validation logic here, such as 'String.IsNullOrWhitespace(tb.Text)'
            if (Utility.ValidIdentifier.IsMatch(tb.Text))
            {
                //Omitted for clarity - clear the color/tooltip/border thickness etc.
                ResetTextboxBorder(tb);
            }
            else
            {
                tb.BorderThickness = new Thickness(3);
                ReddenTextboxBorder(tb, this);
                tb.ToolTip = "Invalid name";
                //Display some information in the status bar:
                stbMessage.Text = "Learn to type, user!";
            }
        };
    }
}
Here, I build an array containing all the textboxes I wish to validate. I then loop through them, and for each textbox, hook-up a TextChanged event. That event
- Checks if the uers’ text is valid, if so
- Clear any previous effects from the textbox
- Otherwise, animate the border and set the tool tip
Summary
Animation makes your applications easier to use and less frustrating. More importantly, apps with animated feedback require less training. If you have a lot of users, training costs can be significant, so you are really cutting-down on the cost to run your app. Your user manager should love you when you save them costs! Maybe you will be recognized for writing superior code! BTW, you could do this in HTML/ASP or other web technologies, but not as slickly nor as easily! WPF makes vastly superior UIs!
Search Multiple Files with My Speedy Parallel Searcher
Now-a-days, almost every PC has multiple processors. But, your app may not run faster on these boxes, unless you take advantage of parallel programming! Fortunately, .NET makes some things easy with its ‘Parallel.Foreach’. Learn how to make your apps keep-up with the competition with this short and useful sample!
My Need for Speed
Here’s a couple scenarios I have encountered in the past few weeks, I’ll bet you have faced similar challenges:
- I needed to search through a ton of log files, seeking info on missing orders, etc.
- I wanted to find usage examples of a particular data table, in several dozen projects, amounting to thousands of files
My answer: whip-up a quick file searcher! Results: I quickly found the lost orders and figured-out what happened using the log files. Also, I can understand the massive code base I work with because I can quickly find the table usage I need to understand.
What’s that you say – there are free file searchers already available? Well, yes, there are, but
- My version is parallelized, so it is much faster
- There is no licensing issue for mine, and no learning curve
- I can customize mine any time I need to
- I wrote it in just a couple hours
Caveat
Your hardware will heavily impact the speed you experience using my program.
- If, like me, you are lucky enough to have a Solid State Drive, you experience great performance gains
- If you are reading directories off a network drive, you should see performance improve significantly
- However, if you have a normal hard drive, parallel code could actually be slower, because the limiting factor for speed will be your disk head, and parallel algorithm may send your disk head jumping around
In general, the techniques shown here work great for code that is independent of your hardware, such as performing big math computations.
Highlights of My Algorithm
- Parallel.ForEach – allows you to easily do the same thing to every list item
- Interlocked.Increment – allows you to add to a number, thread-safe
- Sample usage of Tuples – pack several variables into a single object
- ObservableCollection – allows you to continually add to a Grid ItemsSource in WPF

The Heart of My Algorithm
//Get all the files matching the pattern (such as *.cs)
//in the specified folder, plus all child folders:
string[] allFiles = Directory.GetFiles(rootFolder,
      filePattern, SearchOption.AllDirectories);

//This will assign a chunk of allFiles to each processor and do the work
//in parallel, greatly improving speed!
Parallel.ForEach(allFiles, curFile => {
  Regex reMatchMe = null;
  if (useRegex) {
    reMatchMe = new Regex(target, RegexOptions.Compiled | RegexOptions.IgnoreCase);
  }
  using (StreamReader sr = File.OpenText(curFile)) {
    int lineNum = 0;
    while (sr.Peek() != -1) {
      string aLine = sr.ReadLine();
      if (useRegex) {
        Match m = reMatchMe.Match(aLine);
        if (m.Success) {
          RecordHit(curFile, lineNum, aLine);
        }
      } else {
        int p = aLine.IndexOf(target, 0, StringComparison.CurrentCultureIgnoreCase);
        if (p >= 0) {
          RecordHit(curFile, lineNum, aLine);
        }
      }

      lineNum++;
    }
    //By using 'Interlocked', I can safely increment the member-variable _FileProg
    //Always use a similar technique when more than one thread changes a variable!
    Interlocked.Increment(ref _FileProg);
    int pct = (int)(100 * ((double)_FileProg / _TotalFiles));
    _Worker.ReportProgress(pct);
  }
});
Explanation
- Get the names of all files matching the users’ pattern,
- Parallel.ForEach takes, as a parameter, an anonymous function (all the code above inside the {} brackets)
- It invokes the code for each file in the array (curFile)
- The main thread waits until all the files have been processed
- I didn’t mention this until now, but in order to keep the main display responsive (and display my progress bar), I run this particular chunk of code in a Background worker thread
- You may have noticed the last line of code above, “_Worker.ReportProgress” – the name of my Background worker is “_Worker”, and this is where I tell the main thread to update my progress bar
Code to Start-Up the Backgroundworker
//Initialize the background worker that does the work. By doing the work
//on a background worker, we allow the main window to continue updating the display
_Worker = new BackgroundWorker();
_Worker.WorkerReportsProgress = true;
//Hook-up to the events
_Worker.DoWork += Worker_DoWork;
_Worker.ProgressChanged += Worker_ProgressChanged;
_Worker.RunWorkerCompleted += Worker_RunWorkerCompleted;

//Use a tuple to pass 4 input parameters to the worker
//The 'Create' method builds a strongly-typed class with whatever values
//you pass - I need to do this because the method (RunWorkerAsync) only accepts
//a single parameter
_Worker.RunWorkerAsync(Tuple.Create(txtFolder.Text, txtFilePattern.Text,
        txtSearchTarget.Text, chkUseRegex.IsChecked ?? false));
Backgroundworker Explanation
- I declared my Backgroundworker (not shown above) as a member-level object
- In the code above, I connected its events (such as Worker_DoWork) to methods in my class (not shown above; download the code to see it).
- For example, “_Worker.ProgressChanged += Worker_ProgressChanged” tells my worker to run that method when its ProgressChanged event is fired
- The worker doesn’t start until I invoke ‘RunWorkerAsync’ (last line above)
- Inside the method ‘Worker_DoWork’, I extract all 4 input parameters from my tuple with the following code:
void Worker_DoWork(object sender, DoWorkEventArgs e) {
    Tuple<string, string, string, bool> args =
                       (Tuple<string, string, string, bool>)e.Argument;
    string rootFolder = args.Item1;
    string filePattern = args.Item2;
    string target = args.Item3;
    bool useRegex = args.Item4;
Continually Updating the Grid with ObservableCollection
If you download and run my code, you see me add results are to my grid as soon they are found; I find this keeps the users happier! A normal list will not tell the grid to update when you add new entries. To keep the users entertained, I use an ObservableCollection, which will tell the grid to update when new items are added/removed. Here’s some code that makes that happen:
//Declare the collection as a member level object:
ObservableCollection<SearchResult> _HitResults;

private void RecordHit(string curFile, int lineNum, string aLine) {
    SearchResult aHit = new SearchResult {
        FileName = System.IO.Path.GetFileName(curFile),
        Path = System.IO.Path.GetDirectoryName(curFile),
        Hit = aLine, LineNumber = lineNum
     };

    //Since _HitResults belongs to the main thread,
    //use the following technique to add to it
    //Basically, invoke the method 'AddToHitResults' on a new thread
    Dispatcher.BeginInvoke(DispatcherPriority.Normal,
                new Action(() => AddToHitResults(aHit)));
}

private void AddToHitResults(SearchResult aHit) {
    //This will appear in the grid immediately:
    _HitResults.Add(aHit);
}
Future work:
Depending on my needs, I may:
- Modify my grid so I can click on a file and open it in a preview window
- Include additional filtering for my results grid to help weed-out matches I don’t care about
NPR Puzzle Solved: 3 Similar Names
That puzzle was the fastest solve ever, I had the whole thing done in less than an hour! Yee-haw! The funny thing is that, just last week, Will actually said that he designs the puzzles to be just as hard to solve manually as with code. But solving this one in code was so easy that perhaps Will didn’t understand what that means…
The Challenge
This week’s challenge comes from listener Matt Jones of Portland, Ore. There are three popular men’s names, each six letters long, that differ by only their first letters. In other words, the last five letters of the names are all the same, in the same order. Of the three different first letters, two are consonants and one is a vowel. What names are these?
Challenge URL: http://www.npr.org/2014/07/27/335590211/a-flowery-puzzle-for-budding-quizmasters
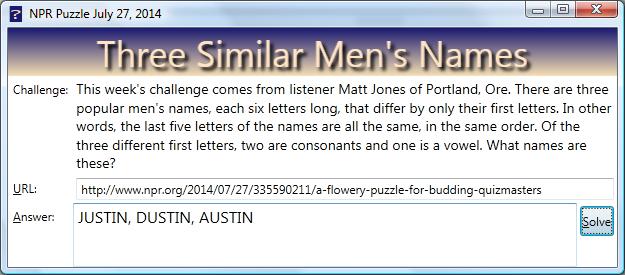
What You Will Learn from Reading!
- Improve your understanding of generic dictionaries in .NET
- Specifically, how dictionary entries can contain complex structures, such as lists
- String manipulation, specifically searching for substrings and extracting them from larger strings
- A sample use of a lambda expression, using the operator ‘Aggregate’, which I use to build a comma-delimited list from a list of string
Solving the Puzzle
I have a file of the to 1,219 most common boy’s names, and was able to use it to find the three forming the solution. Sorry, I don’t remember where I got it; I thought it was from the Census Bureau, but now I can’t find it on their site. Using that file,
- Build a dictionary to hold candidate names
- Open the file of names for reading
- Examine every name whose length is 6
- Extract the last 5 letters from each name
- Check if the dictionary already has a pre-existing entry, using the last 5 letters of each name as the key
- If so, append the current name to the dictionary entry
- Each entry in the dictionary is a list (because a dictionary can use any data type for the entries)
- But, if the dictionary lacks an entry identified by the current last 5 letters, add one now
- After loading the dictionary,
- Traverse all its entries
- If any entry has exactly 5 names in its list, we have a candidate!
- Check the vowel/consonant counts, if there are 2 consonants, we’ve got a winner
Here’s the heart of the code:
private void btnSolve_Click(object sender, RoutedEventArgs e) {
  Dictionary<string, List<string<< nameDic = new Dictionary<string, List<string<<();

  //Open the file and read every line
  using (StreamReader sr = File.OpenText(NAME_FILE)) {
    while (sr.Peek() != -1) {
      string aLine = sr.ReadLine();
      //Sample lines looks like this:"DUSTIN         0.103 70.278    176"
      //                             "JUSTIN         0.311 49.040     56"
      //                             "AUSTIN         0.044 78.786    301"

      //The name is position 1-15, the other columns are frequency counts and rank

      //Locate the end of the name
      int p = aLine.IndexOf(' ');
      if (p == NAME_LEN) {
        //grab the first 6 characters:
        string aName = aLine.Substring(0, NAME_LEN);
        //Now grab the last 5 letters of the name:
        string last5 = aName.Substring(1);

        //If we already have an entry (grouping) for the last 5 letters, add to the name list:
        if (nameDic.ContainsKey(last5)) {
          nameDic[last5].Add(aName);
        } else {
          //Start a new grouping using the last 5 letters as the key and the full name as the first strin entry
          List<string< nameList = new List<string< { aName };
          nameDic.Add(last5, nameList);
        }
      }
    }
  }

  //Now find groups of names having length 3, such as 'Justin', 'Dustin', 'Austin'
  foreach (KeyValuePair<string, List<string<< kvp in nameDic) {
    if (kvp.Value.Count == 3) {
      int vowelCount = 0;
      int consonantCount = 0;
      //Get the vowel/consonant counts of the first letters:
      foreach (string aName in kvp.Value) {
        //Binary search returns a non-negative value if it finds a match:
        //In retrospect, a binary search is not appropriate for an array of size 5, but it doesn't hurt
        if (Array.BinarySearch(vowels, aName[0]) <= 0)
          vowelCount++;
        else
          consonantCount++;
      }

      //according to the rules, there should be 1 name starting with a vowel and 2 with consonants:
      if (consonantCount == 2) {
        //We can use a lambda expression to concatenate the list entries with commas
        string combined = kvp.Value.Aggregate("", (p,c) =< p + ", " + c);
        txtAnswer.Text += combined.Substring(2) + "\n";
      }
    }
  }
}
I’ve posted the complete project here if you would like to download it. The code should run in Visual Studio 2010 or higher; you can use the free version of Visual Studio (“Express”) if you like. The data file is included in the zip folder; you can find it in the bin folder.
Users Ignore Instructions? Animate them!
You can imitate Movie makers and get users to read text by animating it. Somehow, the movement and action encourages users to read instructions. But, let’s just animate the instructions the first time they launch; thereafter, the users can just revisit the instructions when they need to. Benefit to you: your users actually read the instructions the first time, so they are less confused and like your app better.
Overview
The text doesn’t dance around, but it is displayed in sequence, as if being typed. I prefer to display whole words at a time, you can also add single letter at a time. In this sample, I will do the following actions in sequence:
- Animate my instruction string using a StringAnimationUsingKeyFrames
- Call attention to the instructions, one last time, by gently pulsing the background color
- Shrink-down the instructions
- Hide the instructions by closing the expander containing them
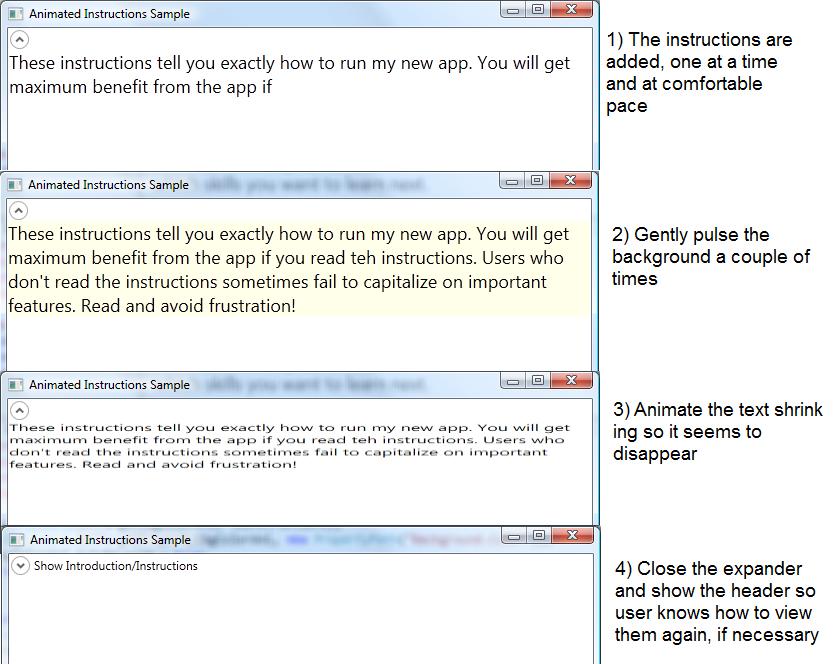
The Animation Will only Run the First Time
The first time it runs, we will try hard to get the user to read the instructions. But the animation takes time, so let them use the expander if they need to read it again.
	if (AnimatedInstructions.Properties.Settings.Default.FirstTime) {
		AnimatedInstructions.Properties.Settings.Default.FirstTime = false;
		AnimatedInstructions.Properties.Settings.Default.Save();
		SetupInstructionAnimation();
	} else {
		expInstructions.Header = "Introduction/Instructions";
		expInstructions.IsExpanded = false;
	}
We will use the .NET properties functionality to record whether this is the first time user has run the app. We update the users’ config file to write ‘false’ to an xml variable called ‘FirstTime’. The method ‘SetupInstructionAnimation’ does the animation, as I am sure you can tell by the name!
Why am I doing this animation in code? You’ll see shortly, but basically, animating the text in XAML requires creating a lot of KeyFrames; it is easier to generate them inside a loop.
The Method ‘SetupInstructionAnimation’ Builds Three Animations
private void SetupInstructionAnimation() {
	Storyboard sb = new Storyboard();
	string instructions = "These instructions tell you exactly how to run my new app. " +
		"You will get maximum benefit from the app if you read the instructions. " +
		"Users who don't read the instructions sometimes fail to capitalize on important " +
		"features. Read and avoid frustration! ";
	StringAnimationUsingKeyFrames stringAni;
	int stringAnilMs;
	BuildInstructionStringAnimation(instructions, out stringAni, out stringAnilMs);
	tbInstructions.BeginAnimation(TextBlock.TextProperty, stringAni);

	//now, a color animation for the background that starts after the string animation completes.
	ColorAnimation bgColorAni = BuildBackgroundColorAnimation(stringAnilMs);

	sb.Children.Add(bgColorAni);

	DoubleAnimation shrinkAni = BuildShrinkInstructionAnimation(stringAnilMs);
	sb.Children.Add(shrinkAni);
	sb.Completed += new EventHandler(Introductory_Animation_StoryBoard_Completed);

	tbInstructions.Loaded += delegate(object sender, RoutedEventArgs e) {
		sb.Begin(this);
	};
}
The first method we invoke is called ‘BuildInstructionStringAnimation’, and does exactly what you would think. The other methods generate the other animations.
The String Animation
We use a StringAnimationUsingKeyFrames to make it look like we are typing the words. To set it up, we specify a “Key Frame” for every step of the animation. In our case, we will create a Key Frame for each word. As I mentioned, you can also provide a frame for every letter, but that didn’t look as nice to me.
private static void BuildInstructionStringAnimation(string instructions,
                    out StringAnimationUsingKeyFrames stringAni, out int ms) {
    stringAni = new StringAnimationUsingKeyFrames();
    ms = 0;
    KeyTime kyTime = new KeyTime();
    int interval = 150;
    int wordIndex = 0;
    wordIndex = instructions.IndexOf(' ');
    while (wordIndex > 0) {
        string aWord = instructions.Substring(0, wordIndex);
        kyTime = TimeSpan.FromMilliseconds(ms);
        if (aWord.EndsWith("?") || aWord.EndsWith(".")) {
            ms += 1250;
        } else {
            ms += interval;
        }
        stringAni.KeyFrames.Add(new DiscreteStringKeyFrame(aWord, kyTime));

        wordIndex = instructions.IndexOf(' ', wordIndex + 1);
    }
    stringAni.Duration = TimeSpan.FromMilliseconds(ms);
}
Note that each word is displayed after a pause of 150 milliseconds, using the variable ‘ms’. Except, after the end of each sentence, we wait 1-1/4 seconds (1250 milliseconds) so the user can read the whole sentence. To find word boundaries in the instruction string, we search for spaces using the ‘IndexOf’ method. Then we use the Substring method to grab all of the instructions up to the current space and build a KeyFrame with it.
Note that we return ms to the caller, because we will use it for the BeginTime of the next animation.
The Remainder of the Code
The rest of the code is fairly standard if you have done any other animation.
private ColorAnimation BuildBackgroundColorAnimation(int ms) {
    ColorAnimation bgColorAni = new ColorAnimation();
    bgColorAni.BeginTime = TimeSpan.FromMilliseconds(ms);

    bgColorAni.From = Colors.White;
    bgColorAni.To = Colors.LightYellow;
    bgColorAni.Duration = TimeSpan.FromSeconds(1);
    bgColorAni.RepeatBehavior = new RepeatBehavior(2);

    Storyboard.SetTarget(bgColorAni, tbInstructions);
    Storyboard.SetTargetProperty(bgColorAni, new PropertyPath("Background.Color"));
    bgColorAni.AutoReverse = true;
    return bgColorAni;
}

private DoubleAnimation BuildShrinkInstructionAnimation(int stringAnilMs) {
    ScaleTransform scale = new ScaleTransform(1.0, 1.0);
    tbInstructions.RenderTransformOrigin = new Point(0, 0);
    tbInstructions.RenderTransform = scale;

    DoubleAnimation shrinkAni = new DoubleAnimation(1.0, 0.35, TimeSpan.FromMilliseconds(500), FillBehavior.Stop);
    shrinkAni.BeginTime = TimeSpan.FromMilliseconds(stringAnilMs + 4000);
    Storyboard.SetTargetProperty(shrinkAni, new PropertyPath("RenderTransform.ScaleY"));
    Storyboard.SetTarget(shrinkAni, tbInstructions);
    return shrinkAni;
}

void Introductory_Animation_StoryBoard_Completed(object sender, EventArgs e) {
    expInstructions.IsExpanded = false;
    expInstructions.Header = "Show Introduction/Instructions";
}
And Finally, the XAML
<Expander Grid.Row="1" Grid.ColumnSpan="3" Name="expInstructions" IsExpanded="True" >
    <TextBlock FontSize="18" Name="tbInstructions" TextWrapping="Wrap" >
        <TextBlock.Background>
            <SolidColorBrush Color="White" />
        </TextBlock.Background>
        These instructions tell you exactly how to run my new app.
        You will get maximum benefit from the app if you read the instructions.
        Users who don't read the instructions sometimes fail to capitalize on important
        features. Read and avoid frustration!
    </TextBlock>
</Expander>
Summary
Easy-to-learn applications are cheaper to maintain! They will generate fewer support calls from confused users. You can help your users learn to run your app by animating the instructions. Your boss and users will like you better for it!
