
Coding Raves
Efficiently Protect Your Company from SQL Injection
Most places I work don’t want to be bothered protecting themselves from hackers, an attitude I find hard to believe given that, almost every day, another company looses mega-bucks after failing to protect themselves.
What you will learn: How to protect yourself against SQL Injection with a few lines of really cool code that runs six times faster than a naive implementation.

Why Don’t Most Folks Protect Themselves?
Most programmers think that hacker attacks are rare, and defending is work, so they’ll hope they get lucky. Sometimes I think they’re just burying their heads in the sand. The problem is, they aren’t thinking about how devastating one lucky hacker attack can be. A hacker attack can easily put a company out of business; just think what would happen if all your credit card info was stolen, or your database backups were destroyed!

The other mistake they make is assuming they are protected by technology X; usually they put all their trust in their firewall or https. Sorry, hackers have defeated those technologies plenty of times. Furthermore, most attacks from from disgruntled former employees or business associates. They already know your passwords, so they use one weak app to get through the fire wall, then exploit their loop hole to attack other apps. Bottom line: the best security is to never assume any technology is foolproof, always use defense-in-depth.
I’ll guarantee that the latest company who got hacked had that attitude; i.e. the guys who screwed-up assumed that they didn’t need to use precautions because technology X was enough.I hope they like sleeping in their cars! I know you don’t like sleeping in your car, so spend some time to prevent a catastrophe.
My Defense Task: Prevent SQL Injection
SQL Injection is when an attacker submits SQL in a string that you use to run as a query. Generally you are vulnerable when you build an ad hoc query and run it against your database. For example, if you append the contents of a textbox to your query, the attacker can turn part of your intended query into a comment and run his query after a truncated version of your query runs. Note: any string from the outside world is a potential threat, even XML from your corporate partners. They could have disgruntled employees, or they could be hacked, or someone could spoof their transmission.
Normally, you can protect yourself by using parameterized queries. My problem: our ERP controls access to our database, and I can’t force it to use parameterized queries. Solution: scrub all input to sanitize SQL key words. For example, if the user input contains the words ‘drop table foo’, you can inject a space, or other character, into either ‘drop’ or ‘table’. In other words, substitute ‘dr op table’ whenever you find ‘drop table’. That way, legitimate text is still readable, but your database won’t run the query.

Scrub Efficiently with Regular Expressions!
Your naive coworker will conduct six different search-and-replace operations. I assert that this is six times too slow. Instead, be smart, use regular expressions: then you can only make one pass through your text!
Naive Approach:
public string SlowScrub(string cleanMe) {
  string result = cleanMe.Replace("Drop Table", "D rop Table")
                         .Replace("Select ", "S elect ")
                         .Replace("Update ", "U pdate ")
                         .Replace("Delete ", "D elete ")
                         .Replace("Insert ", "I nsert")
                         .Replace("Truncate Table ", "T runcate Table ");
  return result;
}
There are three problems with the code above:
- It makes 6 passes through your string, that slows-down your app
- It is case sensitive (and the Replace method won’t allow you to change that problem)
- It won’t catch Truncate Table or Drop Table when split across two lines
Regular Expressions to the Rescue
Here’s how I used a regular expression to make 1 pass through my string. The regular expression is a pattern to replace in the string. I also used a lambda (anonymous function) that .NET executes on every match it finds – how cool is that!
public string ScrubSql(string cleanMe) {
  string pattern = @"(          #Start our capture group
            (?:drop\stable)     #Non-capturing group 1; the word 'drop', space, then 'table'
            |                   #or
            (?:select\s)        #Non-capturing group 2: select' followed by whitespace
            |                   #Or
            (?:update\s)        #Non-capturing group 3; update' followed by whitespace
            |                   #or
            (?:delete\s)        #Non-capturing group 4; 'delete' followed by whitespace
            |                   #or
            (?:insert\s)        #Non-capturing group; the word 'insert' followed by whitespace
            |
            (?:truncate\stable) #'truncate table'
          )";

  string result = Regex.Replace(cleanMe, pattern, (m) => {
                    //This anonymous function is run on every match
                    string danger = m.Groups[1].Value.ToLower();
                    return danger.StartsWith("dr") ? "d rop t able "
                         : danger.StartsWith("s") ? "s elect "
                         : danger.StartsWith("u") ? "u pdate "
                         : danger.StartsWith("de") ? "d elete "
                         : "i nsert";
		 },
		RegexOptions.IgnoreCase | RegexOptions.IgnorePatternWhitespace
		| RegexOptions.Multiline | RegexOptions.Singleline);

  return result;
}
Notes:
- I include comments in my regular expression; that helps make it easier to maintain. # is the comment char
- This only works if I also specify ‘IgnorePatternWhitespace’ and ‘MultiLine’
- My Search Pattern consists of six different choices, the same choices I showed you in my naive implementation.
- The pipe character | means ‘or’ when used in a regular expression; it separates the for choices
- Note that I supply a function (a ‘MatchEvaluator’) that .NET runs for every match it finds
- My MatchEvaluator serves to identify which dangerous text it identified in the input string
- And then it returns an appropriate sanitized string
- Note that I also specified ‘IgnoreCase’
- Also: the RegexOption ‘SingleLine’ is a bit confusing. It basically means “match your text as if it were a single line”, with the effect that, when your pattern seeks 2 words, it will find them even if on separate lines.
Bottom Line
You can easily plug-in my little function to your code. Every string you get from the outside world, use my funciton to scrub that string. The job you save may be your own!
Download the Code!
Simple XPath Usage
If you’re like me, you use a zillion different techniques, but some only rarely. I learned XPath a long time ago, and haven’t used it lately. So, I had to struggle a bit to make it work this time around. To make it easier next time, I’m saving my code where I can find it again quickly. You might find it useful too!
My Task: Extracting Custom Fields from XML
Our ERP allows us to create custom fields, as many as we want; it stores our custom fields in XML format. Here’s a sample, with the fields whimsically renamed to protect everyone’s privacy:
<?xml version="1.0"?>
<ArrayOfEntityPropertyOfString>
	<EntityPropertyOfString>
		<Name>Account Manager</Name>
		<Value>Marge Innovera</Value>
	</EntityPropertyOfString>
	<EntityPropertyOfString>
		<Name>Temporary Housing Provider</Name>
		<Value>Horseshoe Road Inn</Value>
	</EntityPropertyOfString>
	<EntityPropertyOfString>
		<Name>Weight Loss Consultant</Name>
		<Value>Hugh Jazz</Value>
	</EntityPropertyOfString>
	<EntityPropertyOfString>
		<Name>Collection Agent</Name>
		<Value>Amanda Recconwith</Value>
	</EntityPropertyOfString>
	<EntityPropertyOfString>
		<Name>Audiologist</Name>
		<Value>Isabelle Ringing</Value>
	</EntityPropertyOfString>
</ArrayOfEntityPropertyOfString>
My task: extract a couple of these fields and send the values to our eCommerce partner. For example, let’s say I need the name of our Audiologist, ‘Isabelle Ringing’, for our partner. The tool to use is XPath, which is designed for that very purpose. In fact, the XPath query to extract her looks like this:
/ArrayOfEntityPropertyOfString/EntityPropertyOfString[Name=’Audiologist’]/Value
What this XPath query does is:
- Start at the root, represented by the forward slash ‘/’.
- From there, find the child XML node named ‘ArrayOfEntityPropertyOfString‘
- Find a grandchild node named ‘EntityPropertyOfString‘
- With a Name having a value of ‘Audiologist‘
- From that node, descend one more level to the child node ‘Value‘
- Once we have that node, we can extract its inner text, which should be ‘Isabelle Ringing’
For a tutorial on XPath syntax, you could try W3Schools.
Tip: Use Notepad++ Plugins to Get Started
Notepad++ has a ton of useful plugins, you can use the XML tools for building and testing XPath queries. Start by asking it to give you a starter XPath query, as shown in the screen shot below:
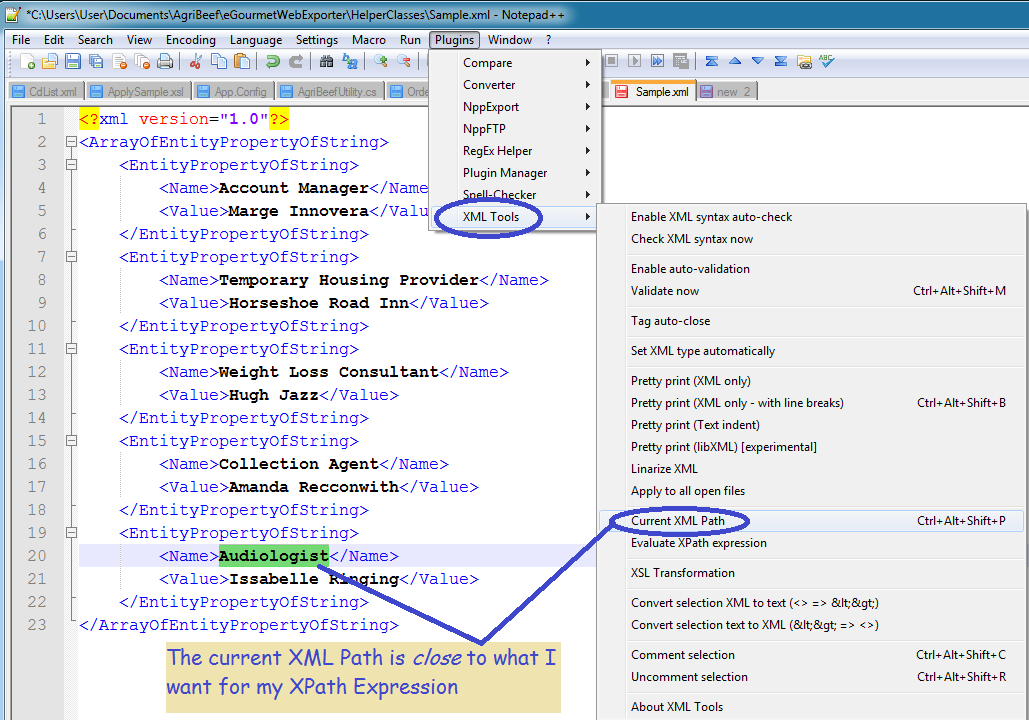
Once you have the XML path, you can modify it to meet your exact needs. If you don’t have the XML Tools Plugin, use the Plugin Manager to download it – the price is free.
Use your XPath Query in Code
I needed different fields from that same XML at different points, so I wrote a routine to extract different field values based on the name. That allowed me to reuse the code a couple times.
using System.Xml;
using System.IO;

public static string ExtractCustomField(string xml, string fieldCaption) {
  string result = "";
  if (!string.IsNullOrWhiteSpace(xml)) {
    string xPath = "/ArrayOfEntityPropertyOfString/EntityPropertyOfString[Name='{0}']/Value";
    string xPathQuery = string.Format(xPath, fieldCaption);
    XmlDocument xDoc = new XmlDocument();
    //We need a stream to load the XML, and StringReader works fine
    StringReader sr = new StringReader(xml);
    xDoc.Load(sr);
    XmlNode targetNode = xDoc.SelectSingleNode(xPathQuery);
    if (targetNode != null) {
      result = targetNode.InnerText;
    }
  }
  return result;
}
And, here is some sample usage:
string xml = ErpGetCustomFieldXml(orderId);
string audiologist = ExtractCustomField(xml, "Audiologist");
string collectionAgent = ExtractCustomField(xml, "Collection Agent");
One more Notepad++ tip: you can use it to test your XPath queries, which is a lot easier than doing so in your code!


Alternate Means to the Same End
I could have done a couple different techniques:
- Regular expression. Problem: each node would require a slightly different regex
- Linq to XML. [Edit: I wasn’t familiar with Linq to XML until now. Having spent a couple hours studying it, it seems somewhat easier than XPath.]
private string ExtractCustomField(string xml, string fieldCaption) {
  XDocument myXDoc = XDocument.Load(new StringReader(xml));
  //Try and get the Audiologist's name
  var matches = from n in myXDoc.Descendants("EntityPropertyOfString")
                where n.Element("Name").Value == "Audiologist"
                select n.Element("Value").Value;

  string result = (matches.Count() > 0)
                ? matches.FirstOrDefault()
                : "";
  return result;
}
Summary
XPath allows you to search for the field you want. If you write a reusable method, you can extract different field values by passing a field name and reuse the same code.
Make Debugging Easier with my Complex Object Visualizer
Use Reflection to Display Complex Objects While Debugging!
Problem: it is hard to inspect complicated objects in the debugger. Lately, I’ve been testing a lot of web services and using complex objects form 3rd party libraries. These objects are big, complicated chunks of data. If you’re like me, you might feel frustrated inspecting them in the debugger. Nested properties can be a pain, especially in huge lists. What I find particularly irritating is, having scrolled deep, deep down into a big nested object, is accidentally clicking away and loosing the whole freakin’ thing! It would be better if I could dump the entire object somewhere like the output window or an unused TextBox. And that’s just what I’ve done!

Reflection to the Rescue
if you’re familiar with the .NET Reflection API, you know that you can use it to examine or manipulate any programming object. I decided to use Reflection to display my complex objects by converting them to a nice, easy-to-read string.

Benefits
If you download my code, compile it into a dll, you can add it to any project. Next time you’re debugging, just use my method to blast your objects into a textbox or the output pane! You get instant visibility into complex, nested objects.
Nuts and Bolts: Reflection Methods that Make it Happen
I used these methods to generate a string representation of arbitrary objects:
- GetValue – retrieves the property value for your class instance, using a PropertyInfo object representing the property in question
- GetFields – I could have used it, but didn’t, because Web Services don’t return objects with fields. But! You can modify my code to do so, if desired.
-
- GetProperties – retrieves all properties for any class type. In the example above, it retrieved, for example, ‘ShipToAddress’, ‘Name’, ‘Street1’, Orders (an array) etc.
‘GetProperties’ returns an array of PropertyInfo objects; each PropertyInfo has
- PropertyType – for example, if the PropertyInfo represents my OrderID, then the PropertyType will be int
- Name – for example, ‘OrderId’
I also used the following property of the ‘Type’ class:
- IsArray – for an arbitrary type, tells you whether it is an array. I think it works for Lists as well, but I didn’t test, because, again, web services return arrays by default, and I’m testing Web Services right now.
Take a Look at the Short, Sweet Code!
// Returns a nice string representation of an arbitrary object, useful for debugging
public static string ComplexObjectToString(object someClassInstance, int indentLevel = 0) {
    StringBuilder sbResult = new StringBuilder();
    Type classType = someClassInstance.GetType();
    PropertyInfo[] allProperties = classType.GetProperties(BindingFlags.Public
                                    | BindingFlags.DeclaredOnly | BindingFlags.Instance);

    //If the current property is an array, loop through each entry and
    //display the member values, indented 4 characters deeper:
    if (someClassInstance is IEnumerable && !(someClassInstance is string)) {
        foreach (var anItem in (IEnumerable)someClassInstance) {
            if (IsNotCoreType(anItem.GetType()))
                sbResult.AppendFormat("{0}", anItem);
            else {
                string theItem = ComplexObjectToString(anItem, indentLevel + 4);
                sbResult.Append(theItem);
            }
            sbResult.AppendLine("---------------------");
        }
    } else {
        string indentSpaces = new string(' ', indentLevel);
        foreach (PropertyInfo pi in allProperties) {
            //Handle arrays and lists:
            if (IsEnumerable(pi.PropertyType)) {
                object subProperty = pi.GetValue(someClassInstance, null);
                sbResult.AppendLine(pi.Name + " items:");
                foreach (var anItem in (IEnumerable)subProperty) {
                    string subProps = ComplexObjectToString(anItem, indentLevel + 4);
                    sbResult.Append(subProps);
                    sbResult.AppendLine(new string(' ', indentLevel) + "------");
                }
            } else if (IsNotCoreType(pi.PropertyType)) {
                //Handle nested complex objects:
                object subProperty = pi.GetValue(someClassInstance, null);
                if (subProperty != null) {
                    sbResult.AppendFormat("{0}{1}:\n", indentSpaces, pi.Name);
                    string subProps = ComplexObjectToString(subProperty, indentLevel + 4);
                    sbResult.Append(subProps);
                }
            } else {
                if (!_UnwantedProperties.Contains(pi.Name)) {
                    //Handle normal properties, using the Name from the PropertyInfo and
                    //GetValue to retrieve each successive value
                    object propVal = pi.GetValue(someClassInstance, null);
                    sbResult.AppendFormat("{0}{1}:\t{2}\n", indentSpaces, pi.Name, propVal);
                }
            }
        }
    }
    return sbResult.ToString();
}

public static bool IsEnumerable(Type theType) {
    return theType.IsArray ||
                    (
                    theType != typeof(string)
                    &&
                    theType.GetInterfaces().Any(t => t == typeof(IEnumerable))
                    );
}

/// <summary>
/// Determines whether a given object is a 'built-in' class, such as int,
/// DateTime, string, etc.
/// </summary>
/// <param name="type">A type which might be a 'built-in' class</param>
/// <returns>True when the class needs to have its properties displayed</returns>
public static bool IsNotCoreType(Type type) {
    return !type.IsPrimitive && !type.ToString().StartsWith("System.");
    //return (type != typeof(object) && Type.GetTypeCode(type) == TypeCode.Object);
}

/// <summary>
/// These properties apply to every class, and I don't want to see them:
/// </summary>
private static string[] _UnwantedProperties = new string[] { "ExtensionData", "IsReadOnly",
                            "IsFixedSize", "IsSynchronized", "Length",
                            "LongLength", "Rank", "SyncRoot" };
}
Put it to Work and Visualize Your Data!
So, download my sample project. Extract the class ‘Utility’ and modify (it if you want). For example, you might want to see private properties or fields in your output (not there in this version); that would be easy for you to plug in. Now, build a class library; compile it to a dll. Add your dll to your project! Next debug session, use my class on your huge object back and spit-it-out into a textbox or the immediate pane of the debugger. Frustration relieved!

Future Directions
- If you’re feeling ambitious, you could adapt my technique to create your own fantastically useful Visual Studio Plug-in! http://msdn.microsoft.com/en-us/vstudio/vextend.aspx
- You could also consider using the Visual Studio T4 code generator in conjunction with the technique demonstrated here. For example, you could use it to generate label/textbox pairs, on-the-fly, for any class T4 Code generation:. http://msdn.microsoft.com/en-us/library/bb126445.aspx
- You could also incorporate it into your logging routines; that would allow you to capture the complete state of an object that might be misbehaving.
Update
I tweaked it some; I enhanced it to handle lists. I also added a universal XML serializer to the project, as part of the download.
Download
Code Link Download: Visualize Complex Objects. Note: recently revised to expose the functionality as a separate project, built as a dll.
ILookup: A Hidden, Powerful Feature of Linq
The ILookup Interface Just Made My Life Easier!
It was a classic case of something that sounded easy to the users, but which was, in reality, somewhat tricky. All right, I admit it, at first I thought would be easy too!
Problem: our ERP sometimes generates two line items for the same product. Actually, it wasn’t a problem until we got a new eCommerce partner and they griped about multiple line items for the same thing. “Your’e making us work too hard here, our warehouse people are getting frustrated when they have to go back to the bin they just visited to pickup something they could have grabbed the first time!”.
Naturally, our business folks wanted to please, so I got my marching orders to “Just consolidate the two line items into one and sum the quantity. It’ll be easy!”. Famous last words.
My first approach was too complicated: use a Linq Groupby clause to grab all the duplicates (along with quantities), then iterate all the line items and, for each item, if my list of duplicates contained the current Product ID, write the first line item with the grand total and suppress all subsequent items. Too complicated, I hope you’re still reading!
Here’s what I ended-up doing with ILookup:
int prodIndex = 0;

//Build the lookup
//Each entry will have the ProductId for the key
//The value is the list of all line items sharing that key!
ILookup<string, LineItem> distinctProductIds = ((IEnumerable)orderHeader.DetailList)
                                               .ToLookup(i => i.ProductID);
result = new ShippingProduct[distinctProductIds.Count()];
//Loop through the distinct ProductIDs:
foreach (var anOrderItem in distinctProductIds)
{
        //Grab the first product that might be duplicated
	LineItem firstInItemGoup = distinctProductIds[anOrderItem.Key].First();
	ShippingProduct curProd = new ShippingProduct();
	curProd.SKU = anOrderItem.Key;
	curProd.Name = firstInItemGoup.Description;
	//Here is where the order gets consolidated
	curProd.Quantity = distinctProductIds[anOrderItem.Key].Sum(i => i.Quantity).ToString();
	//... Copy all other remaining fields

	result[prodIndex++] = curProd;
}
Receiving Order Confirmations
OK, that wasn’t really tricky, but receiving the order confirmations from our eCommerce partner was. Fortunately, I used similar code for that, and that made life easier. One reason for the trickiness: our eCommerce partner doesn’t send the Product ID back to us, just the line item IDs. Also tricky because I had to credit the original order line items with the correct quantity.
ILookup<string, LineItem> ProductIDLookup = detailList.ToLookup(i => i.ProductID);

//Loop through each line item from partner and match, on LineItem ID (LineSeq == ItemNumber) to find a line item in Traverse that matches theirs
foreach (OrdersItem orderLineItem in egOrder.Items)
{
   decimal partnerQty = 0;
   decimal.TryParse(orderLineItem.Shipped, out partnerQty);
   if (partnerQty > 0)
   {
      LineItem curOrderDetail = detailList.FirstOrDefault(dtl => dtl.LineSeq.Value.ToString() == orderLineItem.ItemNumber);
      if (curOrderDetail != null)
      {
         string ProductID = curOrderDetail.ProductID;

         decimal lineItemTotQty = ProductIDLookup[ProductID].Sum(i => i.Quantity);
         if (lineItemTotQty !=partnerQty)
         {
            string msg = string.Format("Quantity shipped by does not match ");
            throw new ApplicationException(msg);
         }

         //There should only be one line item for this ProductID (product id)
         //BUT, if there are duplicates, we will handle them all, so long as we do not exceed the quantity actually shipped by partner
         foreach (LineItem erpLineItem in ProductIDLookup[ProductID].OrderByDescending(l => l.UnitPrice))
         {
            decimal qtyToCredit = erpLineItem.Quantity;
            ReconcileOrder(erpLineItem, qtyToCredit, erpLineItem.TransId);
            partnerQty -= qtyToCredit;
            if (partnerQty <= 0)
               break;
         }
      }
   }
}
Bottom Line
Any time you need to group members of your list on some field, whether it is Product ID, customer ID, zip code, or any other field, and then do something with each little group, the ILookup interface makes your life easier. For starts, building the list is painless. I’m surprised I never knew about it before!
Users Ignore Instructions? Animate them!
You can imitate Movie makers and get users to read text by animating it. Somehow, the movement and action encourages users to read instructions. But, let’s just animate the instructions the first time they launch; thereafter, the users can just revisit the instructions when they need to. Benefit to you: your users actually read the instructions the first time, so they are less confused and like your app better.
Overview
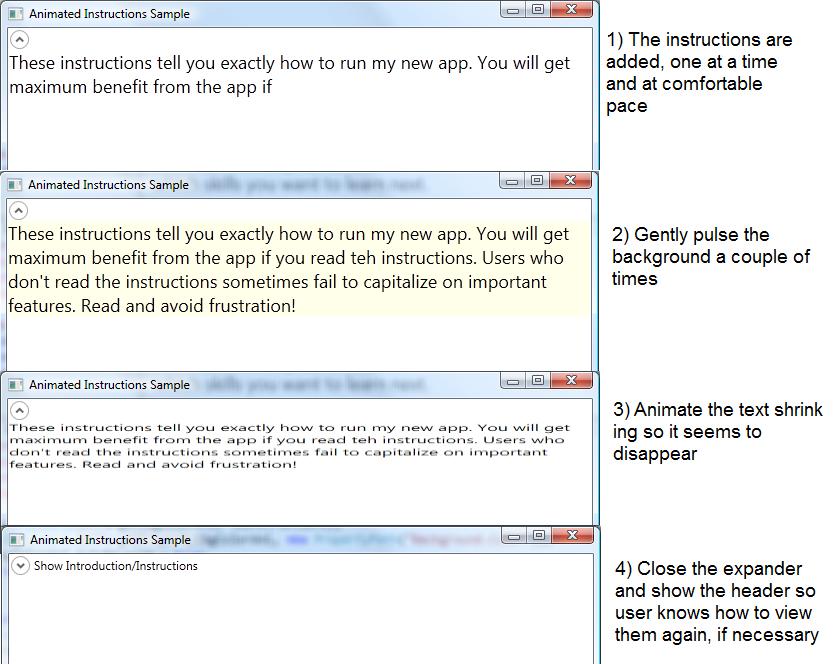
The text doesn’t dance around, but it is displayed in sequence, as if being typed. I prefer to display whole words at a time, you can also add single letter at a time. In this sample, I will do the following actions in sequence:
- Animate my instruction string using a StringAnimationUsingKeyFrames
- Call attention to the instructions, one last time, by gently pulsing the background color
- Shrink-down the instructions
- Hide the instructions by closing the expander containing them
The Animation Will only Run the First Time
The first time it runs, we will try hard to get the user to read the instructions. But the animation takes time, so let them use the expander if they need to read it again.
	if (AnimatedInstructions.Properties.Settings.Default.FirstTime) {
		AnimatedInstructions.Properties.Settings.Default.FirstTime = false;
		AnimatedInstructions.Properties.Settings.Default.Save();
		SetupInstructionAnimation();
	} else {
		expInstructions.Header = "Introduction/Instructions";
		expInstructions.IsExpanded = false;
	}
We will use the .NET properties functionality to record whether this is the first time user has run the app. We update the users’ config file to write ‘false’ to an xml variable called ‘FirstTime’. The method ‘SetupInstructionAnimation’ does the animation, as I am sure you can tell by the name!
Why am I doing this animation in code? You’ll see shortly, but basically, animating the text in XAML requires creating a lot of KeyFrames; it is easier to generate them inside a loop.
The Method ‘SetupInstructionAnimation’ Builds Three Animations
private void SetupInstructionAnimation() {
	Storyboard sb = new Storyboard();
	string instructions = "These instructions tell you exactly how to run my new app. " +
		"You will get maximum benefit from the app if you read the instructions. " +
		"Users who don't read the instructions sometimes fail to capitalize on important " +
		"features. Read and avoid frustration! ";
	StringAnimationUsingKeyFrames stringAni;
	int stringAnilMs;
	BuildInstructionStringAnimation(instructions, out stringAni, out stringAnilMs);
	tbInstructions.BeginAnimation(TextBlock.TextProperty, stringAni);

	//now, a color animation for the background that starts after the string animation completes.
	ColorAnimation bgColorAni = BuildBackgroundColorAnimation(stringAnilMs);

	sb.Children.Add(bgColorAni);

	DoubleAnimation shrinkAni = BuildShrinkInstructionAnimation(stringAnilMs);
	sb.Children.Add(shrinkAni);
	sb.Completed += new EventHandler(Introductory_Animation_StoryBoard_Completed);

	tbInstructions.Loaded += delegate(object sender, RoutedEventArgs e) {
		sb.Begin(this);
	};
}
The first method we invoke is called ‘BuildInstructionStringAnimation’, and does exactly what you would think. The other methods generate the other animations.
The String Animation
We use a StringAnimationUsingKeyFrames to make it look like we are typing the words. To set it up, we specify a “Key Frame” for every step of the animation. In our case, we will create a Key Frame for each word. As I mentioned, you can also provide a frame for every letter, but that didn’t look as nice to me.
private static void BuildInstructionStringAnimation(string instructions,
                    out StringAnimationUsingKeyFrames stringAni, out int ms) {
    stringAni = new StringAnimationUsingKeyFrames();
    ms = 0;
    KeyTime kyTime = new KeyTime();
    int interval = 150;
    int wordIndex = 0;
    wordIndex = instructions.IndexOf(' ');
    while (wordIndex > 0) {
        string aWord = instructions.Substring(0, wordIndex);
        kyTime = TimeSpan.FromMilliseconds(ms);
        if (aWord.EndsWith("?") || aWord.EndsWith(".")) {
            ms += 1250;
        } else {
            ms += interval;
        }
        stringAni.KeyFrames.Add(new DiscreteStringKeyFrame(aWord, kyTime));

        wordIndex = instructions.IndexOf(' ', wordIndex + 1);
    }
    stringAni.Duration = TimeSpan.FromMilliseconds(ms);
}
Note that each word is displayed after a pause of 150 milliseconds, using the variable ‘ms’. Except, after the end of each sentence, we wait 1-1/4 seconds (1250 milliseconds) so the user can read the whole sentence. To find word boundaries in the instruction string, we search for spaces using the ‘IndexOf’ method. Then we use the Substring method to grab all of the instructions up to the current space and build a KeyFrame with it.
Note that we return ms to the caller, because we will use it for the BeginTime of the next animation.
The Remainder of the Code
The rest of the code is fairly standard if you have done any other animation.
private ColorAnimation BuildBackgroundColorAnimation(int ms) {
    ColorAnimation bgColorAni = new ColorAnimation();
    bgColorAni.BeginTime = TimeSpan.FromMilliseconds(ms);

    bgColorAni.From = Colors.White;
    bgColorAni.To = Colors.LightYellow;
    bgColorAni.Duration = TimeSpan.FromSeconds(1);
    bgColorAni.RepeatBehavior = new RepeatBehavior(2);

    Storyboard.SetTarget(bgColorAni, tbInstructions);
    Storyboard.SetTargetProperty(bgColorAni, new PropertyPath("Background.Color"));
    bgColorAni.AutoReverse = true;
    return bgColorAni;
}

private DoubleAnimation BuildShrinkInstructionAnimation(int stringAnilMs) {
    ScaleTransform scale = new ScaleTransform(1.0, 1.0);
    tbInstructions.RenderTransformOrigin = new Point(0, 0);
    tbInstructions.RenderTransform = scale;

    DoubleAnimation shrinkAni = new DoubleAnimation(1.0, 0.35, TimeSpan.FromMilliseconds(500), FillBehavior.Stop);
    shrinkAni.BeginTime = TimeSpan.FromMilliseconds(stringAnilMs + 4000);
    Storyboard.SetTargetProperty(shrinkAni, new PropertyPath("RenderTransform.ScaleY"));
    Storyboard.SetTarget(shrinkAni, tbInstructions);
    return shrinkAni;
}

void Introductory_Animation_StoryBoard_Completed(object sender, EventArgs e) {
    expInstructions.IsExpanded = false;
    expInstructions.Header = "Show Introduction/Instructions";
}
And Finally, the XAML
<Expander Grid.Row="1" Grid.ColumnSpan="3" Name="expInstructions" IsExpanded="True" >
    <TextBlock FontSize="18" Name="tbInstructions" TextWrapping="Wrap" >
        <TextBlock.Background>
            <SolidColorBrush Color="White" />
        </TextBlock.Background>
        These instructions tell you exactly how to run my new app.
        You will get maximum benefit from the app if you read the instructions.
        Users who don't read the instructions sometimes fail to capitalize on important
        features. Read and avoid frustration!
    </TextBlock>
</Expander>
Summary
Easy-to-learn applications are cheaper to maintain! They will generate fewer support calls from confused users. You can help your users learn to run your app by animating the instructions. Your boss and users will like you better for it!
WPF: Animate Your Button’s Enabled/Disabled Event
Probably this sounds really easy. I’ll bet you’re thinking “all you have to do is create a style with an event trigger for the event ‘IsEnabledChanged‘ and plug-in some animation.” Unfortunately, this won’t fly because event triggers only work for routed events, and IsEnabledChanged is not a routed event.
Animation Reduces Confusion for State Changes
Why would you want to animate a button? To call attention to it, so the user realizes they now have the power to do something they didn’t before. Little touches like this can greatly reduce training time for your apps, and generate good will with your users. According to this interview on DotNetRocks, you can reduce the overall cost of your app by 10% – 40% by making it more intuitive this way. (Note that you need to do more than animate just one button!) Back to the correct animation approach. You can’t do it the obvious way, using an event trigger. That leaves you with three approaches:
- Write a data trigger
- Create your own routed event and raise it in code when the button’s IsEnabledChanged event fires
- Create your own ControlTemplate and utilize the VisualStateManager to provide animations
Options one and two have this disadvantage: the animation is not automatic. You have to set some flag in your code to signal to the data trigger that you want the animations to fire, or else raise your custom event. Effectively you would perform two operations in code every time you disable your button (set enabled state, then set the code flag). I like option three, even though it requires more work to set up. After setting up, it is easier to use because the animation happens automatically. Benefit: for big projects, you write the template once and never have to look at again. You also gain the option to customize your button in other ways, which I won’t discuss here. To use VisualStateManager, you create a style with a ControlTemplate, my research has not uncovered any other way. That requires you to custom-build most of your button’s display features. Here is a screen shot of the enabled and disabled states of my sample:

To mimic the normal button appearance, I used two rectangles, one on above the other, generating the button’s appearance. Examine the left above: the dark gray top of the button, comes from one of my rectangles. The black bottom part comes from my other rectangle. The disabled appearance on the right uses the same two rectangles, but the animation changes the colors to White and WhiteSmoke. I supply a ColorAnimation for each rectangle.
You can’t tell from the screen shot, but I elected to send the colors through 3 states to make it obvious something has happened to the button:
- From disabled colors
- Through pale yellow colors
- To enabled colors
Or vice-versa when changing the other way, normal to disabled.
Here is the style that uses the VisualStateManager:
<Style TargetType="Button" x:Key="AnimatedEnableButtonStyle" >
    <Setter Property="Margin" Value="5" />

    <Setter Property="Template">
        <Setter.Value>
            <ControlTemplate TargetType="Button">
                <Border BorderBrush="Black" BorderThickness="1" CornerRadius="2"
                           TextBlock.Foreground="Black"
                           RenderTransformOrigin=".5,.5" Name="theBorder" >
                    <Border.RenderTransform>
                        <TransformGroup>
                            <ScaleTransform x:Name="scaleTransform" />
                        </TransformGroup>
                    </Border.RenderTransform>
                    <Grid >
                        <Grid.RowDefinitions>
                            <RowDefinition />
                            <RowDefinition />
                        </Grid.RowDefinitions>
                        <Rectangle Name="topBackground" Fill="WhiteSmoke"  />
                        <Rectangle Grid.Row="1" Name="bottomBackground"
                                   Fill="LightGray" />
                        <ContentPresenter Grid.RowSpan="2"
                               VerticalAlignment="Center"
                               HorizontalAlignment="Center" Margin="5 0" />
                    </Grid>
                    <VisualStateManager.VisualStateGroups>
                        <VisualStateGroup Name="CommonStates">
                            <VisualState Name="Disabled">
                                <Storyboard>
                                    <ColorAnimation Storyboard.TargetName="topBackground"
                                          Storyboard.TargetProperty="(Rectangle.Fill).(Color)"
                                          To="White" Duration="0:0:.5" />
                                    <ColorAnimation Storyboard.TargetName="bottomBackground"
                                          Storyboard.TargetProperty="(Rectangle.Fill).(Color)"
                                          To="WhiteSmoke" Duration="0:0:0.5" />
                                    <ColorAnimation Storyboard.TargetName="theBorder"
                                          Storyboard.TargetProperty="(TextBlock.Foreground).(Color)"
                                          To="Gray" Duration="0:0:0.5" />
                                </Storyboard>
                            </VisualState>

                            <VisualState Name="Normal">
                                <Storyboard>
                                    <ColorAnimation Storyboard.TargetName="topBackground"
                                          Storyboard.TargetProperty="(Rectangle.Fill).Color"
                                          To="PeachPuff" Duration="0:0:0.5" />
                                    <ColorAnimation Storyboard.TargetName="topBackground"
                                          Storyboard.TargetProperty="(Rectangle.Fill).Color"
                                          BeginTime="0:0:0.5"
                                          To="WhiteSmoke" Duration="0:0:0.5" />

                                    <ColorAnimation Storyboard.TargetName="bottomBackground"
                                          Storyboard.TargetProperty="(Rectangle.Fill).Color"
                                          To="LightYellow" Duration="0:0:0.5" />
                                    <ColorAnimation Storyboard.TargetName="bottomBackground"
                                          BeginTime="0:0:0.5"
                                          Storyboard.TargetProperty="(Rectangle.Fill).(Color)"
                                          To="LightGray" Duration="0:0:0.5" />

                                    <ColorAnimation Storyboard.TargetName="theBorder"
                                          Storyboard.TargetProperty="(TextBlock.Foreground).Color"
                                          To="Black" Duration="0:0:0.5" />

                                    <ColorAnimation Storyboard.TargetName="theBorder"
                                          Storyboard.TargetProperty="BorderBrush.Color"
                                          From="Black" To="DarkBlue"
                                          Duration="0:0:1" AutoReverse="True" />
                                </Storyboard>
                            </VisualState>
                            <VisualState Name="Pressed">
                                <Storyboard>
                                    <DoubleAnimation Storyboard.TargetName="scaleTransform"
                                          Storyboard.TargetProperty="ScaleX"
                                          To=".9" Duration="0" />
                                    <DoubleAnimation Storyboard.TargetName="scaleTransform"
                                          Storyboard.TargetProperty="ScaleY"
                                          To=".9" Duration="0" />
                                </Storyboard>
                            </VisualState>
                        </VisualStateGroup>
                    </VisualStateManager.VisualStateGroups>
                </Border>
            </ControlTemplate>
        </Setter.Value>
    </Setter>
</Style>
Using the control style is pretty simple, but, just to make sure, here is a sample showing how you will use it:
<Button Content="Test Button" Name="btnTest"
            IsEnabled="{Binding ElementName=chkEnabled,Path=IsChecked}"
            Height="30" Margin="5"
            Click="btnTest_Click"
            Style="{StaticResource AnimatedStyle}" />
Dissecting the Style
Note that my control template completely replaces the normal button appearance. Should you desire, you can capitalize on this to make custom buttons, such as round buttons. Note that I define my button using
- A border, with a name
- An empty scale transform, with a name,
- A grid
- Containing two rectangles, each named.
- A content presenter
Tip: provide names (such as for my named border, rectangle and scale transform) to make it easier to specify the target of your animations. As discussed above, my button appearance mimics the standard button, other than the animations. This requires two rectangles, the top and bottom of the button.
My Control States
Note that I have provided animation for three different control states:
- Disabled
- Normal
- Pressed
I’ve looked around for a complete list of states, all I could find was Karen Corby’s Blog post. For normal and disabled states, I provide an ColorAnimation, cycling from dull colors, through pale yellows, to the normal enabled colors. Not that ColorAnimation allows you to specify a BeginTime; that is how you make your colors change through more than one state. For example, you start at the disabled color, use a ColorAnimation to move to a pale yellow, then, start your next animation when the first one ends, using the BeginTime; the effect is one animation starting after the other ends. For the pressed state, I use a scale transform to briefly shrink the button by 10 % (to .9).
Summary
Animations make it apparent to the user that something has changed and reduce training costs, making your app more profitable overall. You use a VisualStateManager inside a ControlTemplate to provide animations for each state (disabled, pressed, normal).
Publish an SSRS Subscription From an Application
Here’s Your Situation:
- You have an SSRS report to publish dailiy, when ready
- And a list of subscribers
- When the key user clicks a button, the subscribers should be emailed their report for the day
Here’s Your Problem:
SSRS doesn’t have an subscription option that works that way. It likes to publish on a schedule, or, if you specify “When the report data is updated on the report server“, it tries to work with a cached version of your report. That wouldn’t work because we couldn’t figure-out how to cache the report when user clicked a button in the application. There is no built-in way to push the subscription from within your application 😦 Naturally, your users can’t figure-out why you can’t do something that ought to be so simple!
Here’s Your Solution:
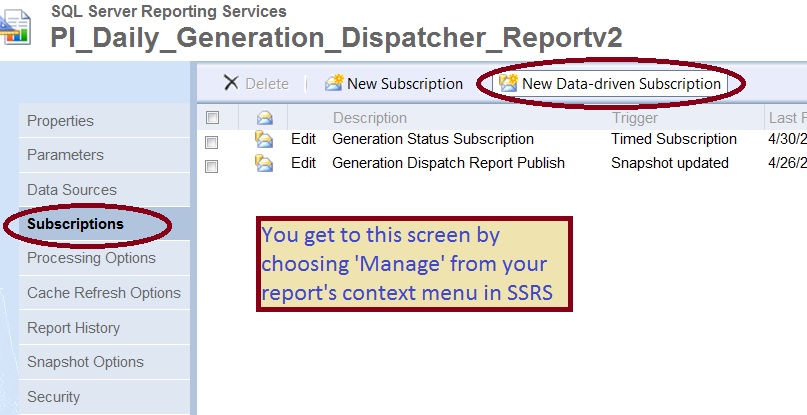
- Create a data-driven subscription for your report
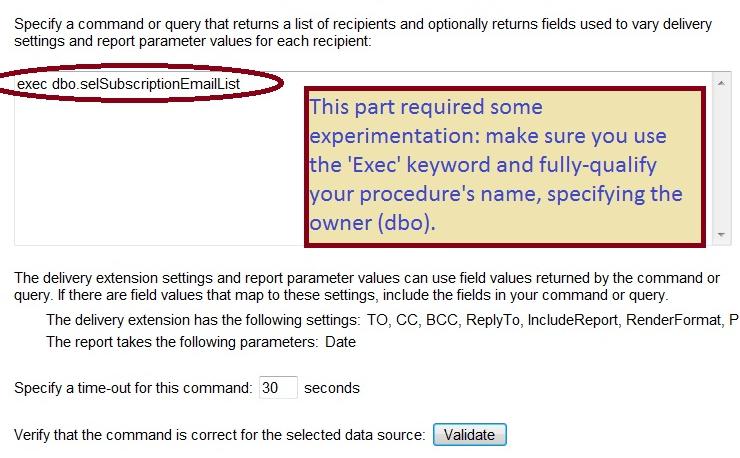
- Key: use a stored procedure as the data source
- Write your stored procedure to not just return data, but also update the database so that, the next time, it won’t return any data. Effectively, it only returns data once per day. (Unless the users want to republish.)
- Key: make sure you “Grant Execute” on your stored procedure to the account running the report. Apparently granting execute privileges to public doesn’t work.
- Key: use the correct syntax to invoke your stored procedure from SSRS (see below)
The Solution Nitty-Gritty
Nitty-Gritty
Write your stored procedure to return the same columns regardless of whether the you want the subscription to be published. However, make sure no rows are returned unless you are ready to publish.
The following stored procedure excerpt assumes you already have a variable named @Midnight containing todays’ date with no time component:
    --This 'if-clause' returns data for today if the SubscriptionSent flag hasn't been set yet
    If Exists (Select  *
		  From	PublishEvent
		  Where	SubscriptionSent = 0
			And
			PublishDate Between @Midnight And DateAdd(dd, 1, @Midnight)
		  )
	Begin
		--Set the flag so it won't happen again
		Update	PublishEvent
		Set		SubscriptionSent = 1
		Where	PublishDate Between @Midnight And DateAdd(dd, 1, @Midnight)

		--Return the list of subscribers
		Select	EmailAddress
		From	EmailNotification
		Where	Active = 1
	End
	Else
	Begin
		--Select an empty list with the same columns as above
		Select	EmailAddress
		From	EmailNotification
		Where	(1 = 0)
	End
Note the ‘where-clause’ for my second select statement – I wrote it so that it never returns any rows. This is necessary to ensure we get the same columns regardless of whether the flag has been set.
Explicitly Grant Permission!
Here’s what I did for my sproc:
Grant Execute on selSubscriptionEmailList to GenDispatchRpt_SSRS_RD
Make sure you revise the permissions if you change the account for the report!
Set-up Your Subscription in SSRS
Examine the screen shots below, which are from SSRS. They skip the easy choices and only illustrate the tricky steps.
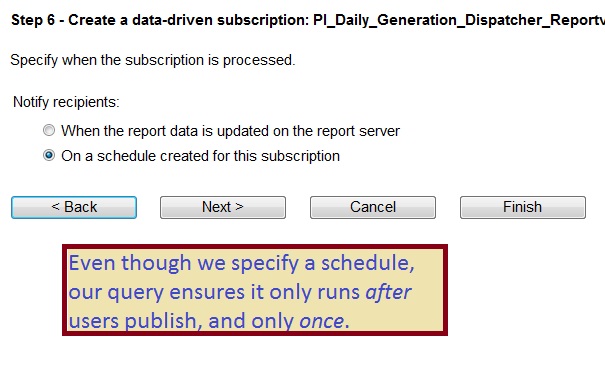

Bottom line: when user clicks the application button, it updates the database, creating an entry for today in our table ‘PublishEvent’. Key point: the flag ‘SubscriptionSent’ is set to false; when SSRS runs, the stored procedure will return a list of email addresses and, as a side-effect, set that field to true. This ensures the subscription only gets published once.
Summary
By using a stored procedure that not only fetches data, but also updates a table as a side effect when it runs, you can make SharePoint check whether it should run every ten minutes, but only publish once per day. The upshot is that your users can trigger the publish event when they are ready, and it won’t publish again until the next day. If you didn’t use the stored procedure this way, you would have to settle for publishing on a fixed schedule regardless of whether the users are ready. With this trick, the users can have the convenience of SharePoint publishing, but under their control. Maybe they’ll finally give you some respect!~
Tuples for Convenience and Speed
Being a smart programmer means knowing when to use the right tool for the job at hand, and when not to use those same tools! In this post I try to be smart about using the Tuple class, illustrated by an example. Possibly you have already encountered Tuples and were wondering when you should use them; I hope my simple example will provide you with some ideas.
My Problem
I want to use a BackgroundWorker and I need to pass it two arguments (for good reasons which divert from my main point, so won’t be explained here). BackgroundWorker has a method ‘DoWork’, but it only accepts one input arugment!
Here are three alternatives we could use to address the problem:
- We could combine our arguments to a single string, thus creating a single
argument. I prefer not because strings are not strongly typed, and
converting back and forth is work I would like to avoid if possible. - We could make a single-use class, create an instance of it, and pass it
to our DoWork method. Again, more work than I wish to perform. - Or, we could use a Tuple to pack our arguments into a single object, as illustrated in the sample below:
        //Pack my variables into a single variable
        var args = Tuple.Create(myTotal, myBoolArg);
        //Kick-off the worker
        _FetchWorker.RunWorkerAsync(args);

        ...
        //Inside the 'DoWork' method, we need to extract
        //our arguments from e.Argument
        void FetchWorker_DoWork(object sender, DoWorkEventArgs e) {

            //Since e.Argument's type is 'object', we need to cast
            //it back to the original type
            Tuple<int, bool> args = (Tuple<int, bool>)e.Argument;
            //Put the arguments into nicely named variables:
            int myTotal = args.Item1;
            bool myBoolArg = args.Item2;
        }
A Couple of Explanatory Notes
Every tuple has properties Item1… Item8, that is, up to 8 items. Every property is strongly-typed, according to this principle: if you put an int in, your tuple gets an int property, if you put a bool in, you get a bool out. The correct property type is created for you, automatically. Whatever type you put in, you get that same type out.
And when I say ‘put it in‘, I mean use the ‘Tuple.Create method’. As many things as you put in (up to 8), that is how many you get out. Simple!
Usage (Abusage?)
Tuples are great for single-use classes. Here is my proposed usage principal: if you use same your tuple in more than two places, then do the work and create a dedicated class instead. Why? Because myClass.Total is more readable than myClass.Item1. ‘Item1’ is generic and requires you to backtrack to understand the purpose, but ‘Total’ is self-explanatory.
This simple sample is just the start, you can use Tuples in many places where you need a quick-and-dirty way to lump data together into a temporary object. Have fun!
Write Reusable Code With Function Pointers – Avoid Repeating Yourself!
I’ve been aware of function pointers for a couple decades now, but they seemed abstract and, well, hard to use. I finally put them to good use in my latest project. My benefits were 1) less repeated code and 2) fixing a bug that resulted from writing (essentially) the same code 10 times, but screwing-up once. Yippee! I got to use a cool feature and make my code better too.
The Problem We Want to Solve: Repeated Code
Imagine this: your project has at least 10 grids to display data which you can also export. Your users all love Excel because they love to analyze their data with fancy statistics. We help the users by allowing them to export their grid data to CSV files, giving them the option to launch in Excel. Since we are considerate coders, we export their data with a nice header section showing details like location, name, date, etc. which is above and beyond the mere row and column data.
So, we wrote 10 custom export functions that have a lot in common. Every function asks our users the same two questions (where to save, whether to launch in Excel), and does the actual work of opening the file and saving user’s data. The only thing different btween the 10 functions is the output header. I hate repeated code (you should too!), so we want a way to consolidate the repeated parts . If only we had a way to write a universal export function with customizable head output!
My solution:
- Write a universal CSV export function
- Which takes a function pointer as input
- That function pointer will control to write each individual header format
What the Heck is a ‘Function Pointer’?
If you read Microsoft documentation, you may never see my term “function pointer”; Microsoft uses the term “delegate”. Since I’m old-fashioned, I have been loosely tossing-around the term “function pointers” because it has the same purpose. Whatever you call it, .NET implements my concept by two techniques:
Core concept: you use either of the things above to create a function variable that you can pass around like any other variable. Sometimes we use the term “first class function” to refer to the idea that you can store, assign, return, etc. these variables. Question: when do you use an Action vs. a Func? Answer: if you need to return a value, use Func, otherwise Action is simpler. Both have variations to allow a lot more parameters (e.g. Action<T1,T2,T3,T4… T16>.
Sample Action<T>:
//Build an action that will write some data to a stream writer 'sw'
 Action<StreamWriter> printFunc = (sw) => {
     sw.WriteLine("Elevation Band:,{0}", _LocationName);
     sw.WriteLine("Date,Value");
     sw.WriteLine("----,-----");
     foreach (TimeSeriesPoint tsp in _ObservedValues) {
         sw.WriteLine("{0},{1}", tsp.TsDate, tsp.TsValue);
     }
 };

// Invoke the function with a stream writer we built somewhere else:
printFunc(someStreamWriter);
The sample shows how to
- Declare a variable “printFunc”
- Which takes an input parameter “sw”, a StreamWriter
- And uses sw to print some class-level variables, namely, ‘_LocationName’ and ‘_ObservedValues’. Don’t worry about what these variables represent, trust me, they are just data and irrelevant to the main concept
- Finally, executing the code is as simple as executing any other function, just type the name (in this case, ‘printFunc’) and pass the parameter
- ← Previous
- 1
- 2
- 3
