
Coding Raves
Make Your Data Graphical in WPF
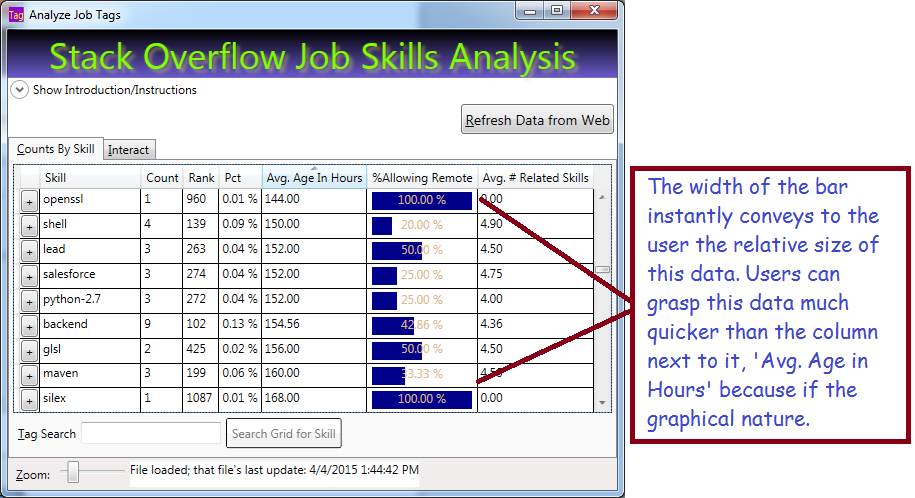
Data Visualization and User Experience (UX) is very important in making your apps easy to use. If your apps are easy to use, they will be cheaper for your employer, because users will require less training and grasp the data faster. Hopefully, that will reflect positively on you too!. In this blog post, I will show a simple way to display a bar graph inside your grid to represent data.
The Basic Ingredients
To make this work, we will use:
- Data Converter which allows the UI to convert a percentage value to a bar-graph width
- DataTemplateColumn in the grid to display the bar graph
- Rectangle, with variable width and colored background, to represent the value. Bind your rectangle width to the value
- Textblock with transparent background to display the numeric value
The Converter
If you work with WPF, you already know that converters are used to bridge the gap between your data and the UI. Your converter will implement the interface IValueConverter; that will allow you to add it as a resource to your page. Basically, you write a bit of code in a simple class, add it as a resource to your page, then reference it in your data binding. Here is the code to write the Converter:
using System;
using System.Windows;
using System.Windows.Data;

namespace CountJobTags {
    public class Pct2WidthConverter : IValueConverter {
        public object Convert(object value,
                             Type targetType,
                             object parameter,
                             System.Globalization.CultureInfo culture) {
            //'value' is PctAllowingRemote'
            if (value is double) {
            //Result will be int between 0 and 100: the width of the rectangle
                return (int)(100 * (double)value);
            }
            return 0;
        }

        //ConvertBack is used for read-write, this is readonly
        public object ConvertBack(object value,
                                  Type targetType,
                                  object parameter,
                                  System.Globalization.CultureInfo culture) {
            return DependencyProperty.UnsetValue;
        }
    }
}
Your UI calls your converter for the PctAllowingRemote value in every grid row. The parameter ‘value’ holds what we bind to in the grid. Don’t worry, this will make more sense shortly.
Reference the Converter in your XAML
Once we have the code class to convert between our value (PctAllowingRemote) and the rectangle width, we need to reference the converter class in our XAML. To do so, we will need:
- Resource
- XMLNS reference to the class namesapce in our XAML, basically a shortcut prefix
Here’s the XAML from the top of my window where I set-up the XMLNS reference (XMLNS == XML NameSpace):
<Window x:Class="CountJobTags.MainWindow"
        xmlns="http://schemas.microsoft.com/winfx/2006/xaml/presentation"
        xmlns:x="http://schemas.microsoft.com/winfx/2006/xaml"
        xmlns:local="clr-namespace:CountJobTags"
        Title="Analyze Job Tags" Height="750" Width="705"
        MinHeight="300" MinWidth="400"
        FocusManager.FocusedElement="{Binding ElementName=btnFetch}"
        DataContext="{Binding RelativeSource={RelativeSource Self}}"
        WindowStartupLocation="CenterScreen" >
Basically, the highlighted code allows me to reference my own code inside the markup, using the prefix ‘local’ in front of any class names I need. ‘CountJobTags’ is the namespace that my class lives in. Relax: the Intellisense will help you write this code if you just type ‘xmlns:’ and pause.
Now, let’s use the prefix ‘Local’ to reference my converter as a resource. We enter the XAML below somewhere on our page. Of course, there are other ways, this is the most straighforward. We’re almost there!
<Window.Resources>
    <!-- Converts percentage to an int between 0 and 100, suitable for binding to a rectangle width to represent a bar graph -->
    <local:Pct2WidthConverter x:Key="widthConverter" />
</Window.Resources>
Define a DataGridTempateDataColumn To Host The Bar
At this point, we have a converter and a means to reference it in our page. Now we need a special column in our grid that will host a Rectangle representing the value as its width. Here’s the simplified DataGrid with our template column, plus another column for comparison:
<DataGrid AutoGenerateColumns="False" Name="grdCountsByTag" IsReadOnly="True" >
    <DataGrid.Columns>

        <!-- Normal column for comparison -->
        <DataGridTextColumn Header="Avg. Age In Hours"
	    Binding="{Binding AvgAgeInHours, StringFormat=N2}" />

        <!-- Template holds rectangle, with variable width,
         and a Textblock for the text -->
        <DataGridTemplateColumn Header="%Allowing Remote"
			CanUserSort="True" SortMemberPath="PctAllowingRemote">
            <DataGridTemplateColumn.CellTemplate>
                <DataTemplate>
                    <Border Width="104" Height="20" >
                        <!-- Grid allows us to put 2 controls -->
                        <Grid>
                 <!--Rectangle has its width bound to the
                 value we display, using the converter! -->
                            <Rectangle Height="18" HorizontalAlignment="Left"
					VerticalAlignment="Center" Fill="DarkBlue"
					Margin="2 0 2 0"
                                Width="{Binding PctAllowingRemote,
					Converter={StaticResource widthConverter}}" />
                         <!-- Display the text; note transparent background color for Textblock
                         Color is chosen to be visible with either light or dark background -->
                            <TextBlock Background="Transparent"
					Foreground="BurlyWood" HorizontalAlignment="Center"
					Text="{Binding PctAllowingRemote, StringFormat=P}" />
                        </Grid>
                    </Border>
                </DataTemplate>
            </DataGridTemplateColumn.CellTemplate>
        </DataGridTemplateColumn>
        <DataGridTextColumn Header="Avg. # Related Skills"
		Binding="{Binding AvgNumRelatedSkills, StringFormat=N2}" />
    </DataGrid.Columns>
</DataGrid>
The XAML above represents the simplified data grid with a normal column for comparison, and a template column which holds the bar. The template holds two controls, a Rectangle with variable width and a Textblock to display the text value. Important: note that both controls are bound to the same value, ‘PctAllowingRemote. The rectangle binds its width to the that value, using the converter we defined above, while the Textblock binds its text.
A couple key points:
- You can place any kind of control in a template column
- Normally you can only have a single direct child control; I used a layout grid (not a DataGrid) as the direct child and the grid will allow multiple child controls
- By giving the Textblock a transparent background, it will appear on top of the rectangle
- The text color is not super nice, but I have little choice because it must be visible with either a light or dark background
- Normal columns allow sorting by default; but note that I had to specifically allow sorting (CanUserSort=”true”) and specify the column to use (please refer to the XAML for details.)
Bind Your DataGrid to an IEnumerable
I bound my entire grid to a List<TagAndCount> in code. Hopefully you already grasp that TagAndCount is a class and each row in the grid represents an instance of that class. Obviously, the class has properties that correspond to the grid columns, such as ‘PctAllowingRemote’. Here’s the code to bind it:
List<TagAndCount> tagList);
//...Write code to build the list, then bind:
grdCountsByTag.ItemsSource = tagList;
Summary
WPF gives you a lot of flexibility on how to display data. You should make your data easy to understand using graphical techniques; that reduces training costs and improves comprehension of your data. Your users will thank you for making the data easier to use!
We displayed our data using a rectangle whose width is bound to the data we are displaying. The rectangle was bound using a reference to a converter class we wrote, which converted a percentage value into a different value between 0 and 100. The rectangle was displayed in DataGridTemplateColumn.
Get the Code
I already hosted this project on Codeplex. Occasionally I update that site and add features, such as my new bar-chart column. You can download the entire project or seem more of the code on line. The project is available here: http://visualizejobskills.codeplex.com/
WPF – Animate Textboxes to Highlight Bad Data
WPF makes extremely good UIs (i.e. easy to use and attactive), but most programmers don’t take advantage of the power at their fingertips. One common scenario is providing immediate feedback when your users mess-up. I like to know immediately, not when I try to click the button to submit. Because I hate it when I don’t realize I made a mistake until long after the fact!

The Technique
- Set-up validation for multiple textboxes with the same code
- Using delegates to reduce your code!
- Build a border animation
- Using a gradient
- Your gradient will use a moving middle stop, generating something like a wiping effect
- Every time the textbox change event fires, call your validation on users’ text;
- If bad, display your fancy animation, and set the tool tip and status bar message
The result looks (IMHO) pretty slick and is hard. I prefer it to the standard technique (IDataErrorInfo) for scenarios when I have several textboxes with the same validation rules, because it is less work overall.
The Fun Part – Animate Your Border!
public static void ReddenTextboxBorder(TextBox txt, MainWindow theMainWindow) {
    //Starting by defining 3 gradient stops; the middle one will move from left to right
    GradientStop stop1 = new GradientStop(Colors.Black, 0);
    GradientStop stop2 = new GradientStop(Colors.Red, 0);

    //Since we created the stop 'on-the-fly', we need to register the name to animate
    theMainWindow.RegisterName("stop2", stop2);
    GradientStop stop3 = new GradientStop(Colors.Black, 1);

    //We will use the brush for the border being animated, tell it all 3 stops:
    LinearGradientBrush gradBrush = new LinearGradientBrush(new GradientStopCollection { stop1, stop2, stop3 });
    txt.BorderBrush = gradBrush;

    //The animation will go from 1% to 99% over .3 second time period:
    DoubleAnimation ani = new DoubleAnimation(.1, .99, new Duration(TimeSpan.FromMilliseconds(300)));
    //When we hit the right border, bounce back to the left again:
    ani.AutoReverse = true;

    //Storyboard helps connect the animation parts
    Storyboard sb = new Storyboard();
    Storyboard.SetTargetName(ani, "stop2");
    Storyboard.SetTargetProperty(ani, new PropertyPath(GradientStop.OffsetProperty));
    sb.Children.Add(ani);

    //After the animation is don, set the border to pure red (no gradient)
    sb.Completed += delegate(object sndr, EventArgs evtArg) { txt.BorderBrush = new SolidColorBrush(Colors.Red); };

    sb.Begin(theMainWindow);
    //By unregistering the name, I release memory and become confident I can re-run without issues
    theMainWindow.UnregisterName("stop2");
}
At this point, we have a method to animate any textbox, so long as it inhabits our main form. It looks cool and tells the user they messed-up with minimal pain. Now, let’s hook-up several textboxes to use our new method:
Connect the Animation to Your Validation
private void SetUpRequiredFieldValidation()
{
    //An array of textboxes which must be populated before user
    //can click the button to do some work
    TextBox[] _RequiredTextBoxes = new[] { txtName,
                         txtAddress,
                         txtCity,
                         txtState,
                         txtZip
                         };

    //Hook-up a TextChanged event for every textbox in the array;
    foreach (TextBox tb in _RequiredTextBoxes)
    {
        //Dynamically declare an event to fire for each textbox using a delegate
        tb.TextChanged += delegate(object sender, TextChangedEventArgs e) {
            //'ValidIdentifier' (omitted for clarity) is my Regular Expression that checks
            //whether the textbox text is valid. You could substitue
            /your own validation logic here, such as 'String.IsNullOrWhitespace(tb.Text)'
            if (Utility.ValidIdentifier.IsMatch(tb.Text))
            {
                //Omitted for clarity - clear the color/tooltip/border thickness etc.
                ResetTextboxBorder(tb);
            }
            else
            {
                tb.BorderThickness = new Thickness(3);
                ReddenTextboxBorder(tb, this);
                tb.ToolTip = "Invalid name";
                //Display some information in the status bar:
                stbMessage.Text = "Learn to type, user!";
            }
        };
    }
}
Here, I build an array containing all the textboxes I wish to validate. I then loop through them, and for each textbox, hook-up a TextChanged event. That event
- Checks if the uers’ text is valid, if so
- Clear any previous effects from the textbox
- Otherwise, animate the border and set the tool tip
Summary
Animation makes your applications easier to use and less frustrating. More importantly, apps with animated feedback require less training. If you have a lot of users, training costs can be significant, so you are really cutting-down on the cost to run your app. Your user manager should love you when you save them costs! Maybe you will be recognized for writing superior code! BTW, you could do this in HTML/ASP or other web technologies, but not as slickly nor as easily! WPF makes vastly superior UIs!
Defensive Coding with Linq and Generic Methods
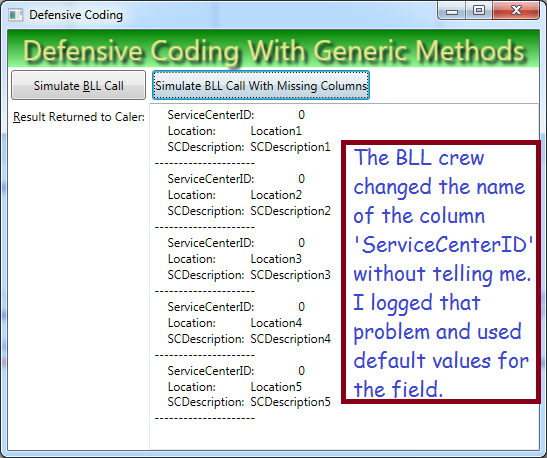
Suppose you work with some off-shore programmers. Also suppose that those off-shore programmers write your BLL (Business Logic Layer) Code. Further, suppose those programmer constantly change your results without telling you. Finally, suppose they give you results in DataTable format, which is completely flexible and not strongly typed, thus making it hard to detect unannounced changes.
Given those assumptions, you’ve got a situation where they break your code all the time and leave you to clean-up the mess. And that is the situation I will address in this post.
Not to slam off-shore programmers per se, but perhaps something about working in a different time zone, in a different culture, makes it more likely they will not understand your needs, even if those needs seem blindingly obvious to you! So, my attitude is, just do the best you can under the circumstances and hope the blame falls on the right shoulders. Defensive coding will help. Even if your teammates work in the cube next to you, that type of coding can help.
What You Will Learn
- How to use Linq (actually Lambda expressions) on DataTables to check for missing columns
- How to use Generic Methods to simplify your logic for extracting data out of a DataTable while checking for misnamed columns
Step One: Check if the Table Returned by the BLL Team has the Columns You Need
If the result set lacks columns we need, we need to log that problem. Also, we should try to work with the data we get and avoid completely crashing. Here is my short-and-sweet method to log missing columns and check how many desired data columns are present in the data we get from the BLL. Basically, I use the ‘Except’ method to compare one list (the expected columns list) against another list (the actual column list in the data table):
public int ColumnMatchCount(DataTable dtReturnTable,
                            List<string> expectedColumnNames,
                            string callingMethod)
{
    //Use the lambda expression 'Except' to determine which columns
    //are not present in the data table provided by BLL
    var unmatched = expectedColumnNames
        .Except(dtReturnTable.Columns.Cast<DataColumn>()
        .Select(c => c.ColumnName));
    foreach (string missingCol in unmatched) {
        //Log the problem column
        _Logger.Log(LogLevel.Error, callingMethod +
                    " - expected BLL to provide column '"
                    + missingCol
                    + "' in the ReturnTable, but it was not present.");
    }
    //Tell the caller how many columns match
    return expectedColumnNames.Count - unmatched.Count();
}
Key point: The data table has a columns collection we can compare using the Except method. Since DataTables are not quite the type of data that works with Linq, we use ‘Cast<DataColumn>() to make ti work. Because DataTables existed before Linq.
In my case, I will give my clients data if at all possible, i.e. if the BLL crew has given me at least one column that matches what they told me they would provide. I’ll provide some sample code shortly, but first, let’s look at my method to get the data out of the data table when the column I expect might not be there.
Step Two: Get Data from the DataTable When a Column is Missing
If the BLL gave me the column I expected, no big deal (of course, I also want to handle possible null values). But, if the column I want is not even present, a default value should be used instead. The method below does that, and it works for any data type, whether string, int, DateTime, etc. Because it is written as a Generic Method, it can handle any data type you provide.
public T CopyValueFromTable<T>(DataRow dr, string columnName)
{
    T result = default(T);
    if (dr.Table.Columns.Contains(columnName) && ! dr.IsNull(columnName))
        result = (T)dr[columnName];
    return result;
}
The method takes a data row as input and examines that DataRow’s parent table.
dr.Table
That table has a Columns collection, and we can check it to see if the column exists or not.
if (dr.Table.Columns.Contains(columnName)
If the BLL crew remembered to give us the column we need, and it it is actually present and not null, then extract it.
dr[columnName]
If you understand Generic Methods, you will recognize that ‘T’ is the data type our caller wants us to use, so we convert the data column to type ‘T’. We cast it to type T using the parenthesis notation; remember that
‘T’ is a placeholder for any type, such as int, string, DateTime, etc.
result = (T)dr[columnName];
The first line in my method ensures that an appropriate default value will be returned if no other choice is available, the ‘default’ method will give us an empty string, a zero, etc., depending on what type is represented by ‘T’:
T result = default(T);
Putting it All Together
private void btnSimulateUnplanedChange_Click(object sender, RoutedEventArgs e) {
    BLL dataFetcher = new BLL();
    //Ask our simulated BLL to get some data, which will lack the column 'ServiceCenterID'
    DataTable ReturnTable = dataFetcher.UnannouncedChange_GetServiceCenters();
    List<string> expectedColumns = new List<string> { "Location",
                                "LocationDescription", "ServiceCenter", "SCDescription" };
    List<InventoryResponse> response = new List<InventoryResponse>();


    //If at least one column name matckes,
    if (ColumnMatchCount(ReturnTable, expectedColumns, "GetResults") > 1) {
        foreach (DataRow dr in ReturnTable.Rows) {
            InventoryResponse invResp = new InventoryResponse();
            invResp.ServiceCenterID = CopyValueFromTable<int>(dr, "ServiceCenterID");
            invResp.Location = CopyValueFromTable<string>(dr, "Location");
            invResp.SCDescription = CopyValueFromTable<string>(dr, "SCDescription");
            response.Add(invResp);
        }
        txtResults.Text = RjbUtilities.DebuggerUtil.ComplexObjectToString(response);
    } else {
        _Logger.Log(LogLevel.Error, "No column names match the expected values");
    }
}
Summary
Sometimes you can’t work with top-quality programmers and possibly they don’t understand the concept of their teammates depending on their code. If you can’t force them to grow-up and communicate, at least you can make sure your code logs the problem and does the best it can with what they give you.
I showed you one method ‘ColumnMatchCount’ that checks how many expected columns are present the results the BLL crew gives you. I showed you another method ‘CopyValueFromTable’ that will provide default values and avoid crashing if the BLL crew renamed a column without telling you.
If you write similar defensive code, you might be lucky and your managers will blame the appropriate people!
Download my sample code here.
Copying with AutoMapper and MemberwiseClone
Copying and cloning is easy, if you know how. Sadly, I’m working on a project where my teammates write many lines of code to accomplish what I can do in just a few. Needless to say, they write tedious and error-prone code that tends to hide their important functionality. If you master a few concepts, you might get some recognition for your superior code, by writing less of that “copying code”!
Note: most of this is pretty straightforward and available elsewhere. However, if you are patient, I will show you how to use AutoMapper for data tables, a concept that I could not easily find on other sites. Besides being a bit tricky, using AutoMapper on tables saves a bunch of code. (Note: AutoMapper is open source and well established.)
Memberwise Clone
If you just want a copy of an object, use MemberwiseClone. Every class implements it by default. At work, one of my teammates has literally written dozens of lines of code to do what this does already; that seems like a big waste of time! (In case you read this, team member, fear not: I have not slammed you at work!)

Sample Code: Memberwise Clone
public class Address {
    public string Line1 { get; set; }
    public string Line2 { get; set; }
    public string Line3 { get; set; }
    public string City { get; set; }
    public string State { get; set; }
    public string Country { get; set; }
    public int DeliveryZone { get; set; }
    public string ZipCode { get; set; }
    public float Latitude { get; set; }
    public float Longitude { get; set; }
    public List<Tenant> Tenants { get; set; }

    public Address Clone() {
        return (Address) this.MemberwiseClone();
    }
}
//Usage:
WCF.Address source= new WCF.Address{ City="Atlantis", ...};
WCF.Address dest = addr1.Clone();
Notes
- MemberwiseClone performs a “shallow clone”
- The new instance is not completely independent form the original
- For example, if I assign addr1.Tenants[0].Name = “Sally”, then addr2 gets its the change too for its first Tenant, i.e. it too is assigned the value “Sally”
- Essentially, the child objects are references to the same memory locations
- If you don’t want this, just implement ‘Clone’ for your child objects! In my example above, I would merely implement Clone on the Tenant class and make use of it in the Address Clone.
AutoMapper
AutoMapper is for when you have similar, not identical classes. AutoMapper:
- Can be set-up with one line of code
- Will copy similarly named properties with no additional input from you
- Can handle dissimilar properties with just a small bit of work from you
One Typical Usage scenario:
- Your DAL teammates use their own classes; they want you to fill them before they give you their results
- You need to take the input you get form your WCF classes, copy it into corresponding DAL classes, then tell them to do the work

The Code
//Properties with different names must be mapped. All others are copied automatically.
Mapper.CreateMap<DAL.Address, WCF.Address>()
      .ForMember(m => m.State, opt => opt.MapFrom(s => s.Province));

//set-up the source
DAL.Address source = new DAL.Address { Line1 = "33 State Str.", Line2 = "#351",
                        City = "Rome", Province = "NY", Country = "USA",
                        DeliveryZone = 3, PostalCode = "11304" };
txtOriginal.Text = RjbUtilities.DebuggerUtil.ComplexObjectToString(source);

//Do the work!
WCF.Address dest = Mapper.Map<WCF.Address>(source);
txtResult.Text = RjbUtilities.DebuggerUtil.ComplexObjectToString(dest);
As you can see, AutoMapper automatically handles at least seven lines of code for you, thus allowing you to spend your attention on more challenging tasks. Now, let’s try something a bit trickier, mapping from DataTables.
Using AutoMapper to Extract Data From DataTables
For whatever reason, all the documentation and samples I found on line didn’t work or else didn’t help. After a few hours of trying variations, here’s a good way to do it. Note: if your DAL gives you DataTables, this can save even more lines of code, . You don’t need to write any loops, and you don’t need to check for nulls.

Here’s the Code
DataTable dt = BuildDummyDataTable();
txtOriginal.Text = DataTableToText(dt);
//Set-up the mapping; I could do it in just one line, except for the Province Column,
//which needs to go into a differently named property
Mapper.CreateMap<IDataReader, WCF.Address>()
       .ForMember(s => s.State, opt => opt.MapFrom(d  => d["Province"]));

//Do the work!
List<WCF.Address> addrLst = Mapper.Map<List<WCF.Address>>(dt.CreateDataReader());
txtResult.Text = RjbUtilities.DebuggerUtil.ComplexObjectToString(addrLst);
Basically, we set-up a mapping between a DataReader and an Address class, then create a DataReader from our DataTable and ask AutoMapper to handle the details. I don’t have to tell you that this saves a lot of work!
Other AutoMapper Features
AutoMapper provides a lot more features, such as null-handling, flattening and projection. I invite you to visit their site for additional info. AutoMapper
Summary
There are many scenarios under which you need to copy objects from one container to another. If you just need a shallow clone, use MemberwiseClone. If you need to copy into a different class, use AutoMapper. You can set-up AutoMapper to work with lists and data tables, which are very common scenarios. At my current gig, I use AutoMapper a lot for communicating with our DAL and for transforming objects to send/receive to other companies via WCF .
Needless to say, you will meet your deadlines faster and write cleaner code when you use these two techniques. When you use them, you can reduce big, long chunks of code into shorter ones. As a result, the non-trivial parts of your code are not buried in humdrum ‘copying code’.
Download: here’s my sample project.
Write a WCF Test App to Connect to Multiple URLs
Scenario: you have deployed your WCF web service to multiple servers, including
- Localhost
- Dev server
- Integration Server
- Training server
- etc.
It would be nice to connect and test to each server with the exact same code! Who wants to write a different app just to connect to a different server with the exact same service.

In the sample above, I get all the available URLs from my config file (in the section “system.serviceModel/Client”). This is convenient if you have established service references in the normal manner. However, it it not necessary to do this.
Part One: Establish a WCF Client/Proxy using a URL Provided at Run Time
We will take advantage of the constructor signature that accepts a URL and a contract. Obviously, the URL will vary according to which server we connect to! If all the servers use the same WSDL, we can use a single contract name; in this case, I use the one from my config file.
public static localInventorySvc.InventorySvcClient BuildClient(string serviceUrl) {
    localInventorySvc.InventorySvcClient result;

    //This is a binding from my config file; it is also possible to
    //construct one in code (but I don't need to)
    string contractName = "BasicHttpBinding_IInventorySvc";

    //The new client/proxy will connect to the URL provided to us:
    result = new localInventorySvc.InventorySvcClient(contractName, serviceUrl);
    return result;
}
At this point, we can just use our client like one we constructed any other way, such as this:
localInventorySvc.InventorySvcClient myClient = BuildClient(cboUrls.Text);
localInventorySvc.GetInventoryDataRequest myRequest = new localInventorySvc.GetInventoryDataRequest();
myClient.getInventoryData(myRequest);
I have simplified the code – I skipped providing the parameters for my request object, but that is rather trivial.
Part Two (Optional) Get URLs from your Config File
Every time you create a new service reference, your config file holds the details, including the URL. This is rather convenient. The only issue is figuring-out the proper syntax to access that data. If you include a using statement for “System.ServiceModel” in your code, you can retrieve a ClientSection object using the configuration manager.
private void Window_Loaded(object sender, RoutedEventArgs e) {
    //Iterate the endoints from the config file and add them to the combo box:
    List<string> allUris = new List<string>();
    ClientSection clientSection;
    //This is the tricky part:
    clientSection = (ClientSection) ConfigurationManager
                    .GetSection("system.serviceModel/client");
    if (clientSection != null) {
        foreach (ChannelEndpointElement ep in clientSection.Endpoints) {
            allUris.Add(((ChannelEndpointElement)ep).Address.AbsoluteUri);
        }
    }
    //Now that we have all the urls, display them in the combo box:
    cboUrls.ItemsSource = allUris;
    if (allUris.Count > 0)
        cboUrls.SelectedIndex = 0;
}
Config File
Here, you can see the two URLs which appear in my combo box; obviously you can add more when you add service references.
<?xml version="1.0" encoding="utf-8" ?>
<configuration>
    <startup>
        <supportedRuntime version="v4.0" sku=".NETFramework,Version=v4.5" />
    </startup>
    <system.serviceModel>
        <bindings>
          <wsHttpBinding>
            <binding name="BasicHttpBinding_IInventorySvc" />
            <binding name="BasicHttpBinding_IInventorySvc1" />
          </wsHttpBinding>
        </bindings>
        <client>
            <endpoint address="http://localhost:49830/InventorySvc.svc"
                  binding="wsHttpBinding"
                  bindingConfiguration="BasicHttpBinding_IInventorySvc"
                  contract="localInventorySvc.IInventorySvc"
                  name="wsHttpBinding_IInventorySvc" />
            <endpoint address="http://localhost/UniversalMessageProcessor/InventorySvc.svc"
                binding="wsHttpBinding"
                bindingConfiguration="BasicHttpBinding_IInventorySvc1"
                contract="deployedInventorySvc.IInventorySvc"
                name="wsHttpBinding_IInventorySvc1" />
        </client>
    </system.serviceModel>
</configuration>
Download the code! Remember, you won’t have the same service references, so you will need to tweak the project to run it.
Simplify Repeated Code with Delegates and Generic Methods
Scenario: Repeated Code in All my Web Methods
- I’m writing a bunch of WCF web methods
- They all have chunks of nearly identical code
- (For example: code for logging, authentication, validation, error handling, etc.)
- But each method has a certain number of lines of code that are unique
- The upshot is that every time I add a new web method, I add a huge amount of code that is the same as before
- And every time we change our general procedure (i.e different logging, different validation, etc.), I need to modify that repeated code, a task that is error prone and boring
What You will Learn
If you read this post, you will see a practical sample of how to:
- Use delegates to execute code that is unique for each of your individual web service methods
- Use a generic method to handle process all your web methods, using any request or response data types
- Use interfaces to add power to you generic methods!
See below for a simplified description of these powerful techniques. The code sample download link is at the end.
Important Principal: Do Not Repeat Yourself!
I have a deadline, and I would like to meet it by avoiding repeated code. I’ll bet you also have a deadline, and maybe you would like to keep your job by meeting that deadline!
Also, my client deserves easy-to-maintain code, so I will write my code to give them the power to easily make changes in one place and have it affect all my web methods. Testing is also easier when you avoid repeating yourself, because you have fewer lines to test.
What I’m talking about is the “best practice” called “DRY”, or Do not Repeat Yourself. In my experience, sophisticated/productive programmers all use DRY, whereas most corporate drones have no frigging clue. Which is why most of their code sucks, IMHO!
The “UniversalMessageProcessor” I describe in this post will show you how to avoid repeating yourself by using delegates, generic methods, and a few other things, thus helping you meet your deadline and give your clients the easy-to-maintain code they deserve.
Sample Code – Shows the Essence of my Repeated Code
Read my simplified sample immediately below to get an idea of the repeated code that I wish to improve a la DRY:
public ResponseType1 GetData1(RequestType1 request){
	try {
		//Simplified representation of the repeated authentication code
		//(Use your imagination to envision longer code)
		CheckAuthentication(request.Credentials);
                //Also repeated in every web method, yada yada yada
		ValidateRequest(request);
                //Another chunk of repeated code that is actually more like 15 lines:
		LogRequest(request);
		//Simplified representation of the lengthy code to copy the result from BLL into
		//the response we send to service partner, again, imagine 30 lines instead of 2)
                bllResult = Bll.GetReponseType1(request);
		ReponseType1 myResponse = CopyBllResultToResponse(bllResult);
		LogResponse(myResponse);
		return myResponse
	} catch (Exception ex) {
		LogError(ex, request);
	}
}
In other words, I have a bunch of web methods that follow the simplified pattern above, except they use ‘ResponseType2’, ‘ResponseType3’, etc. Only the portion in yellow is unique to each web method; otherwise they are (mostly) similar. I would like to avoid all this repeated code! But first, let’s make sure we understand a couple of techniques I will use, delegates and generic methods:
Nutshell Definitions for ‘Delegate’ and ‘Generic Method’
Delegates: a Variable to Hold Your Code
In a nutshell, a delegate (sometimes called a function pointer) is how you represent your code as a variable (i.e. as a First Class Object) which you can pass to other methods. Like this (over simplified) sample:
Func<int, string> GetSign = (i) => {
	if (i < 0)
		return "-";
	else if (i > 0)
		return ("+");
	else
		return "";
};

//Usage:
string s1 = GetSign(5);
Console.WriteLine(s1);
//Output will be "+"‘GetSign‘ is a delegate, and I can pass it to another method, because it is a variable. You may also see folks declare delegates using the ‘Action‘ keyword, instead of the ‘Func‘ keyword I used above.
For another example of passing delegates as parameters, take a look at how I used them to solve a puzzle: https://actualrandy.wordpress.com/2014/09/18/calculator-letters-puzzle-solved/
Generic Methods – Work on Any Data Type!
In another nutshell, a generic method is a method which does the same work regardless of parameter type. Here’s a quick sample from the MSDN site:
static void Swap<T>(ref T lhs, ref T rhs)
{
    T temp;
    temp = lhs;
    lhs = rhs;
    rhs = temp;
}
//Usage:
string s1 = "A", s2 = "B";
Swap<string>(s1, s2);
int i1 = 1, i2 = 2;
Swap<int>(i1, i2);
In this sample, ‘T‘ could be int, string, DateTime, or any other data type you need!
Enough Background, Here’s the Code!
The code for this post is available for download at the bottom of the article. I will discuss the important portions here. The download code has two web methods (but my production code has a lot more, I simplified my sample for your sake). Let’s look at my first web method, which returns a list of locations associated with the caller’s service center:
public GetLocationServiceCenterResponse GetLocationByServiceCenter(GetLocationServiceCenterRequest request) {
    //The delegate performs the work which only applies to this
    //web method; the common work is performed by ProcessMessage
    Func<IRequestWithCredential, IReturnMessageResponse, BllResult> getBllResult = (req, response) => {
        //cast to the type we need:
        GetLocationServiceCenterRequest getLocRequest = (GetLocationServiceCenterRequest)req;

        //Invoke the Business-Logic-Layer method that does the database work:
        BllResult theBllResult = BllMain.GetLocationServiceCenter(getLocRequest);

        //Here we will copy the result from the ReturnTable into the response
        //Note that the ReturnTable is a weakly-typed DataTable that varies according to the method
        GetLocationServiceCenterResponse getLocResponse = (GetLocationServiceCenterResponse)response;
        getLocResponse.Locations = new List<LocationInfo>();
        if (theBllResult.ReturnCode == BllConstants.SUCCESS) {
            //Copy the weakly-typed data from the BllResult into our response:
            foreach (DataRow dr in theBllResult.ReturnTable.Rows) {
                LocationInfo curLoc = new LocationInfo();
                curLoc.Location = (string)dr["LocationID"];
                curLoc.Description = (string)dr["Description"];
                curLoc.LocationType = (string)dr["LocationType"];
                getLocResponse.Locations.Add(curLoc);
            }
        }

        return theBllResult;
    };
    //End of delegate body

    //Now, do all the work, using the delegate we built above:
    GetLocationServiceCenterResponse result = ProcessMessage<GetLocationServiceCenterRequest, GetLocationServiceCenterResponse>
                        (request, "getLocationServiceCenter", getBllResult);
    return result;
}
As you can see above, the main thing I do is declare my delegate, ‘getBllResult’, and then pass it to a medhod called ‘ProcessMessage’. The delegate begins in the highlighted code. Just to refresh your memory, this delegate handles the work that is unique to finding locations by service center.
Also, take a look at how I invoke ‘ProcessMessage’ – I tell it the input and output types (GetLocationServiceCenterRequest, GetLocationServiceCenterResponse) in between the angle brackets:
result = ProcessMessage<GetLocationServiceCenterRequest, GetLocationServiceCenterResponse> ...If you download my code, you will see that I do almost the exact same thing with my second web method. The only difference is that my second method declares the delegate to handle different types of data. This means that all the web methods are greatly shortened, because all they do is define a delegate and call ProcessMessage!
Now Look at My ‘Universal’ ProcessMessage Method
The following is a simplified sample – I cut-out approximately 50 lines of logging/authentication, etc., just so you can read it easier!
public TResult ProcessMessage<TRequest, TResult>
1		(TRequest request,
2		 string methodName,
3		 Func<IRequestWithCredential, IReturnMessageResponse, BllResult> getBllResult
		)
4	where TResult : IReturnMessageResponse, new()
5	where TRequest : IRequestWithCredential
{
6   TResult result = new TResult();
    _Logger.Log(LogLevel.Info, methodName + " started...");
    result.ReturnMessage.ReturnMessageDetails = new List<ReturnMessageDetail>();
    try {
        if (AuthenticateApp(request.credential)) {
            _Logger.Log(LogLevel.Info, methodName + " validating request");
            List<ValidationResult> lstValidationResults = new List<ValidationResult>();
            //The GeneralValidator uses reflection to validate any class and its child members
7           if (_Validator.ValidateComplexObject<TRequest>(request, lstValidationResults)) {
                //Execute the function passed to us
8               BllResult bllResult = getBllResult(request, result);

                if (bllResult != null && bllResult.ReturnCode == BllConstants.FAIL) {
                    result.ReturnMessage.ReturnCode = BllConstants.FAIL;
                    result.ReturnMessage.ReturnText = ERR_MESSAGE;
                } else if (bllResult != null) {
                    //We got the result we wanted, set the appropriate values in our result
                    result.ReturnMessage.ReturnCode = bllResult.ReturnCode;
                    result.ReturnMessage.ReturnText = bllResult.ErrorMessage;
                }
            } else {
                //Validation failed
                CopyValidationResultsToResponse(result, lstValidationResults);
                }
            }
        } else {
            //Invalid authentication
            result.ReturnMessage = new ReturnMessage{ ReturnCode = BllConstants.FAIL,
                  ReturnText = "Your credentials suck --> no data for you, ya filthy hacker!"};
        }
    } catch (Exception ex) {
        while (ex != null) {
            result.ReturnMessage = new ReturnMessage{ ReturnText =  ex.Message };
            _Logger.Log(LogLevel.Error, ex.Message);
            ex = ex.InnerException;
        }
    }
9    return result;
}
Explanation!
I injected some line numbers into my sample above, and they are linked to the numbered bullet points below:
- TRequest request – My method takes a generic input type ‘TRequest’, which could be, for example, ‘GetServiceCenterRequest’
- string methodName – The method uses your method name for logging
- Func<…, …, …> getBllResult – Third parameter is my delegate, which I will execute on line 8 (highlighted). Remember, the delegate is the code which is unique to each web method. Also remember, the point of using a delegate is that I can pass delegates like parameters!
- where TResult : IReturnMessageResponse, new() Generic methods allow you to use the ‘Where’ clause to restrict what types of data they will process. In this case, I require that the result/ouput type (‘TResult’) implement a simple interface called ‘IReturnMessageResponse’. That allows me to write code like this: ‘result.ReturnMessage = new ReturnMessage’, because the interface declares that every implementor has such an object. (Sample code below.)
- “new()” here, my ‘where-clause’ also requires that TRequest expose a constructor, which allows me to write the code on line 6
- where TRequest : IRequestWithCredential – Here, I require that the input paramter (‘TRequest’) implement a different interface, ‘IRequestWithCredential’. In a nutshell, every class that implements this interface has a Credential object.
- TResult result = new TResult() – because of my where-clause on line 4, the compiler knows my input parameter has a constructor it can call! Also, the class of my result is TResult, which can be any class, (subject to my where clause)
- ValidateComplexObject – Refer to my previous post on writing a universal validator using DataAnnotations and Reflection.
- BllResult bllResult = getBllResult(request, result) – here is where I invoke the delegate!. This is the whole point of my post, i.e. use the delegate inside a generic method to perform work that is unique to each web method. Note that my teammates wrote the BLL (Business Logic Layer) to always return a class called bllResult, each result has a table with different data).
- return result; – Since I declared this method to return TResult, my generic method will return whatever class type you need, such as a response object for GetLocationsByServiceCenter.
My Two Interfaces
OK, I promised above that I would list my interfaces, as you can see, they are really simple. Just to refresh your memory,
- All my request classes implement IRequestWithCredential
- And all my response classes implement IReturnMessageResponse
- By doing so, the compiler is not confused when I execute code like ‘request.Credential = null’, or similar actions
- I.e., any time I refer to something defined the the interface, the compiler is happy!
//First interface:
public interface IReturnMessageResponse
{
    ReturnMessage ReturnMessage { get; set; }
}

//Second interface
public interface IRequestWithCredential
{
    Credential credential { get; set; }
}
Summary
- When you write your code, you should avoid repeating yourself, because it will help you meet your deadline and shrink your code.
- If you are writing a web interface, you can find lots of repeated code to optimize, depending on how much logging, authentication, validation, etc. you are required to do. (But the same principle applies to other code!)
- You can create a generic method that will work for any of your response classes and request classes, that is step one to saving a ton of code!
- Your generic method can accept a delegate input parameter; you method will execute that method to handle code that is unique to each web method.
- You can constrain your generic method using the ‘where-clause’; one use is that it tells the compiler that your types implement an interface
By applying these techniques, you should be able to reduce your web method code by 20%-50%, depending on how much repeated code you have. That’s a big savings, and should really speed things up.
Save Time With My Universal Validator
Extend DataAnnotations to Handle Complex Objects
It is super easy and convenient to perform validation using the .NET DataAnnotations namespace. It allows you to describe validation using tags (attributes) on your classes. You can then ask .NET to validate an instance of your class. You will find it very easy to validate your simple classes with no “children”, using the built-in capabilities. In this article, I will show you how to handle more complex classes.

Situations Handled by my Universal Validator
For example, my validator will handle a PurchaseOrder class with a List of LineItems, or a list of suppliers, or containing two instances of an address class (for billing and shipping). The list of LineItems, Address instances, or list of suppliers are what I mean when I refer to ‘nested’ classes, i.e. child classes. Without my Universal Validator, you would need to add a bunch of custom code for every child class.
How You Will Benefit
Here’s a couple scenarios: you will find this useful when validating input in your web service, or when implementing an SOA (Service-Oriented Architecture). In that case, you will wish to validate the data sent to you by your e-commerce partners, or by folks in your organization invoking your web methods. When you use my UniversalValidator (or your own version), you can save time and meet your deadlines! Plus, you get the undying satisfaction of telling your e-commerce partners that they screwed-up!
But first, let’s get some background on the built-in validation in the DataAnnotations namesapce.
Sample Class with Validation Attributes
using System.ComponentModel.DataAnnotations;
    public class Customer{
        [Required]
        [MaxLength(50)]
        public string Name { get; set; }

        [Required]
        [CreditCard]
        public string CreditCard{ get; set; }

        [Phone]
        public string Phone{ get; set; }

        [Required]
        [EmailAddress]
        public string Email{ get; set; }
    }
You can easily validate an instance of this class like this:
Customer sally = new Customer {
	Name = "Sally",
        CreditCard = "378282246310005",
        Phone = "(208) 555-1212",
	Email = "Sally@Example.com"
};
List<ValidationResult> lstResults = new List<ValidationResult>();
ValidationContext myContext = new ValidationContext(sally);
bool isValid = Validator.TryValidateObject(sally, myContext, lstResults);
If any property is invalid, the Validator will return false, and lstResults will receive a list of information which you can thento give to your partners for feedback. For example, if you put letters into Sally’s phone number, you will receive the message “The PhoneNumber field is not a valid phone number.”
The nice part of this scheme is that it is really easy to see what the validation rules are; you just look at the class definition; the tags are obvious. There are a number of additional tags, including a Range tag and a Regular Expression tag. The range (double) is for numbers and allows you to specify min/max for any number; the regular expression tag allows you to enforce string patterns of your choice. You can also create your own custom validation tags, but you would rarely need that.
Problem: Nested Classes Are Not Validated!
The problem with this built-in validation is: it only looks at the top-level objects of the class being validated. For example, it won’t look at a list of line items and enforce your validation rules on them. Fortunately, my Universal Validator is designed for this scenario.
Use Reflection to Enhance Validation
Using reflection, you can get a list of properties for any class. If any of those properties are other classes, or a list of other classes, you can then take appropriate steps to validate them too! This gets around the problem of basic validation, because now you can detect the items which would not ordinarily be validated. The best technique to use is recursion, i.e. call my method ValidateComplexObject on a child class instance, from within ValidateComplexObject. This allows you to handle an unlimited number of grand-children classes/ great-grand-children, etc.
Here’s the code:
using System;
using System.Collections.Generic;
using System.Linq;
using System.ComponentModel.DataAnnotations;
using System.Reflection;
using System.Collections;

namespace UniversalValidator
{
  /// <summary>
  /// Uses DataAnnotations to validate class instances
  /// </summary>
  public class GeneralValidator {
    private Type _EnumerableType;
    private Type[] _NonPrimitiveDontValidate;
    private Type _OurType;
    //We will use the 'Invoke' method on this MethodInfo
    //After converting it to a Generic method
    private MethodInfo validateComplexMi;

    /// <summary>Constructor</summary>
    public GeneralValidator() {
      //We will avoid recursive validation on these types
      _NonPrimitiveDontValidate = new[] { typeof(string),
            typeof(DateTime),
            typeof(Guid),
            typeof(decimal),
            typeof(Type) };
      _OurType = typeof(GeneralValidator);
      _EnumerableType = typeof(IEnumerable);
      validateComplexMi = _OurType.GetMethod("ValidateComplexObject");
    }

    /// <summary>
    /// Uses the validation system to evaluate complex types passed in
    /// Note that this is a 'generic' method
    /// so that parameter 'validateMe' is strongly-typed
    /// </summary>
    /// <typeparam name="T">Generic type</typeparam>
    /// <param name="validateMe">An object to validate</param>
    /// <param name="lstValidationResult">List of results</param>
    /// <returns>True if all itemse a valid, false otherwise</returns>
    public bool ValidateComplexObject<T>(T validateMe, List<ValidationResult> lstValidationResult) {
      bool result = false;

      if (validateMe == null) {
        return true;
      }
      ValidationContext validationContext = new ValidationContext(validateMe);
      //Do the basic validation on top-level members here:
      result = Validator.TryValidateObject(validateMe,
        validationContext, lstValidationResult, true);

      Type typeToValidate = typeof(T);
      //Reflection will give us every property in the class
      PropertyInfo[] allProperties = typeToValidate.GetProperties(BindingFlags.Instance
                      | BindingFlags.Public | BindingFlags.DeclaredOnly);

      foreach (PropertyInfo pi in allProperties) {
        //Only validate 'nested' class members
        if (!pi.PropertyType.IsPrimitive
          && !_NonPrimitiveDontValidate.Contains(pi.PropertyType)) {

          //Check if we have a list, array, etc:
          if (TypeImplementsIEnumerable(pi.PropertyType)) {
            IEnumerable theList = (IEnumerable) pi.GetValue(validateMe);
            List<ValidationResult> childElementResults = new List<ValidationResult>();
            if (theList != null)
              //Validtae each entry in the list/array/etc.
              foreach (var elt in (pi.GetValue(validateMe) as IEnumerable)) {
                //Whatever type the element is, we make a MethodInfo
                //to match that type, then invoke it
                MethodInfo genericMi = validateComplexMi
                        .MakeGenericMethod(new Type[] { elt.GetType() });
                bool curResult = (bool)genericMi
                    .Invoke(this, new object[] { elt, childElementResults});
                if (!curResult) {
                  foreach (ValidationResult res in childElementResults) {
                    //Make the message easier to understand by adding information about its parent
                    res.ErrorMessage += " (" + pi.Name + ")";
                    lstValidationResult.Add(res);
                  }
                }
                result &= curResult;
              }
          } else {
            //Not a list, so recurse
            MethodInfo genericMi = validateComplexMi
                .MakeGenericMethod(new Type[] { pi.PropertyType });
            result &= (bool)genericMi
              .Invoke(this, new object[] { pi.GetValue(validateMe), lstValidationResult });
          }
        }
      }
      return result;
    }

    /// <summary>
    /// Detects whether the parameter is a list or array, etc.
    /// </summary>
    /// <param name="typeToCheck">A type that might be Enumerable</param>
    /// <returns>True if the type implements IEnumerable, false otherwise</returns>
    public bool TypeImplementsIEnumerable(Type typeToCheck) {
      //If the type implements IEnumerable, return true
      //This will include arrays, lists, dictionaries, etc
      return typeToCheck.GetInterfaces().Any(t => t == _EnumerableType);
    }
  }
}
Key Points
- GetProperties gives us all the properties, such as Customer Name/CreditCard/Phone and LineItems
- We have already validated the Name, CreditCard and Phone (
- We avoid validating these because they type, ‘string’, is contained in our array ‘_NonPrimitiveDontValidate’
- But when we get to LineItems, its type is not in our array, and it is not a primitive type
- Next, we detect that LineItems implements ‘IEnumerable’, so we will loop through its members and recursively validate each individual LineItem
- We get the child list by invoking ‘pi.GetValue’, which is a way to get the value of any class member using a PropertyInfo object, in our case, ‘pi’.
- The one weak point is: we don’t want to validate ‘built-in classes’ like DateTime/Guid, etc., and I may not have anticipated all those classes. If you have such a piece of date, an instance of a built-in class, please add its type to my array ‘_NonPrimitiveDontValidate’.
Generate Your WCF Files From Your Spreadsheet
Meet your Deadlines with T4 Template Files
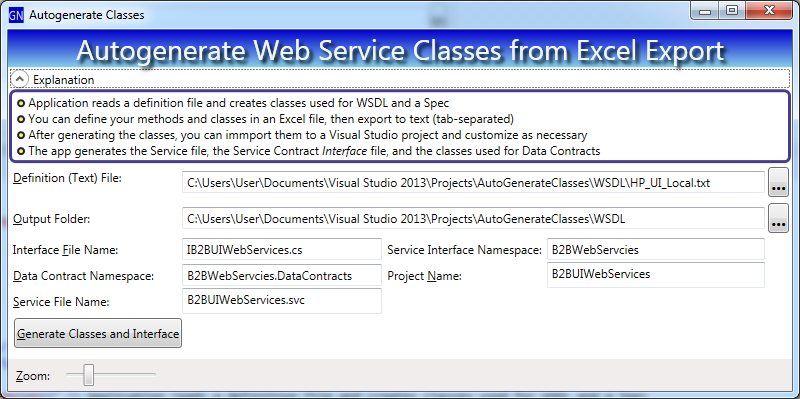
Here’s my situation: we’re building an SOA and spending a long time on our design process. We need to revise our methods and parameters repeatedly, and we’re building a lot of methods and classes. We also need to build some documentation (a specification file). We have a tight deadline, so, after we finally finish modifying all those method signatures, we need to quickly build an interface for our B2B partners. It would be really nice if I could build, or rebuild, all those classes from a master definition file!
Solution
- Enter all the method definitions in an Excel file
- Also enter the data classes and their parameters in the same Excel file
- After all the revisions and negotiations, use the data in the Excel file to generate the code files using T4 templates
- Also generate the spec file using the same process
Remarks
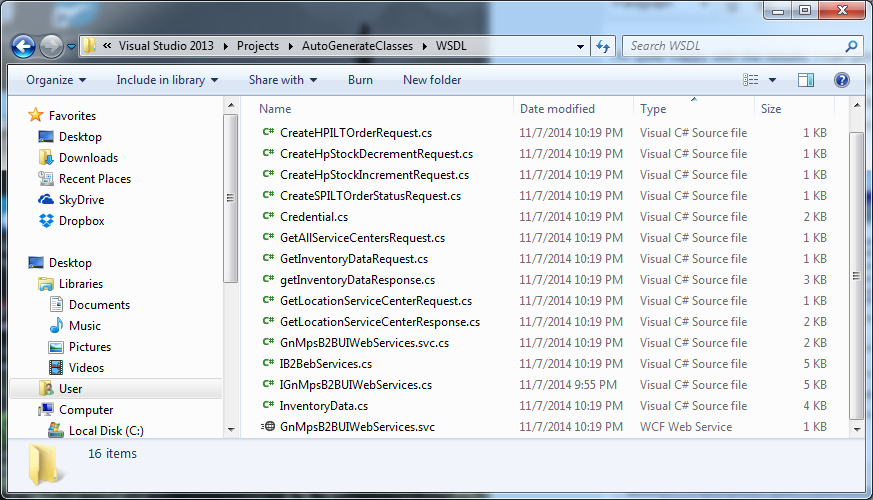
I built a project using T4 templates to generate my code files. Note that the data contract files for WCF are mostly boiler plate, but it is still a lot of work. I can use the results to build WSDL in a few seconds. The benefits is that our B2B partners can code against that WSDL immediately, and I can update it easily.
I’m quite happy with the results. Running the app is easy, and there are no issues like improper casing for names or inconsistent spellings. Plus, when we make changes, the spec file can be immediately regenerated and be completely consistent with the code. Furthermore, it easy to write the my code generator; actually I built a working prototype one afternoon.
,
How it Works
You can add a T4 Template file to any .NET project. T4 templates are designed for generating code from sources like a master definition file, database file, etc. T4 templates are a mixture of text (payload) and markup (your code that injects varying content). Here’s a sample for my auto-generation project:
<#@ template debug="false" hostspecific="false" language="C#" #>
<#@ assembly name="System.Core" #>
<#@ import namespace="System.Linq" #>
<#@ import namespace="System.Text" #>
<#@ import namespace="System.Collections.Generic" #>
<#@ output extension=".txt" #>
<#@ import namespace="AutogenerateWCF.SupportingClasses" #>
using System;
using System.Collections.Generic;
using System.Linq;
using System.Runtime.Serialization;
using System.ServiceModel;
using System.Text;

namespace <#= NamesapceToUse #>
{
    public class <#= ServiceClassName #> : <#= InterfaceName #>
    {
<# foreach(MethodInfo mi in Methods) { #>
	<#= mi.ReturnType #> <#= mi.Name #>(<#= mi.FormattedParameterList #>){
		return new NotImplementedException();
	}

<# } #>
	}
}
In the sample above, all my markup is in between the tags <# and #>. The markup references class properties on my T4 class. I wrote my T4 class to expose properties called “NamespaceToUse”, “ServiceClassName” and “Methods”. When I use my template (explained in depth below), it generates output that looks like the following:
using System.Runtime.Serialization;
using System.ServiceModel;

namespace B2BWebServcies
{
    public class B2BHPServices : IB2BWebServcies
    {
		GetLocationResponse getLocationServiceCenter(Credential credential, GetLocationServiceCenterRequest request){
			return new NotImplementedException();
		}

		GetInventoryDataResponse getInventoryData(Credential credential, GetInventoryDataRequest Request){
			return new NotImplementedException();
		}
	}
}
Adding a T4 Template to Your Project
Add a new item to your project; for the type, choose ‘Text Template’:
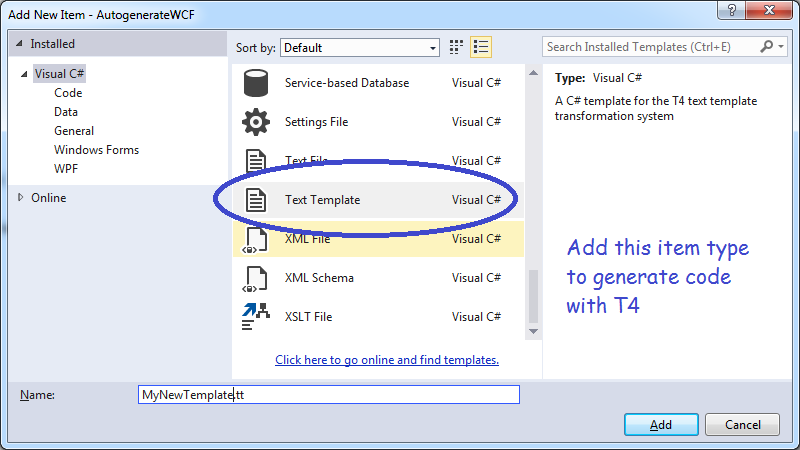
After you add your Template file, change its Custom Tool to ‘TextTemplatingFilePreprocessor’

Now, add a partial class with the same class name as your template file. The partial class will hold the properties you will utilize in your markup, such as ‘NamespaceToUse’. Next, populate your markup, injecting class properties where necessary.
To use your template,
- Set the class properties using whatever data source you need; in my case, I loaded from my master definition file (exported from Excel)
- Invoke your template class’s TransformText method – this returns a string containing your final output!
To learn more, download my sample code here.
Search Multiple Files with My Speedy Parallel Searcher
Now-a-days, almost every PC has multiple processors. But, your app may not run faster on these boxes, unless you take advantage of parallel programming! Fortunately, .NET makes some things easy with its ‘Parallel.Foreach’. Learn how to make your apps keep-up with the competition with this short and useful sample!
My Need for Speed
Here’s a couple scenarios I have encountered in the past few weeks, I’ll bet you have faced similar challenges:
- I needed to search through a ton of log files, seeking info on missing orders, etc.
- I wanted to find usage examples of a particular data table, in several dozen projects, amounting to thousands of files
My answer: whip-up a quick file searcher! Results: I quickly found the lost orders and figured-out what happened using the log files. Also, I can understand the massive code base I work with because I can quickly find the table usage I need to understand.
What’s that you say – there are free file searchers already available? Well, yes, there are, but
- My version is parallelized, so it is much faster
- There is no licensing issue for mine, and no learning curve
- I can customize mine any time I need to
- I wrote it in just a couple hours
Caveat
Your hardware will heavily impact the speed you experience using my program.
- If, like me, you are lucky enough to have a Solid State Drive, you experience great performance gains
- If you are reading directories off a network drive, you should see performance improve significantly
- However, if you have a normal hard drive, parallel code could actually be slower, because the limiting factor for speed will be your disk head, and parallel algorithm may send your disk head jumping around
In general, the techniques shown here work great for code that is independent of your hardware, such as performing big math computations.
Highlights of My Algorithm
- Parallel.ForEach – allows you to easily do the same thing to every list item
- Interlocked.Increment – allows you to add to a number, thread-safe
- Sample usage of Tuples – pack several variables into a single object
- ObservableCollection – allows you to continually add to a Grid ItemsSource in WPF

The Heart of My Algorithm
//Get all the files matching the pattern (such as *.cs)
//in the specified folder, plus all child folders:
string[] allFiles = Directory.GetFiles(rootFolder,
      filePattern, SearchOption.AllDirectories);

//This will assign a chunk of allFiles to each processor and do the work
//in parallel, greatly improving speed!
Parallel.ForEach(allFiles, curFile => {
  Regex reMatchMe = null;
  if (useRegex) {
    reMatchMe = new Regex(target, RegexOptions.Compiled | RegexOptions.IgnoreCase);
  }
  using (StreamReader sr = File.OpenText(curFile)) {
    int lineNum = 0;
    while (sr.Peek() != -1) {
      string aLine = sr.ReadLine();
      if (useRegex) {
        Match m = reMatchMe.Match(aLine);
        if (m.Success) {
          RecordHit(curFile, lineNum, aLine);
        }
      } else {
        int p = aLine.IndexOf(target, 0, StringComparison.CurrentCultureIgnoreCase);
        if (p >= 0) {
          RecordHit(curFile, lineNum, aLine);
        }
      }

      lineNum++;
    }
    //By using 'Interlocked', I can safely increment the member-variable _FileProg
    //Always use a similar technique when more than one thread changes a variable!
    Interlocked.Increment(ref _FileProg);
    int pct = (int)(100 * ((double)_FileProg / _TotalFiles));
    _Worker.ReportProgress(pct);
  }
});
Explanation
- Get the names of all files matching the users’ pattern,
- Parallel.ForEach takes, as a parameter, an anonymous function (all the code above inside the {} brackets)
- It invokes the code for each file in the array (curFile)
- The main thread waits until all the files have been processed
- I didn’t mention this until now, but in order to keep the main display responsive (and display my progress bar), I run this particular chunk of code in a Background worker thread
- You may have noticed the last line of code above, “_Worker.ReportProgress” – the name of my Background worker is “_Worker”, and this is where I tell the main thread to update my progress bar
Code to Start-Up the Backgroundworker
//Initialize the background worker that does the work. By doing the work
//on a background worker, we allow the main window to continue updating the display
_Worker = new BackgroundWorker();
_Worker.WorkerReportsProgress = true;
//Hook-up to the events
_Worker.DoWork += Worker_DoWork;
_Worker.ProgressChanged += Worker_ProgressChanged;
_Worker.RunWorkerCompleted += Worker_RunWorkerCompleted;

//Use a tuple to pass 4 input parameters to the worker
//The 'Create' method builds a strongly-typed class with whatever values
//you pass - I need to do this because the method (RunWorkerAsync) only accepts
//a single parameter
_Worker.RunWorkerAsync(Tuple.Create(txtFolder.Text, txtFilePattern.Text,
        txtSearchTarget.Text, chkUseRegex.IsChecked ?? false));
Backgroundworker Explanation
- I declared my Backgroundworker (not shown above) as a member-level object
- In the code above, I connected its events (such as Worker_DoWork) to methods in my class (not shown above; download the code to see it).
- For example, “_Worker.ProgressChanged += Worker_ProgressChanged” tells my worker to run that method when its ProgressChanged event is fired
- The worker doesn’t start until I invoke ‘RunWorkerAsync’ (last line above)
- Inside the method ‘Worker_DoWork’, I extract all 4 input parameters from my tuple with the following code:
void Worker_DoWork(object sender, DoWorkEventArgs e) {
    Tuple<string, string, string, bool> args =
                       (Tuple<string, string, string, bool>)e.Argument;
    string rootFolder = args.Item1;
    string filePattern = args.Item2;
    string target = args.Item3;
    bool useRegex = args.Item4;
Continually Updating the Grid with ObservableCollection
If you download and run my code, you see me add results are to my grid as soon they are found; I find this keeps the users happier! A normal list will not tell the grid to update when you add new entries. To keep the users entertained, I use an ObservableCollection, which will tell the grid to update when new items are added/removed. Here’s some code that makes that happen:
//Declare the collection as a member level object:
ObservableCollection<SearchResult> _HitResults;

private void RecordHit(string curFile, int lineNum, string aLine) {
    SearchResult aHit = new SearchResult {
        FileName = System.IO.Path.GetFileName(curFile),
        Path = System.IO.Path.GetDirectoryName(curFile),
        Hit = aLine, LineNumber = lineNum
     };

    //Since _HitResults belongs to the main thread,
    //use the following technique to add to it
    //Basically, invoke the method 'AddToHitResults' on a new thread
    Dispatcher.BeginInvoke(DispatcherPriority.Normal,
                new Action(() => AddToHitResults(aHit)));
}

private void AddToHitResults(SearchResult aHit) {
    //This will appear in the grid immediately:
    _HitResults.Add(aHit);
}
Future work:
Depending on my needs, I may:
- Modify my grid so I can click on a file and open it in a preview window
- Include additional filtering for my results grid to help weed-out matches I don’t care about
Auto-Generate Forms and Class by Reverse Engineering Your Class or Web Reference
Use Reflection with T4 Templates to Instantly Build WPF Forms
Want to meet your deadlines? Want your boss to respect your ability to get work done fast? Then automate your coding process and watch your credibility rise! Your boss willl be impressed with your speed and sophistication.
.NET already generates some data entry forms for you, such as in the ASP.NET MVC framework. But, as far as I know, this only works when your source is database tables, queries or views. That doesn’t help if you want to work with, for example, a web service and send data across the web.
In contrast, I am generating code using reflection. That means you can build a data entry (or display) form based on any dll or exe. That works nicely when you consume Web Services, because Reflection can examine the class structures and build forms, etc.
If you need additional, or special functionality, you are completely free to augment or customize the code I generate, So just your special needs after you do most of the work automatically!
Sample Output

What Gets Generated
- My code generates the XAML displayed above
- You also get a ViewModel, if you elect to use MVVM (MVVM is like a Model-View-Controller for WPF),
- Every TextBox you see above is databound to a field in the ViewModel (again, optional)
- I also generate a save button with associated MVVM command, but you need to write some codeto perform your save
Besides Running my Code Generator, I Did This:
As I mentioned above, my code uses reflection, so it needs a dll (or exe) to reverse-engineer. For this sample,
- I started coding my main project
- Added a (Web) Service Reference to Amazon Web Services, to my main project
- (which caused Visual Studio to generate data-classes in my project) (but not data entry forms)
- Since the code generator needs a dll, I then built my partially completed project to make that dll
- Then I switched to my code generator
- Browsing for the dll from the first project
- Next, I clicked a button to generate the code shown above
- And saved it to file
- Finally, I switched back to my original project and added the new code that I just built!

Next, I specify some options to use when generating my code:

Next, I generate the code, and modify it, if desired. When happy, I click the save button.

How does it Work?
I demonstrated some features of Reflection in a previous post, “Make Debugging Easier with My Complex Object Visualizer“. If you read that post, you know that you can get class properties using reflection like this:
//'selectedType' is, in my sample, the Address class Type, hard-coded here
Type selectedType = typeof(Address);
PropetyInfo[] props = selectedType.GetProperties(BindingFlags.Public
                                 | BindingFlags.DeclaredOnly | BindingFlags.Instance);
Now my array ‘props’ has all the properties form the Address class, such as ‘Street1’ or ‘City’.
You can also use reflection to load an assembly at run time, as shown below:
string fName = "OrderLib.dll";
Assembly targetDll = System.Reflection.Assembly.LoadFrom(fName);
//Then I can get all the Types (classes) and let you pick which to use:
Type[] targetTypes = targetDll.GetTypes();
If you download my code (bottom of the post), you can see some other Reflection features I utilized.
A Brief Explanation of T4
T4 is the code generation library included in Visual Studio. It is actually quite easy to use, particularly if you are familiar with ASP.NET. It is a mixture of markup and code. Microsoft has some easy, yet useful, tutorials here: http://msdn.microsoft.com/en-us/library/bb126445.aspx. The excerpt below (from my T4 Template file) shows how I generate the code behind file:
<#@ template language="C#" #>
<#@ assembly name="System.Core" #>
<#@ import namespace="System.Linq" #>
<#@ import namespace="System.Text" #>
<#@ import namespace="System.Collections.Generic" #>
using System;

namespace <#= _NameSapceToUse #> {
    public partial class <#= ClassNameToUse #> : Window {
        public <#= ClassNameToUse #>() {
            InitializeComponent();
            this.DataContext = new <#= ViewModelClassName #>();
        }
    }
}
The highlighted portions are injected with values from my code, when I generate my code. Anything outside <# #> brackets is just text that is copied into the output. The equals sign (inside the <# #> brackets) signifies to copy a class property from my T4 class.
You can also use loops inside a T4 Template, as illustrated in the fragment below:
<# for (int i = 0; i < _ClassProps.Count; i++) { #> <Label Grid.Row="<#= i #>" Grid.Column="0" Content="<#= _ClassProps[i].Key #>" Target="{Binding ElementName=txt<#= _ClassProps[i].Key #>}" /> <TextBox Grid.Row="<#= i #>" Grid.Column="1" Name="txt<#= _ClassProps[i].Key #>" Text="{Binding <#= _ClassProps[i].Key#>}" /> <# } #>
The sample above shows a loop, inside a T4 template; it generates a Textbox and label for every entry in my list ‘_ClassProps’. As you can see, I wrote a ‘for loop’ here, but you can insert any other code you need.
Three Tips for Using T4
- When you add a T4 template to your class (with file extension ‘.tt’), change its custom tool to ‘TextTemplatingFilePreprocessor’

2.) Add a new class file to your project and make it a partial class, with the same name as your T4 class. This is how you add custom properties to your T4, such as the _ClassProps list you saw used above. The properties/fields in your partial class are visible in the template.
3.) When you are ready to generate your code, invoke the ‘TransformText’ method on an instance of your class, as shown below:
WpfFormGen myGen = new WpfFormGen(classProps, GeneratedNamespace, GeneratedFormName, ShouldGenerateViewModel.Value);
string theWindow = myGen.TransformText();
GeneratedXaml = theWindow;
Caveat
This is not a commercial product, and I only spent a few days developing it. It could do a lot more, or you could download the code and tweak it yourself. Also, you aren’t allowed to sell my code or claim it as your own!
Moving Forward
My code generate creates WPF forms, suitable for use with the MVVM style of development, because I am familiar with that style of coding. But, there is nothing to stop you from writing similar code to generate, for example, ASP.NET code. Why? Because it is nice to generate code from dlls, not being limited to database tables. But! There is nothing stopping you from using T4 to generate forms from tables (if you aren’t using ASP.NET MVC).
Next, I may re-write my project to generate AngularJS javascript, because I am learning it now. So far, I have found that AngularJs is case-sensitive and very picky, so generating the code automatically would make it less painful by getting the proper case.
I may also elect to re-write the project as a Visual Studio Add-in.
Download the code here
- ← Previous
- 1
- 2
- 3
- Next →
