
Visual Studio
Visual Studio Quick Tip: Snippet Manager Writes Code for You!
You can type less and meet your deadlines faster by using the snippet manager for boiler plate code, such as properties, try-catch blocks, etc. Plus, you look like a total expert when you blast-in your code with just a few keystrokes! Learn how by watching my video.
Video: Easily enter boiler plate code with Snippet Manager
Total time: 03:46
Video Quick Tips: Use Intellisense for Super Productivity
Intellisense is a fantastic invention that, sadly, most programmers don’t take full advantage of. If you like to meet your deadlines, and impress your coworkers with your magical typing skills, take a quick look at these videos.
Intellisense quick tip #1 – Amp-up your productivity with Intellisense!
Total time: 01:39
Intellisense quick tip #2 – Method signatures made easy!
Total time: 02:04
Intellisense quick tip #3 – Different ‘pick keys’; using Intellisense to correct your typing
Total time: 02:30
Visual Studio Quick Tip: Add Files to Your Project the Easy Way
Occasionally you need to add new files to your project that were created outside of Visual Studio. Such as image files, files that you created in a special ‘proof-of-concept’ project, or the output from my T4 code generator. Here’s a short and simple trick to save time, plus make yourself look like a pro to your coworkers!
Quick tip Video: Add Files to your Project Like a Pro!
Total Time: 01:28
Video Quick Tip: Align and Format Your Code the Smart Way
Nothing makes you look like an amateur more than mis-aligned code. Plus, incorrectly aligned code is hard to debug and maintain. Visual Studio has two simple tricks that you can use to never experience this problem again! You’ll impress anyone who watches you work when you try these two methods, and write better code too!
Quick Tip: Align Your Code like a Visual Studio Jedi!
Total time: 02:55
Video Quick Tip: Navigating Your Code with Ease!
Lots of programmers waste their time getting lost in their own code. Or, more likely, in someone else’s code in a big, confusing project. Here’s a tip that I could almost call a ‘secret productivity tip’, because I think almost no one takes advantage of it. If you learn this tip, you will reduce your mental workload and stress, and thus improve your productivity!
Quick-Tip Video- Navigate like a Coding Master!
Total time: 02:01
Visual Studio Quick Tip #1
Video Posted on Updated on
Something New: My First Quick Tip Video
I go to lots of sites and encounter coders with a wide range of experience with Visual Studio. Apparently I know a lot of tips and tricks that are largely unknown at those sites. Sometimes experienced programmers tell me “Holy cow, I wish I’d known how to do that!” I’m glad to share, but I often wonder how they got where they are now!
Some of these tips and tricks can make a huge impact on your productivity. For an experiment, I’m going to try making short videos explaining how to easily perform common tasks.
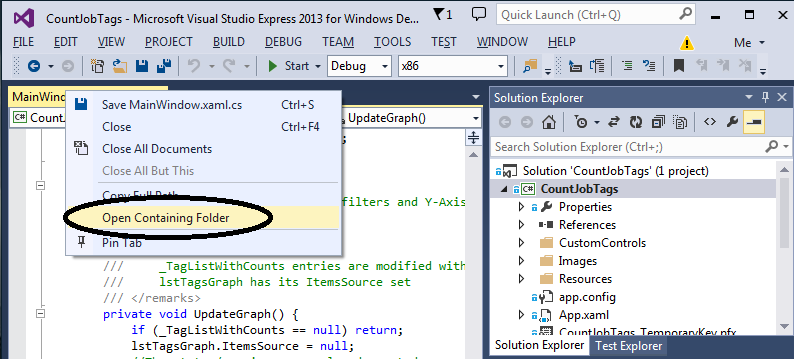
Try this video on how to quickly find your files outside of Visual Studio! I use it all the time. Total length: 01:19
Visual Studio Quick Tip Movie #1
Auto-Generate Forms and Class by Reverse Engineering Your Class or Web Reference
Use Reflection with T4 Templates to Instantly Build WPF Forms
Want to meet your deadlines? Want your boss to respect your ability to get work done fast? Then automate your coding process and watch your credibility rise! Your boss willl be impressed with your speed and sophistication.
.NET already generates some data entry forms for you, such as in the ASP.NET MVC framework. But, as far as I know, this only works when your source is database tables, queries or views. That doesn’t help if you want to work with, for example, a web service and send data across the web.
In contrast, I am generating code using reflection. That means you can build a data entry (or display) form based on any dll or exe. That works nicely when you consume Web Services, because Reflection can examine the class structures and build forms, etc.
If you need additional, or special functionality, you are completely free to augment or customize the code I generate, So just your special needs after you do most of the work automatically!
Sample Output

What Gets Generated
- My code generates the XAML displayed above
- You also get a ViewModel, if you elect to use MVVM (MVVM is like a Model-View-Controller for WPF),
- Every TextBox you see above is databound to a field in the ViewModel (again, optional)
- I also generate a save button with associated MVVM command, but you need to write some codeto perform your save
Besides Running my Code Generator, I Did This:
As I mentioned above, my code uses reflection, so it needs a dll (or exe) to reverse-engineer. For this sample,
- I started coding my main project
- Added a (Web) Service Reference to Amazon Web Services, to my main project
- (which caused Visual Studio to generate data-classes in my project) (but not data entry forms)
- Since the code generator needs a dll, I then built my partially completed project to make that dll
- Then I switched to my code generator
- Browsing for the dll from the first project
- Next, I clicked a button to generate the code shown above
- And saved it to file
- Finally, I switched back to my original project and added the new code that I just built!

Next, I specify some options to use when generating my code:

Next, I generate the code, and modify it, if desired. When happy, I click the save button.

How does it Work?
I demonstrated some features of Reflection in a previous post, “Make Debugging Easier with My Complex Object Visualizer“. If you read that post, you know that you can get class properties using reflection like this:
//'selectedType' is, in my sample, the Address class Type, hard-coded here
Type selectedType = typeof(Address);
PropetyInfo[] props = selectedType.GetProperties(BindingFlags.Public
                                 | BindingFlags.DeclaredOnly | BindingFlags.Instance);
Now my array ‘props’ has all the properties form the Address class, such as ‘Street1’ or ‘City’.
You can also use reflection to load an assembly at run time, as shown below:
string fName = "OrderLib.dll";
Assembly targetDll = System.Reflection.Assembly.LoadFrom(fName);
//Then I can get all the Types (classes) and let you pick which to use:
Type[] targetTypes = targetDll.GetTypes();
If you download my code (bottom of the post), you can see some other Reflection features I utilized.
A Brief Explanation of T4
T4 is the code generation library included in Visual Studio. It is actually quite easy to use, particularly if you are familiar with ASP.NET. It is a mixture of markup and code. Microsoft has some easy, yet useful, tutorials here: http://msdn.microsoft.com/en-us/library/bb126445.aspx. The excerpt below (from my T4 Template file) shows how I generate the code behind file:
<#@ template language="C#" #>
<#@ assembly name="System.Core" #>
<#@ import namespace="System.Linq" #>
<#@ import namespace="System.Text" #>
<#@ import namespace="System.Collections.Generic" #>
using System;

namespace <#= _NameSapceToUse #> {
    public partial class <#= ClassNameToUse #> : Window {
        public <#= ClassNameToUse #>() {
            InitializeComponent();
            this.DataContext = new <#= ViewModelClassName #>();
        }
    }
}
The highlighted portions are injected with values from my code, when I generate my code. Anything outside <# #> brackets is just text that is copied into the output. The equals sign (inside the <# #> brackets) signifies to copy a class property from my T4 class.
You can also use loops inside a T4 Template, as illustrated in the fragment below:
<# for (int i = 0; i < _ClassProps.Count; i++) { #> <Label Grid.Row="<#= i #>" Grid.Column="0" Content="<#= _ClassProps[i].Key #>" Target="{Binding ElementName=txt<#= _ClassProps[i].Key #>}" /> <TextBox Grid.Row="<#= i #>" Grid.Column="1" Name="txt<#= _ClassProps[i].Key #>" Text="{Binding <#= _ClassProps[i].Key#>}" /> <# } #>
The sample above shows a loop, inside a T4 template; it generates a Textbox and label for every entry in my list ‘_ClassProps’. As you can see, I wrote a ‘for loop’ here, but you can insert any other code you need.
Three Tips for Using T4
- When you add a T4 template to your class (with file extension ‘.tt’), change its custom tool to ‘TextTemplatingFilePreprocessor’

2.) Add a new class file to your project and make it a partial class, with the same name as your T4 class. This is how you add custom properties to your T4, such as the _ClassProps list you saw used above. The properties/fields in your partial class are visible in the template.
3.) When you are ready to generate your code, invoke the ‘TransformText’ method on an instance of your class, as shown below:
WpfFormGen myGen = new WpfFormGen(classProps, GeneratedNamespace, GeneratedFormName, ShouldGenerateViewModel.Value);
string theWindow = myGen.TransformText();
GeneratedXaml = theWindow;
Caveat
This is not a commercial product, and I only spent a few days developing it. It could do a lot more, or you could download the code and tweak it yourself. Also, you aren’t allowed to sell my code or claim it as your own!
Moving Forward
My code generate creates WPF forms, suitable for use with the MVVM style of development, because I am familiar with that style of coding. But, there is nothing to stop you from writing similar code to generate, for example, ASP.NET code. Why? Because it is nice to generate code from dlls, not being limited to database tables. But! There is nothing stopping you from using T4 to generate forms from tables (if you aren’t using ASP.NET MVC).
Next, I may re-write my project to generate AngularJS javascript, because I am learning it now. So far, I have found that AngularJs is case-sensitive and very picky, so generating the code automatically would make it less painful by getting the proper case.
I may also elect to re-write the project as a Visual Studio Add-in.
Download the code here
Make Debugging Easier with my Complex Object Visualizer
Use Reflection to Display Complex Objects While Debugging!
Problem: it is hard to inspect complicated objects in the debugger. Lately, I’ve been testing a lot of web services and using complex objects form 3rd party libraries. These objects are big, complicated chunks of data. If you’re like me, you might feel frustrated inspecting them in the debugger. Nested properties can be a pain, especially in huge lists. What I find particularly irritating is, having scrolled deep, deep down into a big nested object, is accidentally clicking away and loosing the whole freakin’ thing! It would be better if I could dump the entire object somewhere like the output window or an unused TextBox. And that’s just what I’ve done!

Reflection to the Rescue
if you’re familiar with the .NET Reflection API, you know that you can use it to examine or manipulate any programming object. I decided to use Reflection to display my complex objects by converting them to a nice, easy-to-read string.

Benefits
If you download my code, compile it into a dll, you can add it to any project. Next time you’re debugging, just use my method to blast your objects into a textbox or the output pane! You get instant visibility into complex, nested objects.
Nuts and Bolts: Reflection Methods that Make it Happen
I used these methods to generate a string representation of arbitrary objects:
- GetValue – retrieves the property value for your class instance, using a PropertyInfo object representing the property in question
- GetFields – I could have used it, but didn’t, because Web Services don’t return objects with fields. But! You can modify my code to do so, if desired.
-
- GetProperties – retrieves all properties for any class type. In the example above, it retrieved, for example, ‘ShipToAddress’, ‘Name’, ‘Street1’, Orders (an array) etc.
‘GetProperties’ returns an array of PropertyInfo objects; each PropertyInfo has
- PropertyType – for example, if the PropertyInfo represents my OrderID, then the PropertyType will be int
- Name – for example, ‘OrderId’
I also used the following property of the ‘Type’ class:
- IsArray – for an arbitrary type, tells you whether it is an array. I think it works for Lists as well, but I didn’t test, because, again, web services return arrays by default, and I’m testing Web Services right now.
Take a Look at the Short, Sweet Code!
// Returns a nice string representation of an arbitrary object, useful for debugging
public static string ComplexObjectToString(object someClassInstance, int indentLevel = 0) {
    StringBuilder sbResult = new StringBuilder();
    Type classType = someClassInstance.GetType();
    PropertyInfo[] allProperties = classType.GetProperties(BindingFlags.Public
                                    | BindingFlags.DeclaredOnly | BindingFlags.Instance);

    //If the current property is an array, loop through each entry and
    //display the member values, indented 4 characters deeper:
    if (someClassInstance is IEnumerable && !(someClassInstance is string)) {
        foreach (var anItem in (IEnumerable)someClassInstance) {
            if (IsNotCoreType(anItem.GetType()))
                sbResult.AppendFormat("{0}", anItem);
            else {
                string theItem = ComplexObjectToString(anItem, indentLevel + 4);
                sbResult.Append(theItem);
            }
            sbResult.AppendLine("---------------------");
        }
    } else {
        string indentSpaces = new string(' ', indentLevel);
        foreach (PropertyInfo pi in allProperties) {
            //Handle arrays and lists:
            if (IsEnumerable(pi.PropertyType)) {
                object subProperty = pi.GetValue(someClassInstance, null);
                sbResult.AppendLine(pi.Name + " items:");
                foreach (var anItem in (IEnumerable)subProperty) {
                    string subProps = ComplexObjectToString(anItem, indentLevel + 4);
                    sbResult.Append(subProps);
                    sbResult.AppendLine(new string(' ', indentLevel) + "------");
                }
            } else if (IsNotCoreType(pi.PropertyType)) {
                //Handle nested complex objects:
                object subProperty = pi.GetValue(someClassInstance, null);
                if (subProperty != null) {
                    sbResult.AppendFormat("{0}{1}:\n", indentSpaces, pi.Name);
                    string subProps = ComplexObjectToString(subProperty, indentLevel + 4);
                    sbResult.Append(subProps);
                }
            } else {
                if (!_UnwantedProperties.Contains(pi.Name)) {
                    //Handle normal properties, using the Name from the PropertyInfo and
                    //GetValue to retrieve each successive value
                    object propVal = pi.GetValue(someClassInstance, null);
                    sbResult.AppendFormat("{0}{1}:\t{2}\n", indentSpaces, pi.Name, propVal);
                }
            }
        }
    }
    return sbResult.ToString();
}

public static bool IsEnumerable(Type theType) {
    return theType.IsArray ||
                    (
                    theType != typeof(string)
                    &&
                    theType.GetInterfaces().Any(t => t == typeof(IEnumerable))
                    );
}

/// <summary>
/// Determines whether a given object is a 'built-in' class, such as int,
/// DateTime, string, etc.
/// </summary>
/// <param name="type">A type which might be a 'built-in' class</param>
/// <returns>True when the class needs to have its properties displayed</returns>
public static bool IsNotCoreType(Type type) {
    return !type.IsPrimitive && !type.ToString().StartsWith("System.");
    //return (type != typeof(object) && Type.GetTypeCode(type) == TypeCode.Object);
}

/// <summary>
/// These properties apply to every class, and I don't want to see them:
/// </summary>
private static string[] _UnwantedProperties = new string[] { "ExtensionData", "IsReadOnly",
                            "IsFixedSize", "IsSynchronized", "Length",
                            "LongLength", "Rank", "SyncRoot" };
}
Put it to Work and Visualize Your Data!
So, download my sample project. Extract the class ‘Utility’ and modify (it if you want). For example, you might want to see private properties or fields in your output (not there in this version); that would be easy for you to plug in. Now, build a class library; compile it to a dll. Add your dll to your project! Next debug session, use my class on your huge object back and spit-it-out into a textbox or the immediate pane of the debugger. Frustration relieved!

Future Directions
- If you’re feeling ambitious, you could adapt my technique to create your own fantastically useful Visual Studio Plug-in! http://msdn.microsoft.com/en-us/vstudio/vextend.aspx
- You could also consider using the Visual Studio T4 code generator in conjunction with the technique demonstrated here. For example, you could use it to generate label/textbox pairs, on-the-fly, for any class T4 Code generation:. http://msdn.microsoft.com/en-us/library/bb126445.aspx
- You could also incorporate it into your logging routines; that would allow you to capture the complete state of an object that might be misbehaving.
Update
I tweaked it some; I enhanced it to handle lists. I also added a universal XML serializer to the project, as part of the download.
Download
Code Link Download: Visualize Complex Objects. Note: recently revised to expose the functionality as a separate project, built as a dll.
NPR Puzzle Solved: 3 Similar Names
That puzzle was the fastest solve ever, I had the whole thing done in less than an hour! Yee-haw! The funny thing is that, just last week, Will actually said that he designs the puzzles to be just as hard to solve manually as with code. But solving this one in code was so easy that perhaps Will didn’t understand what that means…
The Challenge
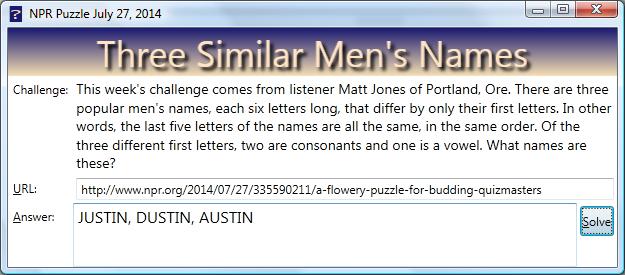
This week’s challenge comes from listener Matt Jones of Portland, Ore. There are three popular men’s names, each six letters long, that differ by only their first letters. In other words, the last five letters of the names are all the same, in the same order. Of the three different first letters, two are consonants and one is a vowel. What names are these?
Challenge URL: http://www.npr.org/2014/07/27/335590211/a-flowery-puzzle-for-budding-quizmasters
What You Will Learn from Reading!
- Improve your understanding of generic dictionaries in .NET
- Specifically, how dictionary entries can contain complex structures, such as lists
- String manipulation, specifically searching for substrings and extracting them from larger strings
- A sample use of a lambda expression, using the operator ‘Aggregate’, which I use to build a comma-delimited list from a list of string
Solving the Puzzle
I have a file of the to 1,219 most common boy’s names, and was able to use it to find the three forming the solution. Sorry, I don’t remember where I got it; I thought it was from the Census Bureau, but now I can’t find it on their site. Using that file,
- Build a dictionary to hold candidate names
- Open the file of names for reading
- Examine every name whose length is 6
- Extract the last 5 letters from each name
- Check if the dictionary already has a pre-existing entry, using the last 5 letters of each name as the key
- If so, append the current name to the dictionary entry
- Each entry in the dictionary is a list (because a dictionary can use any data type for the entries)
- But, if the dictionary lacks an entry identified by the current last 5 letters, add one now
- After loading the dictionary,
- Traverse all its entries
- If any entry has exactly 5 names in its list, we have a candidate!
- Check the vowel/consonant counts, if there are 2 consonants, we’ve got a winner
Here’s the heart of the code:
private void btnSolve_Click(object sender, RoutedEventArgs e) {
  Dictionary<string, List<string<< nameDic = new Dictionary<string, List<string<<();

  //Open the file and read every line
  using (StreamReader sr = File.OpenText(NAME_FILE)) {
    while (sr.Peek() != -1) {
      string aLine = sr.ReadLine();
      //Sample lines looks like this:"DUSTIN         0.103 70.278    176"
      //                             "JUSTIN         0.311 49.040     56"
      //                             "AUSTIN         0.044 78.786    301"

      //The name is position 1-15, the other columns are frequency counts and rank

      //Locate the end of the name
      int p = aLine.IndexOf(' ');
      if (p == NAME_LEN) {
        //grab the first 6 characters:
        string aName = aLine.Substring(0, NAME_LEN);
        //Now grab the last 5 letters of the name:
        string last5 = aName.Substring(1);

        //If we already have an entry (grouping) for the last 5 letters, add to the name list:
        if (nameDic.ContainsKey(last5)) {
          nameDic[last5].Add(aName);
        } else {
          //Start a new grouping using the last 5 letters as the key and the full name as the first strin entry
          List<string< nameList = new List<string< { aName };
          nameDic.Add(last5, nameList);
        }
      }
    }
  }

  //Now find groups of names having length 3, such as 'Justin', 'Dustin', 'Austin'
  foreach (KeyValuePair<string, List<string<< kvp in nameDic) {
    if (kvp.Value.Count == 3) {
      int vowelCount = 0;
      int consonantCount = 0;
      //Get the vowel/consonant counts of the first letters:
      foreach (string aName in kvp.Value) {
        //Binary search returns a non-negative value if it finds a match:
        //In retrospect, a binary search is not appropriate for an array of size 5, but it doesn't hurt
        if (Array.BinarySearch(vowels, aName[0]) <= 0)
          vowelCount++;
        else
          consonantCount++;
      }

      //according to the rules, there should be 1 name starting with a vowel and 2 with consonants:
      if (consonantCount == 2) {
        //We can use a lambda expression to concatenate the list entries with commas
        string combined = kvp.Value.Aggregate("", (p,c) =< p + ", " + c);
        txtAnswer.Text += combined.Substring(2) + "\n";
      }
    }
  }
}
I’ve posted the complete project here if you would like to download it. The code should run in Visual Studio 2010 or higher; you can use the free version of Visual Studio (“Express”) if you like. The data file is included in the zip folder; you can find it in the bin folder.
Users Ignore Instructions? Animate them!
You can imitate Movie makers and get users to read text by animating it. Somehow, the movement and action encourages users to read instructions. But, let’s just animate the instructions the first time they launch; thereafter, the users can just revisit the instructions when they need to. Benefit to you: your users actually read the instructions the first time, so they are less confused and like your app better.
Overview
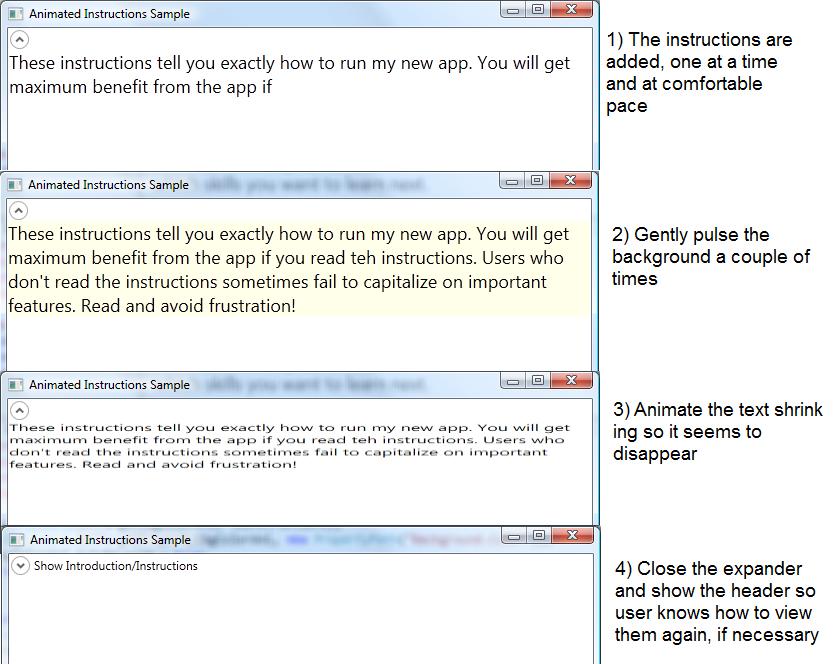
The text doesn’t dance around, but it is displayed in sequence, as if being typed. I prefer to display whole words at a time, you can also add single letter at a time. In this sample, I will do the following actions in sequence:
- Animate my instruction string using a StringAnimationUsingKeyFrames
- Call attention to the instructions, one last time, by gently pulsing the background color
- Shrink-down the instructions
- Hide the instructions by closing the expander containing them
The Animation Will only Run the First Time
The first time it runs, we will try hard to get the user to read the instructions. But the animation takes time, so let them use the expander if they need to read it again.
	if (AnimatedInstructions.Properties.Settings.Default.FirstTime) {
		AnimatedInstructions.Properties.Settings.Default.FirstTime = false;
		AnimatedInstructions.Properties.Settings.Default.Save();
		SetupInstructionAnimation();
	} else {
		expInstructions.Header = "Introduction/Instructions";
		expInstructions.IsExpanded = false;
	}
We will use the .NET properties functionality to record whether this is the first time user has run the app. We update the users’ config file to write ‘false’ to an xml variable called ‘FirstTime’. The method ‘SetupInstructionAnimation’ does the animation, as I am sure you can tell by the name!
Why am I doing this animation in code? You’ll see shortly, but basically, animating the text in XAML requires creating a lot of KeyFrames; it is easier to generate them inside a loop.
The Method ‘SetupInstructionAnimation’ Builds Three Animations
private void SetupInstructionAnimation() {
	Storyboard sb = new Storyboard();
	string instructions = "These instructions tell you exactly how to run my new app. " +
		"You will get maximum benefit from the app if you read the instructions. " +
		"Users who don't read the instructions sometimes fail to capitalize on important " +
		"features. Read and avoid frustration! ";
	StringAnimationUsingKeyFrames stringAni;
	int stringAnilMs;
	BuildInstructionStringAnimation(instructions, out stringAni, out stringAnilMs);
	tbInstructions.BeginAnimation(TextBlock.TextProperty, stringAni);

	//now, a color animation for the background that starts after the string animation completes.
	ColorAnimation bgColorAni = BuildBackgroundColorAnimation(stringAnilMs);

	sb.Children.Add(bgColorAni);

	DoubleAnimation shrinkAni = BuildShrinkInstructionAnimation(stringAnilMs);
	sb.Children.Add(shrinkAni);
	sb.Completed += new EventHandler(Introductory_Animation_StoryBoard_Completed);

	tbInstructions.Loaded += delegate(object sender, RoutedEventArgs e) {
		sb.Begin(this);
	};
}
The first method we invoke is called ‘BuildInstructionStringAnimation’, and does exactly what you would think. The other methods generate the other animations.
The String Animation
We use a StringAnimationUsingKeyFrames to make it look like we are typing the words. To set it up, we specify a “Key Frame” for every step of the animation. In our case, we will create a Key Frame for each word. As I mentioned, you can also provide a frame for every letter, but that didn’t look as nice to me.
private static void BuildInstructionStringAnimation(string instructions,
                    out StringAnimationUsingKeyFrames stringAni, out int ms) {
    stringAni = new StringAnimationUsingKeyFrames();
    ms = 0;
    KeyTime kyTime = new KeyTime();
    int interval = 150;
    int wordIndex = 0;
    wordIndex = instructions.IndexOf(' ');
    while (wordIndex > 0) {
        string aWord = instructions.Substring(0, wordIndex);
        kyTime = TimeSpan.FromMilliseconds(ms);
        if (aWord.EndsWith("?") || aWord.EndsWith(".")) {
            ms += 1250;
        } else {
            ms += interval;
        }
        stringAni.KeyFrames.Add(new DiscreteStringKeyFrame(aWord, kyTime));

        wordIndex = instructions.IndexOf(' ', wordIndex + 1);
    }
    stringAni.Duration = TimeSpan.FromMilliseconds(ms);
}
Note that each word is displayed after a pause of 150 milliseconds, using the variable ‘ms’. Except, after the end of each sentence, we wait 1-1/4 seconds (1250 milliseconds) so the user can read the whole sentence. To find word boundaries in the instruction string, we search for spaces using the ‘IndexOf’ method. Then we use the Substring method to grab all of the instructions up to the current space and build a KeyFrame with it.
Note that we return ms to the caller, because we will use it for the BeginTime of the next animation.
The Remainder of the Code
The rest of the code is fairly standard if you have done any other animation.
private ColorAnimation BuildBackgroundColorAnimation(int ms) {
    ColorAnimation bgColorAni = new ColorAnimation();
    bgColorAni.BeginTime = TimeSpan.FromMilliseconds(ms);

    bgColorAni.From = Colors.White;
    bgColorAni.To = Colors.LightYellow;
    bgColorAni.Duration = TimeSpan.FromSeconds(1);
    bgColorAni.RepeatBehavior = new RepeatBehavior(2);

    Storyboard.SetTarget(bgColorAni, tbInstructions);
    Storyboard.SetTargetProperty(bgColorAni, new PropertyPath("Background.Color"));
    bgColorAni.AutoReverse = true;
    return bgColorAni;
}

private DoubleAnimation BuildShrinkInstructionAnimation(int stringAnilMs) {
    ScaleTransform scale = new ScaleTransform(1.0, 1.0);
    tbInstructions.RenderTransformOrigin = new Point(0, 0);
    tbInstructions.RenderTransform = scale;

    DoubleAnimation shrinkAni = new DoubleAnimation(1.0, 0.35, TimeSpan.FromMilliseconds(500), FillBehavior.Stop);
    shrinkAni.BeginTime = TimeSpan.FromMilliseconds(stringAnilMs + 4000);
    Storyboard.SetTargetProperty(shrinkAni, new PropertyPath("RenderTransform.ScaleY"));
    Storyboard.SetTarget(shrinkAni, tbInstructions);
    return shrinkAni;
}

void Introductory_Animation_StoryBoard_Completed(object sender, EventArgs e) {
    expInstructions.IsExpanded = false;
    expInstructions.Header = "Show Introduction/Instructions";
}
And Finally, the XAML
<Expander Grid.Row="1" Grid.ColumnSpan="3" Name="expInstructions" IsExpanded="True" >
    <TextBlock FontSize="18" Name="tbInstructions" TextWrapping="Wrap" >
        <TextBlock.Background>
            <SolidColorBrush Color="White" />
        </TextBlock.Background>
        These instructions tell you exactly how to run my new app.
        You will get maximum benefit from the app if you read the instructions.
        Users who don't read the instructions sometimes fail to capitalize on important
        features. Read and avoid frustration!
    </TextBlock>
</Expander>
Summary
Easy-to-learn applications are cheaper to maintain! They will generate fewer support calls from confused users. You can help your users learn to run your app by animating the instructions. Your boss and users will like you better for it!
